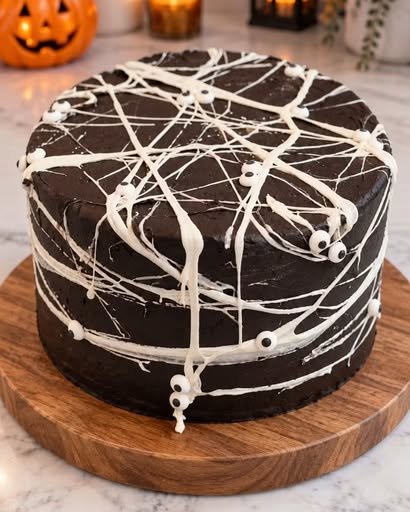
Get ready to make a Halloween dessert that looks almost too spooky to eat! This Spooky Spider Web Cake combines three rich, blood-red velvet cake layers with smooth vanilla buttercream, decadent black chocolate frosting, and a sticky marshmallow spider web that gives the cake its dramatic finish.
The contrast between the deep red cake, dark frosting, and white marshmallow web makes this cake a spectacular centerpiece for a Halloween party. Add a few edible candy eyes, and you’ve got a creepy-cute dessert that’s guaranteed to grab everyone’s attention.
Ingredients
For the Red Velvet Cake
- ¾ cup plus 1 tablespoon unsalted butter, softened
- 2 cups granulated sugar
- 5 large eggs
- ½ cup plus 1 tablespoon unsweetened cocoa powder
- 1–2 teaspoons red gel food coloring
- 2 teaspoons vanilla extract
- 1½ cups plus 1 tablespoon buttermilk
- 3¾ cups all-purpose flour
- 1½ teaspoons baking soda
- 3 teaspoons white vinegar
For the Buttercream
- 1½ cups plus 1 tablespoon unsalted butter, softened
- 5¾ cups powdered sugar
- 1 teaspoon vanilla extract
- ½ cup plus 1 tablespoon unsweetened cocoa powder
- 1 teaspoon black gel food coloring
- 1 tablespoon boiling water
For the Spider Web Decoration
- 5 ounces mini marshmallows
- Edible candy eyes
Instructions
Step 1: Prepare the Cake Pans
Preheat your oven to 350°F (175°C).
Grease three 8-inch round cake pans and line the bottoms with parchment paper. This makes it much easier to remove the cakes after baking.
Step 2: Make the Red Velvet Batter
Place the softened butter and granulated sugar in a large mixing bowl. Beat until the mixture is light, creamy, and fluffy.
Add the eggs one at a time, mixing well after each addition. Add the cocoa powder and mix until evenly incorporated.
In a small bowl, stir the red gel food coloring into the vanilla extract. Add this mixture to the batter and beat until the color is evenly distributed.
Add the buttermilk and flour gradually, alternating between the two. Mix just until the ingredients are combined. Avoid overmixing, as this can make the finished cake dense.
In a small cup, combine the baking soda and white vinegar. Add it immediately to the batter and mix briefly until incorporated.
Divide the batter evenly between the three prepared cake pans.
Step 3: Bake the Cake Layers
Place the pans in the preheated oven and bake for 30–35 minutes, or until a toothpick inserted into the center of each cake comes out clean or with a few moist crumbs.
Let the cakes cool in their pans for about 10 minutes.
Carefully turn them out onto wire racks and allow them to cool completely before decorating.
Step 4: Make the Buttercream
Beat the softened butter until smooth and creamy.
Gradually add the powdered sugar, beating continuously until the frosting becomes light and fluffy.
Divide the buttercream evenly into two portions.
Add the vanilla extract to one portion and mix until smooth. This will be your vanilla buttercream for filling and crumb coating the cake.
For the chocolate frosting, add the cocoa powder to the second portion.
Mix the black gel food coloring with the boiling water to loosen it slightly, then add it to the chocolate buttercream. Beat until the frosting is smooth and a deep black color.
If the frosting is too thick, add a tiny amount of additional liquid. If it becomes too soft, add a little powdered sugar.
Step 5: Assemble the Cake
Place the first cooled cake layer on a cake board or serving plate.
Spread an even layer of vanilla buttercream over the top.
Place the second cake layer on top and repeat with another layer of buttercream.
Add the final cake layer and gently press down to make sure the layers are aligned.
Cover the entire cake with a thin layer of vanilla buttercream. This crumb coat will trap loose cake crumbs and help create a cleaner final finish.
Refrigerate the cake for about 20 minutes, or until the crumb coat feels firm.
Step 6: Add the Black Chocolate Frosting
Cover the chilled cake with the black chocolate buttercream.
Use a cake scraper or offset spatula to smooth the frosting over the top and sides. Don’t worry if it’s not perfectly flawless—the dark, dramatic appearance is part of the Halloween look.
Refrigerate the cake for another 20 minutes to firm up the frosting.
Step 7: Create the Marshmallow Spider Web
Place the mini marshmallows in a microwave-safe bowl or heatproof bowl.
Melt them gently, stirring frequently, until they become stretchy and sticky. If using a microwave, heat them in very short intervals and stir between each interval to prevent overheating.
Allow the melted marshmallow to cool slightly. It should be warm and stretchy but comfortable enough to handle carefully.
Lightly grease your hands with a little neutral oil.
Take a small amount of melted marshmallow between your fingers and gently stretch it apart to create long, thin strands.
Carefully drape and wrap the strands around the chilled cake, creating an irregular spider-web effect.
Don’t worry about making the web perfectly symmetrical. Random, overlapping strands will give the cake a more realistic spooky appearance.
Step 8: Add the Spider Eyes
Finish the cake by placing edible candy eyes throughout the marshmallow web.
You can use different sizes of candy eyes to create the appearance of tiny spiders hiding throughout the cake.
Tips for the Best Spider Web Cake
Cool the cakes completely: Warm cake can cause the buttercream to melt and make the layers difficult to assemble.
Don’t overmix the batter: Mix only until the flour is incorporated for a softer cake texture.
Chill between frosting stages: A short refrigeration period makes the cake easier to decorate and helps prevent the layers from sliding.
Work carefully with melted marshmallow: Melted marshmallow can be extremely hot and sticky. Allow it to cool slightly before handling and keep it away from children during preparation.
Use gel coloring: Gel food coloring provides a stronger red and black color without adding too much liquid to the frosting or cake.
Create the web quickly: Marshmallow becomes less stretchy as it cools, so work while it remains soft and pliable.
Halloween Decorating Ideas
Make your cake even more dramatic by adding:
- Plastic or edible spider decorations
- Chocolate spiders
- Black sprinkles
- Red sugar crystals
- Crushed chocolate cookies around the base
- White chocolate spider webs
- Extra candy eyes
- Red cake crumbs sprinkled around the serving plate
For an extra creepy presentation, place the finished cake on a black cake stand and surround it with small Halloween decorations.
Storage
Keep the finished cake covered and store it according to the storage requirements of the buttercream and other ingredients used.
For best texture and appearance, serve it within a few days. If refrigerated, allow the cake to sit at room temperature briefly before serving so the buttercream can soften.
The marshmallow web may become less stretchy or slightly sticky over time, so it is best added relatively close to serving.
Frequently Asked Questions
Can I make the cake layers ahead of time?
Yes. The cake layers can be baked ahead, cooled completely, wrapped well, and stored until you’re ready to assemble the cake.
Can I use different cake colors?
Absolutely. While the red velvet creates the dramatic “blood-red” Halloween effect, you could make the layers orange, purple, or even use a classic chocolate cake.
Can I make the spider web without marshmallows?
Yes. Melted white chocolate can be used to create a different type of spider-web decoration, although it will have a different texture and appearance.
How do I get very dark black frosting?
Use a good-quality black gel food coloring and allow the frosting to rest for a while after coloring. Black frosting often becomes deeper as it sits.
Final Thoughts
This Spooky Spider Web Cake is everything a Halloween dessert should be—dramatic, indulgent, chocolatey, and wonderfully creepy. The rich red velvet layers provide a beautiful contrast to the dark chocolate buttercream, while the stretchy marshmallow web creates the finishing touch that makes this cake truly unforgettable.
Whether you’re hosting a Halloween party or simply want a fun weekend baking project, this showstopping cake is sure to become the centerpiece of the dessert table.