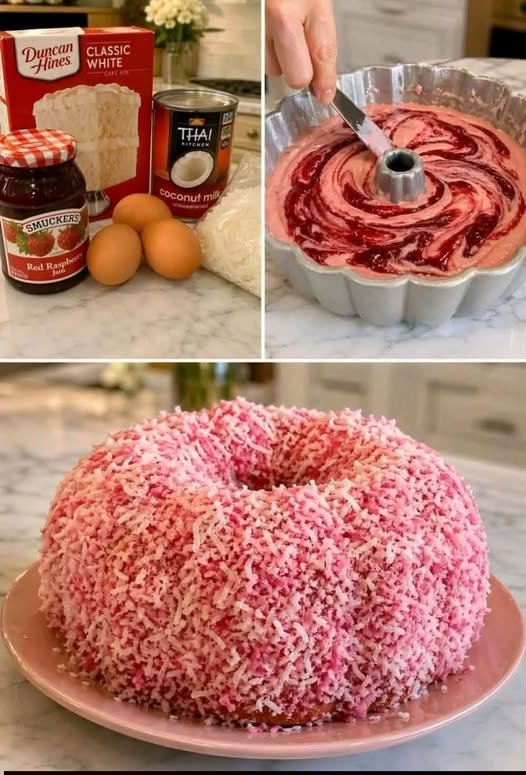
If you love soft, fluffy cakes, sweet coconut, and the refreshing taste of raspberries, this Raspberry Coconut Snowball Cake is a dessert you won’t want to miss. With its tender vanilla cake layers, creamy frosting, juicy raspberry filling, and snowy coating of shredded coconut, this homemade treat looks like something straight from a professional bakery.
Every slice offers a delightful combination of textures and flavors. The cake is light and moist, the raspberry filling adds a bright fruity tang, and the coconut coating provides a delicate sweetness that makes every bite feel special.
Despite its elegant appearance, this cake is surprisingly achievable in your own kitchen. You don’t need professional baking equipment or advanced decorating skills. With a reliable cake recipe, a flavorful filling, and a generous coating of coconut, you can create a beautiful dessert for birthdays, holidays, afternoon tea, or any occasion that deserves something sweet.
Whether you call it a raspberry coconut snowball cake or a coconut-covered raspberry layer cake, this recipe brings bakery-style charm to homemade baking.
Why You’ll Love This Raspberry Coconut Snowball Cake
- Soft and fluffy texture: The vanilla cake layers are tender, light, and delicious.
- Sweet-tart raspberry filling: Raspberries balance the sweetness of the frosting and coconut.
- Beautiful coconut coating: Shredded coconut creates the classic snowy appearance.
- Bakery-style presentation: The finished cake looks impressive on a dessert table.
- Perfect for special occasions: Serve it at birthdays, family gatherings, holidays, or celebrations.
- Customizable: Use fresh or frozen raspberries and choose your favorite frosting.
- Make-ahead friendly: Prepare the raspberry filling in advance to make assembly easier.
Recipe Information
- Preparation time: 35 minutes
- Cooking time: 25–30 minutes
- Cooling and assembly time: 1–2 hours
- Total time: Approximately 2 hours 30 minutes
- Servings: 10–12 slices
- Course: Dessert
- Cuisine: American-inspired home baking
- Difficulty: Intermediate
Ingredients You’ll Need
For the Vanilla Cake
- 2 cups (250 g) all-purpose flour
- 1 1/2 teaspoons baking powder
- 1/4 teaspoon baking soda
- 1/2 teaspoon salt
- 1/2 cup (115 g) unsalted butter, softened
- 1 cup (200 g) granulated sugar
- 2 large eggs, at room temperature
- 2 teaspoons vanilla extract
- 3/4 cup (180 ml) whole milk, at room temperature
- 1 tablespoon vegetable oil
For the Raspberry Filling
- 2 cups (250 g) fresh or frozen raspberries
- 1/3 cup (65 g) granulated sugar
- 1 tablespoon lemon juice
- 1 tablespoon cornstarch
- 2 tablespoons cold water
For the Creamy Frosting
- 1 cup (225 g) unsalted butter, softened
- 3 cups (360 g) powdered sugar, sifted
- 2–3 tablespoons heavy cream or milk
- 1 teaspoon vanilla extract
- A small pinch of salt
For the Coconut Snowball Coating
- 2 cups (150–180 g) finely shredded or desiccated coconut
- Extra raspberries for decoration, optional
- A few mint leaves for decoration, optional
Ingredient note: Unsweetened finely shredded coconut provides a balanced flavor, while sweetened coconut produces a sweeter finish. Both work well, depending on your preference.
How to Make Raspberry Coconut Snowball Cake
Step 1: Prepare the Baking Pans
Preheat your oven to 350°F (175°C).
Grease two 8-inch (20 cm) round cake pans with butter or nonstick baking spray. Line the bottoms with parchment paper to make removing the cakes easier.
In a medium bowl, whisk together the flour, baking powder, baking soda, and salt. Set aside.
Preparing the ingredients before mixing helps the cake batter come together smoothly.
Step 2: Cream the Butter and Sugar
Place the softened butter and granulated sugar in a large mixing bowl.
Beat with an electric mixer for approximately 3–4 minutes, until the mixture becomes pale, creamy, and fluffy.
This step incorporates air into the batter, helping the cake develop a light texture.
Add the eggs one at a time, beating well after each addition. Mix in the vanilla extract and vegetable oil.
Scrape down the sides of the bowl as needed to ensure the ingredients are evenly combined.
Step 3: Finish the Cake Batter
Add approximately one-third of the flour mixture to the butter mixture and mix on low speed.
Pour in half of the milk, followed by another portion of the flour mixture. Repeat, finishing with the remaining flour.
Mix only until the ingredients are combined. Avoid overmixing because excessive mixing can make the cake dense.
Divide the batter evenly between the prepared pans and smooth the tops with a spatula.
Step 4: Bake the Cake Layers
Place the pans in the preheated oven and bake for approximately 25–30 minutes.
The cakes are ready when the tops spring back lightly when touched and a toothpick inserted into the center comes out clean or with a few moist crumbs.
Remove the pans from the oven and allow the cakes to rest for 10 minutes.
Carefully turn the cakes out onto wire racks and allow them to cool completely before adding the filling or frosting.
Never assemble the cake while the layers are warm, as the frosting may melt and the raspberry filling may slide out.
Step 5: Prepare the Raspberry Filling
Place the raspberries, sugar, and lemon juice in a small saucepan over medium heat.
Cook for approximately 5–7 minutes, stirring gently as the berries soften and release their juices.
In a separate small bowl, mix the cornstarch with the cold water until smooth.
Pour the cornstarch mixture into the saucepan while stirring continuously. Cook for another 1–2 minutes, until the raspberry mixture thickens.
Remove from the heat and allow the filling to cool completely.
For a smoother filling, press it through a fine-mesh sieve to remove the seeds. If you enjoy the natural texture of raspberries, leave the seeds in.
The filling should be thick enough to stay between the cake layers rather than running down the sides.
Step 6: Make the Creamy Frosting
Place the softened butter in a large mixing bowl and beat until smooth and creamy.
Gradually add the sifted powdered sugar, mixing on low speed at first to prevent it from scattering.
Add the vanilla extract, a pinch of salt, and 2 tablespoons of cream or milk.
Beat for another 2–3 minutes until the frosting becomes fluffy and spreadable.
If the frosting is too thick, add a little more cream. If it is too soft, refrigerate it briefly before assembling the cake.
Step 7: Assemble the Cake
Place the first completely cooled cake layer on a serving plate or cake stand.
Spread a thin layer of frosting over the top, leaving a small border around the edge. Spoon the cooled raspberry filling into the center and spread it gently.
Avoid using too much filling near the edges, as it can escape when the second layer is added.
Place the second cake layer on top, with the flatter side facing upward if possible.
Apply a thin layer of frosting over the entire cake. This is called a crumb coat and helps trap loose crumbs.
Refrigerate the cake for approximately 20–30 minutes to allow the crumb coat to firm up.
Step 8: Cover the Cake with Coconut
Spread the remaining frosting evenly over the top and sides of the cake.
Place the shredded coconut in a shallow tray or large plate.
Gently press the coconut onto the frosted sides of the cake using clean hands. Sprinkle additional coconut over the top until the entire cake has a snowy, soft appearance.
Rotate the cake as you work to cover any exposed areas.
If a few crumbs become visible, gently press a little more coconut onto those spots.
Step 9: Decorate and Chill
Decorate the top with fresh raspberries or a small cluster of berries in the center.
You can also create a simple border with extra coconut for a classic snowball look.
Refrigerate the assembled cake for at least 30 minutes before slicing. This helps the frosting set and makes the cake easier to cut neatly.
For the best flavor and texture, let the slices sit at room temperature for about 15–20 minutes before serving, provided the cake remains within safe food-handling limits.
Your Raspberry Coconut Snowball Cake is ready to serve!
Tips for the Best Raspberry Coconut Snowball Cake
1. Use Room-Temperature Ingredients
Butter, eggs, and milk at room temperature combine more easily and help create a smoother batter.
2. Cool Every Component Completely
Warm cake layers can melt the frosting, while warm raspberry filling can make the layers slide apart. Allow the cake and filling to cool fully before assembly.
3. Keep the Raspberry Filling Thick
A runny filling can make the cake unstable. Cook it until thickened and let it cool before spreading it between the layers.
4. Do Not Overmix the Batter
Once the flour is added, mix gently and only until combined. This helps preserve a tender cake texture.
5. Apply a Crumb Coat
A thin first layer of frosting traps crumbs and gives the final coating a smoother appearance.
6. Use Finely Shredded Coconut
Fine coconut adheres more easily to the frosting and creates a classic snowball appearance. Large flakes can be used for a more textured finish.
7. Chill Before Slicing
A short chilling period helps the cake hold its shape. Use a sharp knife and wipe it clean between slices for a neat presentation.
Delicious Variations to Try
Raspberry Coconut Snowball Cupcakes
Divide the batter among lined muffin cups, filling each approximately two-thirds full. Bake at 350°F (175°C) for around 16–20 minutes, checking for doneness.
Once cooled, add a small amount of raspberry filling and frosting, then roll or sprinkle the tops with coconut.
White Chocolate Raspberry Coconut Cake
Melt a small amount of white chocolate, allow it to cool until just warm, and fold it into a portion of the frosting. White chocolate pairs beautifully with the tart raspberry filling and coconut coating.
Make sure the chocolate is not hot when combined with the frosting.
Lemon Raspberry Coconut Cake
Add 1 tablespoon of finely grated lemon zest to the cake batter. You can also add a little lemon zest to the raspberry filling for a brighter citrus flavor.
Raspberry Jam Shortcut
If you need to save time, use a thick raspberry jam instead of homemade filling. Choose one with a flavor you enjoy and spread it in a thin, even layer.
Avoid overly runny jam because it may cause the cake layers to slip.
Toasted Coconut Snowball Cake
For a deeper coconut flavor, lightly toast a small portion of the coconut in a dry skillet over low heat, stirring frequently. Allow it to cool before using.
Use mostly untoasted coconut for the snowy coating and sprinkle toasted coconut on top as a decorative accent.
Mini Snowball Cakes
Bake the cake in a rectangular pan and cut it into small squares after cooling. Spread frosting over each square and coat all sides with coconut.
Add a little raspberry filling between two small cake pieces if you want individual layered treats.
What to Serve with Raspberry Coconut Snowball Cake
This cake is rich enough to stand alone but pairs well with several drinks and lighter accompaniments.
- Black tea: Its mild bitterness balances the sweetness of the cake.
- Coffee: A cup of coffee complements the buttery cake and creamy frosting.
- Fresh raspberries: Extra berries provide a refreshing, tart contrast.
- Fresh strawberries: Sliced strawberries add color and a juicy texture.
- Light vanilla ice cream: Serve a small scoop alongside a slice for a special dessert.
- Unsweetened tea: A refreshing choice when the cake is served after a rich meal.
For a celebration, serve the cake on a white cake stand and garnish the plate with a few raspberries and a light scattering of coconut.
Storage and Make-Ahead Instructions
How to Store Raspberry Coconut Snowball Cake
Because this recipe contains buttercream frosting and a fruit filling, refrigerate the finished cake in an airtight cake container.
Store it in the refrigerator at 40°F (4°C) or below and enjoy it within approximately 3–4 days for the best quality.
Keep the cake covered to prevent it from absorbing other refrigerator odors or drying out.
Can You Make the Cake Ahead of Time?
Yes. You can bake the cake layers one day ahead, allow them to cool completely, wrap them well, and refrigerate them until assembly.
The raspberry filling can also be prepared a day in advance and kept covered in the refrigerator.
For easier assembly, let the filling soften slightly if it becomes very firm, but keep it cool. Assemble the cake when you are ready to decorate it.
Can You Freeze This Cake?
You can freeze the unfrosted cake layers. Wrap each completely cooled layer tightly in plastic wrap and place it in a freezer-safe bag or container for up to 2–3 months for best quality.
Thaw the layers in the refrigerator before assembling.
The fully assembled cake can also be frozen, but the coconut and frosting may change texture slightly after thawing. Freeze individual slices in suitable airtight packaging and thaw them in the refrigerator.
Common Mistakes to Avoid
Adding warm filling: Warm filling can soften the frosting and cause the layers to slide. Always cool the filling completely.
Using too much raspberry filling: A thick, generous layer may escape from the sides. Spread it evenly and leave a small border.
Frosting a warm cake: Heat can melt buttercream and make the coconut coating difficult to apply. Let the layers cool completely.
Skipping the crumb coat: Without a crumb coat, cake crumbs can show through the outer frosting. A thin first layer creates a cleaner finish.
Using overly dry cake layers: Overbaking can make the cake less tender. Begin checking for doneness at around 25 minutes.
Applying coconut too late: Coconut sticks best while the frosting is still soft. Apply it soon after spreading the final layer of frosting.
Frequently Asked Questions
1. Can I use frozen raspberries?
Yes. Frozen raspberries work well in the filling and do not need to be fully thawed first. They may release more liquid during cooking, so allow the mixture to simmer until it thickens properly.
2. Can I use store-bought cake mix?
Absolutely. A vanilla or white cake mix can save preparation time. Bake according to the package directions, cool the layers completely, and continue with the raspberry filling, frosting, and coconut coating.
3. Can I use raspberry jam instead of fresh raspberries?
Yes. A thick raspberry jam makes a convenient substitute. Use a moderate amount so the filling does not squeeze out between the layers.
4. Which coconut is best for the snowball coating?
Finely shredded or desiccated coconut usually gives the cake its classic snowy appearance. Sweetened shredded coconut creates a sweeter coating, while unsweetened coconut gives you more control over the overall sweetness.
5. How do I stop the cake layers from sliding?
Use a thick, cooled filling, avoid spreading it all the way to the edges, and apply a thin frosting layer to help hold the layers together. Chilling the assembled cake also helps it become more stable.
6. Can I make this cake without buttercream?
Yes. You can use a suitable cream cheese frosting or another stable frosting you prefer. Keep in mind that softer frostings may make the coconut coating more difficult to apply and may require additional refrigeration.
7. Can I make this recipe in one pan?
Yes. You can bake the batter in a single appropriately sized cake pan, but the baking time will change. Once completely cooled, slice the cake horizontally to create layers. Check doneness carefully because a deeper cake takes longer to bake.
8. Why is my cake dense instead of fluffy?
Common causes include overmixing, inaccurate flour measurements, expired baking powder, or butter that was too warm or melted. Measure accurately and mix the batter only until the ingredients are combined.
9. Does the cake need to be refrigerated?
Yes. Since it contains frosting and a fruit filling, refrigeration is the safest storage option. Do not leave the cake at room temperature for extended periods, particularly in a warm kitchen.
10. Can I make the cake less sweet?
Use unsweetened coconut, choose a less-sweet raspberry filling, and reduce the powdered sugar in the frosting cautiously. Sugar affects frosting consistency, so large reductions may make it too soft to spread and coat properly.
Approximate Nutrition Information
The following estimates are per slice, assuming the cake is divided into 12 servings and made with the listed ingredients. Actual values will vary with the type of coconut, frosting thickness, and amount of filling used.
- Calories: 450–550
- Protein: 4–6 g
- Carbohydrates: 55–70 g
- Sugar: 35–50 g
- Fat: 22–30 g
- Saturated fat: 12–18 g
- Fiber: 2–4 g
These values are estimates, not laboratory-tested nutrition data. Larger slices, extra frosting, and sweetened coconut can increase the calories and sugar.
Final Thoughts
This Raspberry Coconut Snowball Cake brings together everything that makes homemade desserts special: soft vanilla cake, bright raspberry filling, creamy frosting, and a beautiful coating of coconut.
Although it looks like a professional bakery creation, the recipe is manageable when you prepare each component carefully. Bake the layers until just tender, make sure the raspberry filling is thick and completely cool, and take your time coating the cake with coconut.
The result is a beautiful dessert that tastes as wonderful as it looks. Serve it at a birthday party, holiday gathering, afternoon tea, or whenever you want to turn an ordinary day into something memorable.
Once you try this raspberry and coconut combination, it may become one of your favorite homemade celebration cakes.
SEO Details
SEO Title: Raspberry Coconut Snowball Cake – Easy Bakery-Style Recipe
Focus Keyphrase: Raspberry Coconut Snowball Cake
URL Slug: raspberry-coconut-snowball-cake
Meta Description: Make a beautiful Raspberry Coconut Snowball Cake with soft vanilla layers, tangy raspberry filling, creamy frosting, and a snowy coconut coating.
Suggested Tags: Raspberry Coconut Snowball Cake, Raspberry Cake Recipe, Coconut Cake, Homemade Cake, Bakery-Style Desserts, Raspberry Desserts, Layer Cake Recipes, Celebration Cakes, Easy Baking Recipes