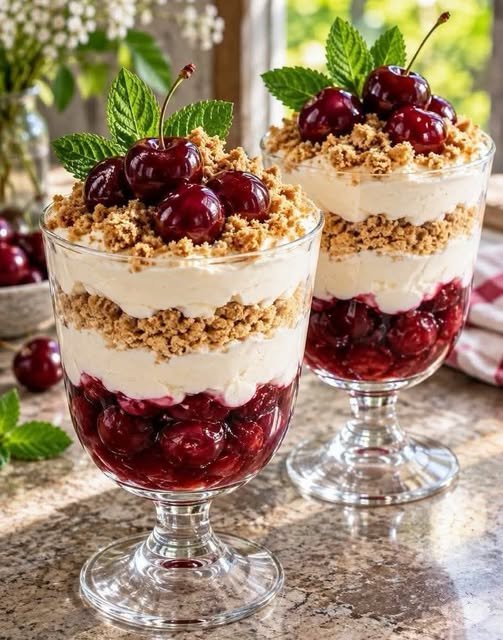
If you love creamy cheesecake, buttery cookie crust, and sweet cherry topping, these Perfect Cherry Cheesecake Cups are the dessert you’ve been looking for. Each little cup combines a crunchy graham cracker base, a smooth cream cheese filling, and a glossy cherry topping for a beautiful treat that tastes like classic cherry cheesecake without the hassle of baking a full cake.
These individual cheesecake cups are perfect for birthdays, holiday dinners, potlucks, family gatherings, or a simple weekend dessert. They look elegant when served in small glasses or dessert cups, yet they are surprisingly easy to prepare with everyday ingredients.
The best part is that you can make them ahead of time and keep them chilled until you’re ready to serve. Whether you use homemade cherry topping or convenient canned cherry pie filling, these mini desserts deliver the perfect balance of creamy, crunchy, sweet, and fruity flavors.
Why You’ll Love These Cherry Cheesecake Cups
- No oven required: This version is a simple no-bake dessert.
- Individual servings: Every guest gets their own beautiful cheesecake cup.
- Creamy texture: Cream cheese and whipped cream create a smooth, fluffy filling.
- Easy preparation: No complicated cheesecake techniques or water bath needed.
- Make-ahead friendly: Prepare them in advance and chill until serving time.
- Customizable: Use fresh cherries, canned cherry pie filling, or your favorite fruit topping.
Ingredients
Servings: 8 cheesecake cups
Preparation time: 20 minutes
Chilling time: 3–4 hours
For the Graham Cracker Crust
- 1 1/2 cups graham cracker crumbs
- 5 tablespoons unsalted butter, melted
- 2 tablespoons granulated sugar, optional
For the Cheesecake Filling
- 8 ounces (225 g) full-fat cream cheese, softened
- 1/2 cup powdered sugar
- 1 teaspoon vanilla extract
- 1 tablespoon lemon juice
- 1 cup heavy whipping cream, cold
For the Cherry Topping
- 1 can (approximately 20–21 ounces or 565–595 g) cherry pie filling
- 1 teaspoon lemon juice, optional
Optional Garnishes
- Fresh cherries
- Whipped cream
- Graham cracker crumbs
- White chocolate shavings
- A few fresh mint leaves
Ingredient tip: Full-fat block cream cheese usually produces a thicker filling than cream cheese spread sold in tubs. Make sure the cream cheese is softened before mixing, but keep the whipping cream cold so it whips properly.
Step-by-Step Instructions
Step 1: Prepare the Graham Cracker Crust
Add the graham cracker crumbs to a medium mixing bowl. Pour in the melted butter and add the granulated sugar if you prefer a slightly sweeter crust.
Stir until the crumbs are evenly coated and resemble damp sand. When squeezed between your fingers, the mixture should hold together.
Divide the crumb mixture among eight small dessert cups or glasses. Use the back of a spoon to press the crumbs firmly into the bottom of each cup.
Place the cups in the refrigerator for approximately 15 minutes while you prepare the filling.
Helpful tip: Press the crust firmly enough to hold together, but do not compact it so tightly that it becomes difficult to spoon through when serving.
Step 2: Beat the Cream Cheese
Place the softened cream cheese in a large mixing bowl. Using an electric hand mixer, beat it on medium speed until smooth and creamy.
Add the powdered sugar, vanilla extract, and lemon juice. Beat again until the mixture is fully combined, scraping down the sides of the bowl as necessary.
The filling should be smooth without visible lumps of cream cheese.
Why this matters: Starting with softened cream cheese makes it easier to achieve a silky cheesecake texture without overmixing the other ingredients.
Step 3: Whip the Heavy Cream
Pour the cold heavy whipping cream into a separate clean mixing bowl.
Beat with an electric mixer until medium-stiff peaks form. When you lift the beaters, the cream should hold its shape while still looking smooth and fluffy.
Avoid overwhipping, which can make the cream grainy or cause it to separate.
If you prefer to save time, you can use a suitable prepared whipped topping instead, although the flavor and texture may differ.
Step 4: Fold the Whipped Cream Into the Cheesecake Mixture
Add about one-third of the whipped cream to the cream cheese mixture and gently fold it in using a rubber spatula.
Add the remaining whipped cream in two portions, folding gently after each addition until the mixture is light, fluffy, and evenly combined.
Use slow, sweeping movements rather than vigorous stirring. This helps preserve the air in the whipped cream and creates a soft, mousse-like cheesecake filling.
Step 5: Fill the Dessert Cups
Remove the chilled crusts from the refrigerator.
Spoon the cheesecake filling evenly into each cup, dividing it into eight portions. For a neater presentation, transfer the filling to a piping bag or a sturdy food-storage bag with one corner snipped off.
Pipe or spoon the filling over the crust and smooth the tops with the back of a spoon.
Leave enough room at the top of each cup for the cherry topping.
Step 6: Add the Cherry Topping
Open the cherry pie filling and stir it gently to distribute the cherries throughout the glossy sauce.
If the topping tastes particularly sweet, add a teaspoon of lemon juice and mix well.
Spoon a generous layer of cherry topping over each cheesecake cup. Try to include both whole cherries and the thick sauce so every serving has plenty of fruit.
For the cleanest layers, spread the cherry topping gently instead of pressing it into the cream cheese filling.
Step 7: Chill Until Set
Cover the dessert cups and refrigerate them for at least 3–4 hours. For the best texture, allow them to chill overnight.
During this time, the filling becomes firmer, the crust settles, and the flavors blend together.
Although the cups may be edible sooner, adequate chilling helps the cheesecake hold its shape and gives it a more traditional cheesecake texture.
Step 8: Garnish and Serve
Just before serving, add a swirl of whipped cream to each cup if desired.
Sprinkle with graham cracker crumbs, add a fresh cherry, or finish with white chocolate shavings for an elegant presentation.
Serve chilled with small dessert spoons. These cheesecake cups are rich, creamy, and fruity, making them a wonderful finish to almost any meal.
Tips for Perfect Cherry Cheesecake Cups
Use softened cream cheese. Cold cream cheese can create lumps that are difficult to smooth out later.
Keep the whipping cream cold. Cold cream whips more easily and helps produce a light filling.
Fold rather than stir. Gentle folding keeps the filling airy and prevents it from becoming dense.
Choose a thick cherry topping. Very runny topping can sink into the cheesecake layer and blur the neat appearance.
Chill long enough. Three to four hours is a good starting point, but overnight chilling generally produces the best texture.
Add garnishes just before serving. This keeps whipped cream looking fresh and prevents decorations from becoming soggy.
Use clear cups for presentation. Small glass dessert cups show off the distinct layers and make these treats look especially inviting.
How to Make Homemade Cherry Topping
If you prefer homemade cherry topping instead of canned pie filling, you can prepare a quick version with fresh or frozen cherries.
Ingredients
- 2 cups pitted cherries, fresh or frozen
- 1/4 cup granulated sugar, adjusted to taste
- 1 tablespoon lemon juice
- 1 tablespoon cornstarch
- 2 tablespoons water
Instructions
- Add the cherries, sugar, and lemon juice to a small saucepan over medium heat.
- Cook for approximately 5–8 minutes, stirring occasionally, until the cherries begin releasing their juices and soften.
- In a small bowl, mix the cornstarch with the water until smooth.
- Stir the cornstarch mixture into the cherries.
- Cook for another 1–2 minutes, stirring, until the sauce thickens.
- Remove from the heat and allow the topping to cool completely before spooning it over the cheesecake filling.
If the cherries are very tart, add a little more sugar. If the sauce becomes too thick, stir in a small amount of water after cooking.
Important: Never add hot cherry topping directly to the cheesecake filling. Let it cool to room temperature first to protect the filling’s texture.
Delicious Variations
Chocolate Cherry Cheesecake Cups
Add a thin layer of melted chocolate ganache over the crust and let it firm before adding the cheesecake filling. Finish with cherries and chocolate shavings for a chocolate-covered-cherry-inspired dessert.
Oreo Cherry Cheesecake Cups
Replace the graham cracker crumbs with crushed chocolate sandwich cookies. You can include the cookie filling when crushing them and adjust the butter amount until the crumbs hold together.
White Chocolate Cherry Cheesecake Cups
Melt a small amount of white chocolate and let it cool until barely warm. Fold it into the cream cheese mixture before adding the whipped cream. The result is a sweeter, richer cheesecake filling.
Fresh Cherry Cheesecake Cups
When fresh cherries are in season, pit and chop some of them and gently fold a small amount into the filling. Use additional cherries on top for a fresh-fruit finish.
Lemon Cherry Cheesecake Cups
Increase the lemon flavor slightly by adding a little finely grated lemon zest to the cheesecake mixture. Lemon complements the sweetness of the cherries and gives the dessert a brighter taste.
Low-Sugar Variation
Use a suitable lower-sugar cherry topping and reduce the added sugar where appropriate. Keep in mind that graham crackers and many prepared toppings already contain sugar, so the overall nutritional content will depend on the products used.
What to Serve With Cherry Cheesecake Cups
These mini desserts pair well with a range of drinks and light accompaniments.
- Fresh strawberries or blueberries.
- A cup of black coffee or espresso.
- Unsweetened tea.
- A small fruit platter.
- Chocolate-dipped fruit for a special occasion.
Because the cheesecake filling is rich, a small cup is often a satisfying serving after a hearty dinner.
Storage and Make-Ahead Instructions
Refrigeration: Cover the cups and store them in the refrigerator at 40°F (4°C) or below. For the best quality, enjoy them within 3–4 days.
Make ahead: Assemble the crust and cheesecake filling the day before serving. Add the cherry topping before chilling or shortly before serving, depending on the appearance you prefer.
Freezing: These cups can be frozen in suitable freezer-safe containers, although the texture of the whipped cream filling and cherry topping may change after thawing. For the best results, freeze the cheesecake base without the fruit topping and add fresh topping after thawing.
Thawing: Thaw frozen cheesecake cups in the refrigerator rather than on the counter.
Food safety: Do not leave cream cheese and whipped cream desserts at room temperature for more than two hours, or more than one hour when the temperature is above 90°F (32°C).
Frequently Asked Questions
Can I make cherry cheesecake cups without baking?
Yes. This recipe is completely no-bake. The crust firms in the refrigerator, and the cream cheese filling sets through chilling.
Can I use Cool Whip or another prepared whipped topping?
Yes. Fold it into the sweetened cream cheese mixture until combined. The final texture and sweetness may differ from a filling made with freshly whipped heavy cream.
Why is my cheesecake filling too soft?
The filling may need more chilling time, the cream may not have been whipped sufficiently, or the ingredients may contain too much moisture. Make sure the cream cheese is full-fat and the whipped cream is beaten to medium-stiff peaks.
Can I use fresh or frozen cherries instead of canned pie filling?
Absolutely. Prepare the homemade cherry topping described above and allow it to cool completely before adding it to the cups.
Can I make these cheesecake cups a day ahead?
Yes. They are excellent make-ahead desserts. Prepare them the day before serving and refrigerate them overnight. Add delicate garnishes just before serving.
How many servings does this recipe make?
The recipe makes approximately eight individual cheesecake cups. The exact number depends on the size of your dessert containers.
Can I use another type of cookie for the crust?
Yes. Digestive biscuits, vanilla wafers, shortbread cookies, or chocolate sandwich cookies can all work. You may need to adjust the butter slightly depending on how dry or oily the crumbs are.
Final Thoughts
Perfect Cherry Cheesecake Cups combine everything people love about traditional cheesecake in a convenient individual dessert. The buttery graham cracker crust, fluffy cream cheese filling, and sweet cherry topping create a beautiful balance of texture and flavor without requiring an oven.
They’re easy enough for everyday family desserts but attractive enough for celebrations, holidays, and dinner parties. Prepare them ahead of time, chill until firm, and finish with whipped cream and fresh cherries for a dessert that looks as wonderful as it tastes.
Once you try this simple recipe, you can experiment with chocolate, lemon, or cookie variations to create your own favorite version.
SEO Details
SEO Title: Perfect Cherry Cheesecake Cups – Easy No-Bake Dessert
Meta Description: Make perfect cherry cheesecake cups with a buttery graham cracker crust, fluffy cream cheese filling, and sweet cherry topping. An easy make-ahead dessert.
Focus Keyword: Perfect Cherry Cheesecake Cups
URL Slug: perfect-cherry-cheesecake-cups
Related Keywords: no-bake cherry cheesecake cups, mini cherry cheesecake desserts, easy cheesecake cups, cherry cream cheese dessert, individual no-bake cheesecake, graham cracker cheesecake cups