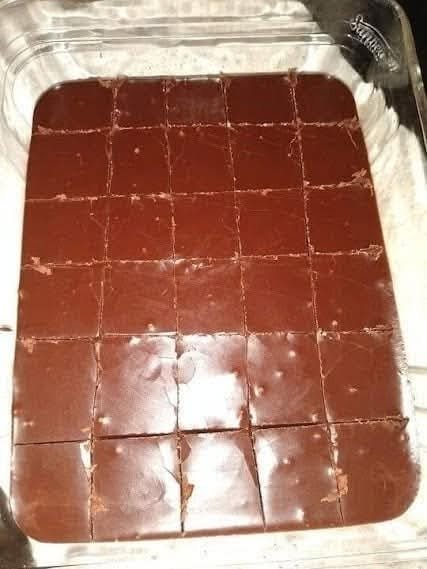
There is something truly special about old-fashioned chocolate fudge. Its rich cocoa flavor, smooth texture, and melt-in-your-mouth sweetness bring back memories of homemade desserts, holiday baking, and family gatherings. This Old Fashioned Hershey’s Cocoa Fudge is a timeless treat made with simple pantry ingredients and the classic cooking method that has been loved for generations.
Unlike modern fudge recipes that rely on marshmallow creme or condensed milk, this traditional version uses Hershey’s unsweetened cocoa powder, sugar, milk, butter, and vanilla extract. The ingredients are cooked together to a specific temperature, then cooled and beaten until the mixture thickens into rich, creamy fudge.
The secret to achieving that nostalgic texture is careful temperature control. Cook the chocolate mixture correctly, allow it to cool without disturbing it, and beat it at the right moment. With a little patience, you can make homemade cocoa fudge that is deeply chocolatey, beautifully sliceable, and perfect for sharing.
Whether you’re preparing a holiday dessert tray, making a homemade gift, or satisfying a chocolate craving, this traditional recipe deserves a place in your kitchen.
Why You’ll Love This Old Fashioned Cocoa Fudge
- Classic chocolate flavor: Unsweetened cocoa powder gives the fudge a rich chocolate taste without relying on chocolate chips.
- Simple ingredients: You probably already have most of the ingredients in your pantry.
- Traditional texture: Properly prepared fudge develops a dense, creamy consistency that melts in your mouth.
- Perfect for special occasions: Cut it into neat squares for holidays, birthdays, parties, or homemade gift boxes.
- Easy to customize: Add chopped nuts, a little espresso powder, or a pinch of sea salt to create your favorite variation.
- A nostalgic homemade dessert: This recipe brings back the charm of traditional candy-making.
Recipe Information
- Preparation time: 10 minutes
- Cooking time: 15–25 minutes
- Cooling and beating time: 30–45 minutes
- Setting time: 1–2 hours
- Total time: Approximately 2–3 hours
- Yield: 36 small squares
- Difficulty: Intermediate
- Pan size: 8-inch square pan
Ingredients for Old Fashioned Hershey’s Cocoa Fudge
- 3 cups (600 g) granulated sugar
- ⅔ cup (approximately 55–60 g) Hershey’s unsweetened cocoa powder
- ⅛ teaspoon salt
- 1 ½ cups (360 ml) whole milk
- ¼ cup (57 g) unsalted butter
- 1 teaspoon vanilla extract
- Optional: ½ cup chopped walnuts or pecans
Important: Traditional cocoa fudge depends on accurate cooking temperature. A candy thermometer is strongly recommended because even a small difference in temperature can affect the final texture.
Step-by-Step Instructions
Step 1: Prepare Your Pan
Line an 8-inch square baking pan with parchment paper, leaving a little extra paper over two opposite sides. This will help you lift the finished fudge out of the pan.
You can lightly butter the parchment paper if desired.
Measure all the ingredients before you begin cooking. Traditional fudge requires attention at the end of the cooking process, so preparing everything in advance makes the method easier.
Step 2: Combine the Cocoa and Sugar
Place the granulated sugar, unsweetened cocoa powder, and salt in a heavy-bottomed saucepan.
Stir thoroughly with a whisk until the cocoa is evenly distributed throughout the sugar. This helps reduce cocoa lumps and creates a more uniform chocolate mixture.
Add the whole milk and stir until the dry ingredients are moistened.
Step 3: Cook the Chocolate Mixture
Place the saucepan over medium heat. Stir gently until the sugar dissolves and the mixture begins to boil.
Once the mixture reaches a steady boil, stop stirring. Attach a candy thermometer to the saucepan, making sure its tip is immersed in the mixture without touching the bottom of the pan.
Cook until the mixture reaches 234°F (112°C), the soft-ball stage, at approximately sea-level atmospheric pressure.
This stage is essential for traditional fudge. If the mixture does not reach the correct temperature, the fudge may remain too soft. If it becomes too hot, the finished candy may turn dry, crumbly, or overly firm.
Cooking time varies with the saucepan, burner, batch size, and altitude, so rely on the thermometer rather than the clock.
Safety note: Boiling sugar syrup is extremely hot and can cause serious burns. Do not taste it while cooking, and keep children away from the stove.
Step 4: Add the Butter and Let It Cool
Remove the saucepan from the heat immediately when the mixture reaches the target temperature.
Place the butter on top of the hot mixture, but do not stir it in yet. Let the saucepan stand undisturbed until the mixture cools to approximately 110°F (43°C).
Depending on the room temperature and the saucepan, this may take around 30–45 minutes.
Avoid stirring, scraping the sides, or shaking the pan during cooling. Disturbing the mixture too early can encourage unwanted sugar crystals to form and may give the fudge a grainy texture.
Step 5: Add Vanilla and Beat the Fudge
Once the mixture has cooled to approximately 110°F, add the vanilla extract.
Beat the mixture vigorously with a sturdy wooden spoon until it begins to lose its glossy appearance, thickens, and becomes more difficult to stir. The butter should incorporate into the mixture as you beat.
This may take several minutes, depending on the temperature and how vigorously you stir.
If you’re using chopped walnuts or pecans, fold them in when the mixture begins to thicken but is still spreadable.
How to recognize the right stage: The fudge should look less shiny and hold its shape briefly when lifted with a spoon. Do not continue beating until it becomes stiff and crumbly, because it may harden before you can spread it.
Step 6: Transfer the Fudge to the Pan
Quickly spoon the thickened fudge into the prepared pan.
Spread it evenly using a spatula. Work efficiently because traditional fudge can set quickly once it reaches the correct consistency.
If the surface looks slightly uneven, gently smooth it before the mixture becomes firm.
Avoid adding extra milk or water at this stage. Doing so can change the sugar concentration and prevent the fudge from setting properly.
Step 7: Allow It to Set
Leave the fudge at room temperature for approximately 1–2 hours, or until firm enough to cut.
Once completely set, lift it out of the pan using the parchment paper.
Place it on a cutting board and use a sharp knife to cut it into small squares. For cleaner cuts, warm the knife slightly, wipe it dry, and repeat between cuts.
Your Old Fashioned Hershey’s Cocoa Fudge is now ready to serve.
The Secrets to Smooth, Creamy Cocoa Fudge
Traditional fudge is a form of sugar candy, so its texture depends on controlling how sugar crystals form as the mixture cools.
Here are the most important tips for getting it right.
Use a Heavy-Bottomed Saucepan
A heavy-bottomed pan distributes heat more evenly and helps reduce the risk of scorching. A thin saucepan can develop hot spots that burn the cocoa mixture before it reaches the proper temperature.
Measure the Temperature Carefully
The soft-ball stage is generally around 234°F at sea level, but the ideal temperature can vary with altitude. At higher elevations, water boils at a lower temperature, so candy-making temperatures may also need adjustment.
If you regularly make candy, a reliable thermometer is a worthwhile investment.
Avoid Stirring After Boiling Begins
Once the sugar mixture reaches a boil, unnecessary stirring can encourage sugar crystals to form on the sides of the saucepan. These crystals may spread through the mixture and create a grainy result.
If sugar crystals collect on the sides, you can carefully wash them down with a clean, wet pastry brush early in the boiling process.
Let the Mixture Cool Before Beating
This is one of the most important steps. Beating the fudge while it is too hot can interfere with proper crystallization, while waiting until it is too cool may make it difficult to spread.
Allowing the mixture to cool to approximately 110°F before beating gives you a better chance of achieving a creamy texture.
Stop Beating at the Right Time
The mixture should become thicker and lose its shine. Stop when it is ready to hold its shape but remains easy to spread.
Overbeating can cause the fudge to become stiff and crumbly before it reaches the pan.
Common Cocoa Fudge Problems and How to Fix Them
Why Is My Fudge Grainy?
Graininess usually develops when sugar crystals form too early or become too large. Common causes include stirring during cooling, sugar crystals remaining on the sides of the pan, or disturbing the mixture before it reaches the correct temperature.
For the next batch, dissolve the sugar thoroughly, avoid stirring after boiling begins, and let the mixture cool undisturbed before beating.
Why Didn’t My Fudge Set?
Fudge may remain soft if the mixture did not reach the required cooking temperature or if the proportions were inaccurate.
If the mixture is still too soft after several hours, it may need to be carefully reheated and cooked to the correct temperature again. This process can be tricky because the mixture may already contain crystals, so follow a reliable candy-making method and use a thermometer.
Why Is My Fudge Too Hard?
Fudge that is cooked above the intended temperature loses too much moisture and may become hard or crumbly. Accurate temperature measurement is the best prevention.
Why Did My Fudge Become Dry and Crumbly?
Overcooking or beating the mixture for too long can produce a dry, crumbly texture. Next time, remove it from the heat as soon as it reaches the target temperature and stop beating as soon as it thickens and loses its shine.
Why Is My Fudge Still Shiny and Sticky?
It may not have been beaten long enough, or it may not have reached the correct cooking temperature. Give it time to set completely before deciding that it has failed.
Delicious Variations
Old Fashioned Chocolate Walnut Fudge
Fold in ½ cup of chopped walnuts just as the fudge begins to thicken. Walnuts add a pleasant crunch that contrasts with the smooth chocolate candy.
Chocolate Pecan Fudge
Replace the walnuts with chopped pecans. Toasting the pecans briefly before adding them can enhance their flavor, but allow them to cool first.
Sea Salt Cocoa Fudge
Sprinkle a small amount of flaky sea salt over the fudge immediately after spreading it in the pan. The salt balances the sweetness and enhances the cocoa flavor.
Mocha Cocoa Fudge
Dissolve ½–1 teaspoon of instant espresso powder in a small amount of the measured milk before adding it to the saucepan. Coffee enhances chocolate flavor without necessarily making the fudge taste strongly of coffee.
Vanilla Cocoa Fudge
For a softer vanilla aroma, use a good-quality vanilla extract and add it after the cooked mixture has cooled. Avoid adding extra liquid flavorings, which may affect the texture.
Extra-Rich Cocoa Fudge
For a deeper chocolate flavor, use a high-quality unsweetened cocoa powder. Natural and Dutch-process cocoa powders can differ in flavor and acidity, so the most predictable results come from following the ingredient type specified by your chosen recipe.
How to Serve Old Fashioned Hershey’s Cocoa Fudge
This classic fudge is delicious on its own, but you can also serve it in several ways.
- Arrange small squares on a holiday dessert tray.
- Package the pieces in a decorative box for a homemade gift.
- Serve a square alongside coffee, tea, or a glass of milk.
- Add small pieces to a dessert platter with cookies and brownies.
- Chop the fudge into bite-sized pieces for an occasional ice cream topping.
Because the flavor is rich and sweet, small squares are usually enough to satisfy a chocolate craving.
How to Store Homemade Cocoa Fudge
At room temperature: Store the fudge in an airtight container in a cool, dry place for several days, provided the environment is not hot or humid. Place parchment paper between layers to prevent sticking.
In the refrigerator: If your kitchen is warm, refrigerate the fudge in an airtight container. Let individual pieces sit briefly at room temperature before serving if you prefer a softer bite.
In the freezer: For longer storage, wrap the fudge tightly and place it in a freezer-safe container for up to 2–3 months for best quality. Thaw it while still wrapped to help prevent condensation from forming on the surface.
Avoid storing fudge near strong-smelling foods because it can absorb odors.
Frequently Asked Questions
Can I make this fudge without a candy thermometer?
Yes, but it is more difficult to achieve consistent results. The traditional cold-water test involves dropping a little of the hot syrup into cold water and checking whether it forms a soft, flexible ball. Because boiling sugar is dangerous and the test takes practice, a candy thermometer is the more reliable option.
Can I use Hershey’s Special Dark cocoa powder?
You can experiment with it, but the flavor and appearance may differ from fudge made with regular unsweetened cocoa powder. For the most traditional flavor, use the cocoa specified in the recipe.
Can I use low-fat milk?
Whole milk is recommended for a richer flavor and more predictable texture. Changing the milk’s fat content may alter the result slightly.
Is this the same as condensed milk fudge?
No. This is a traditional cooked cocoa fudge that relies on sugar crystallization. Condensed milk fudge typically uses a different method and often includes chocolate chips or other ingredients to help it set.
Can I double the recipe?
Doubling traditional fudge can make temperature control and cooling more difficult. For the most reliable result, prepare separate batches unless you have experience adjusting candy recipes.
How can I make the squares look neat?
Allow the fudge to set completely, lift it out of the pan, and use a sharp knife. Warming and wiping the knife between cuts helps create smooth edges.
Can I reduce the sugar?
Reducing the sugar substantially can interfere with the structure and setting of traditional fudge. If you want a less-sweet dessert, it is better to use small portions or choose a recipe specifically developed with a lower sugar content.
Approximate Nutrition Information
The following values are estimates for one piece when the recipe is divided into 36 small squares. Actual nutrition will vary with ingredient brands and portion size.
- Calories: 90–110
- Carbohydrates: 18–22 g
- Protein: 1 g
- Fat: 2–3 g
- Sugar: 17–20 g
Traditional cocoa fudge is a concentrated sweet treat, so smaller portions are a practical way to enjoy it.
Final Thoughts
Old Fashioned Hershey’s Cocoa Fudge is a classic homemade chocolate dessert that proves simple ingredients can create something memorable. Unsweetened cocoa powder, sugar, milk, butter, and vanilla combine to make a rich candy with a smooth, creamy bite and a nostalgic flavor.
The most important part of this recipe is controlling the temperature and allowing the mixture to cool before beating. Once you understand those steps, making traditional fudge becomes much more manageable.
Serve it during the holidays, share it with family and friends, or keep a few small squares ready for an occasional chocolate treat. This timeless recipe is a wonderful reminder that some of the best desserts never go out of style.
SEO Details
SEO Title: Old Fashioned Hershey’s Cocoa Fudge Recipe
Focus Keyphrase: Old Fashioned Hershey’s Cocoa Fudge
URL Slug: old-fashioned-hersheys-cocoa-fudge
Meta Description: Make old fashioned Hershey’s cocoa fudge with sugar, milk, butter, and vanilla. Follow this classic recipe for rich, creamy homemade chocolate fudge.
Suggested Tags: Hershey’s Cocoa Fudge, Old Fashioned Fudge, Homemade Chocolate Fudge, Cocoa Powder Desserts, Classic Candy Recipes, Holiday Fudge, Easy Chocolate Desserts, Traditional Fudge Recipe