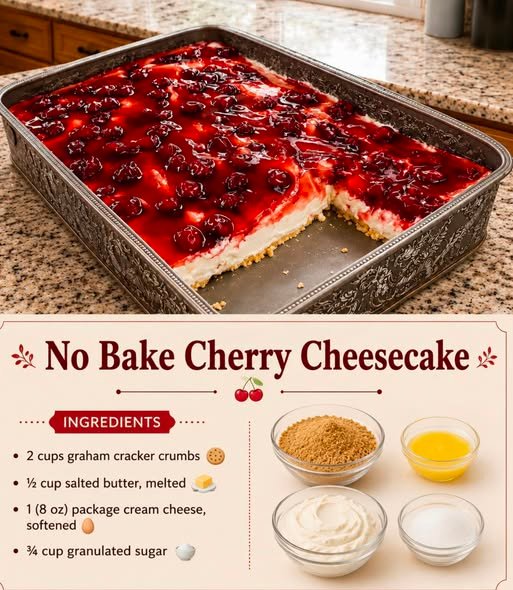
No-Bake Cherry Cheesecake
This No-Bake Cherry Cheesecake is creamy, smooth, fruity, and incredibly easy to make. With a buttery graham cracker crust, rich cheesecake filling, and a sweet cherry topping, it’s the perfect dessert when you want something impressive without turning on the oven.
Unlike traditional baked cheesecake, this recipe sets in the refrigerator. That makes it especially convenient for summer gatherings, holidays, birthdays, potlucks, and busy days when you want a homemade dessert with minimal effort.
The combination of creamy cheesecake and sweet-tart cherries makes every bite refreshing and indulgent at the same time.
Why You’ll Love This No-Bake Cherry Cheesecake
- No oven required
- Easy to prepare
- Creamy and silky cheesecake filling
- Sweet and tangy cherry topping
- Simple ingredients
- Perfect make-ahead dessert
- Great for parties and family gatherings
- Beautiful presentation
- Can be prepared the day before
Ingredients
For the Crust
- 2 cups graham cracker crumbs
- ½ cup unsalted butter, melted
- 3 tablespoons granulated sugar
- Pinch of salt
For the Cheesecake Filling
- 16 ounces cream cheese, softened
- ¾ cup powdered sugar
- 1 teaspoon vanilla extract
- 1 tablespoon lemon juice
- 1 cup heavy whipping cream, cold
- ½ cup sour cream
- 1 teaspoon unflavored gelatin, optional for extra stability
- 2 tablespoons cold water, if using gelatin
For the Cherry Topping
- 2 cups pitted cherries, fresh or frozen
- ½ cup granulated sugar
- 1 tablespoon lemon juice
- 1 tablespoon cornstarch
- 2 tablespoons water
- ½ teaspoon vanilla extract
Optional Garnish
- Fresh cherries
- Whipped cream
- White chocolate shavings
- Graham cracker crumbs
- Lemon zest
How to Make No-Bake Cherry Cheesecake
Step 1: Prepare the Crust
Place the graham cracker crumbs in a medium mixing bowl.
Add the melted butter, sugar, and a small pinch of salt.
Mix until the crumbs are evenly coated and the mixture resembles wet sand.
The melted butter acts as the binder and helps the crust become firm once refrigerated.
Step 2: Press the Crust Into the Pan
Use a 9-inch springform pan or a deep pie dish.
Pour the crumb mixture into the pan.
Using the bottom of a glass or measuring cup, firmly press the crumbs into an even layer.
Pay special attention to the edges and corners.
The crust should be compact enough that it doesn’t crumble when you cut the cheesecake.
Place the crust in the refrigerator while preparing the filling.
Step 3: Prepare the Cream Cheese
Place the softened cream cheese in a large mixing bowl.
Beat it until completely smooth.
Add the powdered sugar gradually and continue mixing until creamy.
Add the vanilla extract, lemon juice, and sour cream.
Mix until everything is well combined.
Make sure there are no lumps remaining.
Important Tip
Use room-temperature cream cheese.
Cold cream cheese can make the filling lumpy and difficult to mix.
Step 4: Whip the Cream
Pour the cold heavy whipping cream into a separate bowl.
Beat with an electric mixer until stiff peaks form.
Don’t overbeat the cream.
Stop once it becomes thick enough to hold its shape.
The whipped cream gives the cheesecake its light and airy texture.
Step 5: Combine the Cheesecake Filling
Gently fold the whipped cream into the cream cheese mixture.
Use a spatula and fold slowly rather than aggressively stirring.
This helps preserve the air in the whipped cream and creates a light, creamy cheesecake filling.
Continue folding until no visible streaks remain.
Optional: Add Gelatin for Extra Stability
If you want a firmer cheesecake that slices particularly cleanly, gelatin can be added.
Sprinkle the gelatin over the cold water and let it sit for approximately 5 minutes.
Warm it gently until dissolved.
Allow it to cool slightly.
Slowly mix it into the cheesecake filling while stirring continuously.
Gelatin isn’t essential, but it can be useful if you’re serving the cheesecake outdoors or in a warm environment.
Step 6: Add the Cheesecake Filling
Remove the crust from the refrigerator.
Spoon the cheesecake mixture over the crust.
Spread it evenly with a spatula.
Smooth the top.
Gently tap the pan on the counter once or twice to remove large air pockets.
Cover the cheesecake and refrigerate for at least 6 hours.
For the best results, let it chill overnight.
Step 7: Prepare the Cherry Topping
While the cheesecake chills, prepare the cherry topping.
Place the cherries, sugar, and lemon juice in a saucepan.
Cook over medium heat for approximately 5–8 minutes, stirring occasionally.
The cherries should soften and release their juices.
In a small bowl, combine the cornstarch and water.
Stir until completely smooth.
Pour the cornstarch mixture into the cherries while stirring.
Continue cooking for another 1–2 minutes, until the mixture thickens.
Remove from the heat.
Stir in the vanilla extract.
Step 8: Cool the Cherry Topping
Allow the cherry topping to cool completely.
This is important.
Do not pour hot cherry topping over the cheesecake.
Hot topping can soften the cheesecake filling and cause it to lose its shape.
For faster cooling, transfer the cherry mixture to a shallow bowl and refrigerate it.
Step 9: Add the Cherry Topping
Once the cheesecake is completely set and the cherry mixture is cold, carefully spoon the cherries over the top.
Spread them evenly across the surface.
Leave a small border around the edge if you want the white cheesecake layer to remain visible.
For a more rustic appearance, allow some of the cherry sauce to naturally drip down the sides.
Step 10: Chill Again
Return the finished cheesecake to the refrigerator for another 30–60 minutes.
This helps the cherry topping settle and makes slicing easier.
When you’re ready to serve, carefully remove the sides of the springform pan.
How to Get Perfect Slices
For clean, professional-looking slices:
- Use a sharp knife.
- Dip the knife in hot water.
- Wipe it dry.
- Slice through the cheesecake.
- Clean the knife between slices.
- Repeat.
This technique creates smooth cuts through the creamy filling and cherry topping.
Tips for the Best No-Bake Cherry Cheesecake
Use Full-Fat Cream Cheese
Full-fat cream cheese provides the richest flavor and best texture.
Reduced-fat varieties can produce a softer filling.
Chill Long Enough
Don’t rush the chilling process.
A minimum of 6 hours is recommended, but overnight refrigeration produces the best results.
Use Cold Heavy Cream
Cold cream whips more easily and holds its structure better.
Don’t Overmix
Once the whipped cream is added, gently fold it into the cream cheese mixture.
Overmixing can reduce the volume and make the filling heavier.
Cool the Cherry Topping
Always allow the cherry topping to cool completely before adding it to the cheesecake.
Fresh, Frozen, or Canned Cherries?
Fresh Cherries
Fresh cherries provide excellent flavor when they’re in season.
Remove the pits before cooking.
Frozen Cherries
Frozen cherries are convenient and work very well.
There’s no need to completely thaw them before cooking.
You may need to cook the mixture slightly longer to evaporate excess liquid.
Canned Cherry Pie Filling
For an extremely quick version, you can use prepared cherry pie filling.
Simply spread the cooled filling over the chilled cheesecake.
This turns the recipe into an almost effortless dessert.
Easy Variations
Chocolate Cherry Cheesecake
Add 2–3 tablespoons of cocoa powder to the cheesecake filling.
You can also add melted dark chocolate for a richer chocolate flavor.
Finish with chocolate shavings.
White Chocolate Cherry Cheesecake
Melt approximately 4 ounces of white chocolate and allow it to cool slightly.
Fold it into the cheesecake filling.
White chocolate and cherries make an excellent combination.
Cherry Almond Cheesecake
Add ½ teaspoon almond extract to the cheesecake filling.
The almond flavor complements cherries beautifully.
Lemon Cherry Cheesecake
Add extra lemon zest and a little more lemon juice to the filling.
The citrus provides a bright contrast to the sweet cherries.
Mini Cherry Cheesecakes
Instead of using a springform pan, divide the crust and filling between individual dessert cups.
Refrigerate until set and top each serving with cherries.
This is a great option for parties.
What to Serve With Cherry Cheesecake
This cheesecake is delicious by itself, but you can add a few simple toppings.
Whipped Cream
Add a small swirl of whipped cream to each slice.
Fresh Cherries
A fresh cherry on top makes the dessert look beautiful.
Chocolate
Chocolate shavings or a light chocolate drizzle add extra richness.
Toasted Almonds
Chopped toasted almonds provide a pleasant crunch and pair wonderfully with cherries.
How to Store No-Bake Cherry Cheesecake
Keep the cheesecake refrigerated at all times.
Cover it tightly or store individual slices in airtight containers.
For the best quality, enjoy it within approximately 3–4 days.
Because the cheesecake contains dairy and whipped cream, don’t leave it sitting at room temperature for extended periods.
Can You Freeze No-Bake Cherry Cheesecake?
Yes.
For the best texture, freeze the cheesecake without the cherry topping.
Wrap it tightly in plastic wrap and aluminum foil.
Freeze for up to approximately 2 months.
Thaw overnight in the refrigerator.
Add the cherry topping after thawing.
Frequently Asked Questions
Why is my no-bake cheesecake too soft?
The cheesecake may not have chilled long enough, or the whipped cream may not have been whipped sufficiently.
Using full-fat cream cheese and properly whipped heavy cream helps create a firmer filling.
Gelatin can also be added for additional stability.
Can I make this cheesecake without gelatin?
Absolutely.
Properly whipped cream and adequate refrigeration are usually enough to create a delicious no-bake cheesecake.
Can I use store-bought cherry pie filling?
Yes.
It’s one of the easiest shortcuts. Simply spread the cherry filling over the chilled cheesecake.
Can I make it the day before?
Yes, and that’s actually recommended.
The cheesecake benefits from several hours of refrigeration, so preparing it the day before is ideal.
Can I use a regular cake pan?
A springform pan makes removal easier, but a deep pie dish or cake pan can also work.
If using a regular cake pan, line it with parchment paper with some overhang to help lift the cheesecake out.
Recipe at a Glance
Recipe: No-Bake Cherry Cheesecake
Prep Time: 30 minutes
Chilling Time: 6 hours
Total Time: About 6½ hours
Servings: 10–12
Course: Dessert
Method: No-bake / Refrigerated
Main Flavors: Creamy cheesecake, sweet cherries, buttery graham crackers