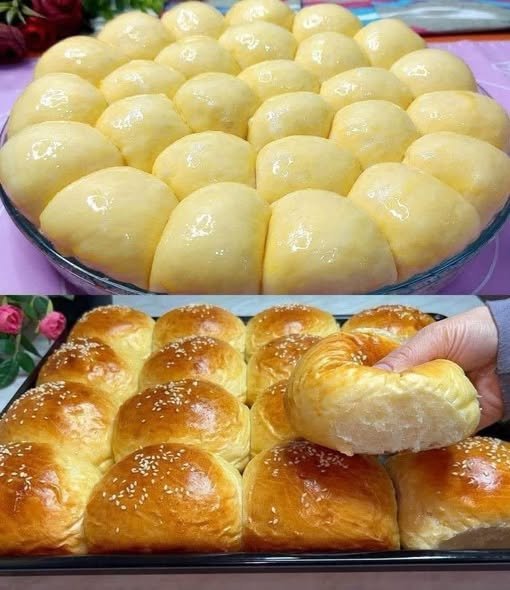
Milk Brioche Rolls
Milk Brioche Rolls are soft, fluffy, buttery, and lightly sweet homemade bread rolls with a beautiful golden-brown crust. Made with milk, butter, eggs, and flour, these rolls have a tender, rich crumb that makes them perfect for breakfast, sandwiches, dinner, or serving alongside soups and stews.
The dough is enriched with milk and butter, giving these Milk Brioche Rolls their signature soft texture. They are delicious fresh from the oven with butter and jam, but they also make wonderful slider buns or sandwich rolls.
Why You’ll Love These Milk Brioche Rolls
- Soft and fluffy texture
- Rich buttery flavor
- Lightly sweet
- Beautiful golden crust
- Easy homemade bread recipe
- Perfect for breakfast
- Great for sandwiches and sliders
- Delicious with butter and jam
- Freezer-friendly
Ingredients
For the Brioche Dough
- 4 cups all-purpose flour or bread flour
- 2¼ teaspoons active dry yeast
- ¼ cup granulated sugar
- 1 teaspoon salt
- 1 cup warm whole milk
- 2 large eggs, room temperature
- 1 teaspoon vanilla extract, optional
- ½ cup unsalted butter, softened
- 2 tablespoons honey, optional
For the Egg Wash
- 1 egg
- 1 tablespoon milk
Optional Topping
- Sesame seeds
- Poppy seeds
- Flaky sea salt
- Melted butter
How to Make Milk Brioche Rolls
Step 1: Activate the Yeast
Pour the warm milk into a small bowl.
The milk should feel warm but not hot, ideally around 100–110°F (38–43°C).
Add the yeast and approximately 1 tablespoon of the sugar.
Stir gently.
Allow the mixture to sit for approximately 5–10 minutes.
The surface should become slightly foamy.
If nothing happens, your yeast may be inactive and should be replaced.
Step 2: Combine the Dry Ingredients
In a large mixing bowl, combine:
- Flour
- Remaining sugar
- Salt
Whisk briefly to distribute the ingredients evenly.
Step 3: Add the Wet Ingredients
Pour the milk and yeast mixture into the flour.
Add the eggs and honey if using.
Add the vanilla extract if you want a subtle sweet aroma.
Mix with a wooden spoon or dough hook until a rough dough forms.
Step 4: Knead the Dough
Transfer the dough to a lightly floured work surface, or use a stand mixer fitted with a dough hook.
Knead for approximately 8–10 minutes by hand or 5–7 minutes in a stand mixer.
The dough should become smooth and elastic.
It may feel slightly sticky at first.
Avoid adding too much flour because that can make the rolls dense.
Step 5: Add the Butter
Once the dough has developed some elasticity, gradually add the softened butter.
Add approximately 1 tablespoon at a time.
Allow each addition to become incorporated before adding more.
Continue kneading until all the butter is absorbed and the dough becomes smooth, soft, and elastic.
This may take several additional minutes.
Step 6: Check the Dough
The finished dough should feel soft and slightly tacky but shouldn’t be excessively sticky.
A useful test is the windowpane test.
Take a small piece of dough and gently stretch it between your fingers.
If it stretches thin enough to let light through without tearing immediately, the gluten has developed properly.
Step 7: First Rise
Shape the dough into a ball.
Place it in a lightly greased bowl.
Cover with plastic wrap or a clean kitchen towel.
Place it in a warm, draft-free area.
Allow it to rise for approximately 1–1½ hours, or until it has nearly doubled in size.
The exact rising time depends on the temperature of your kitchen.
Step 8: Divide the Dough
Once the dough has doubled, gently press it down to release excess air.
Transfer it to a lightly floured surface.
Divide the dough into 12 equal pieces.
For perfectly even rolls, use a kitchen scale.
Step 9: Shape the Rolls
Take one portion of dough.
Pull the edges toward the center to create a smooth surface.
Turn it over and gently roll it between your palms until it forms a smooth ball.
Repeat with the remaining pieces.
Step 10: Arrange the Rolls
Grease a 9×13-inch baking pan.
Place the shaped rolls into the pan, leaving a small amount of space between them.
As they rise, they’ll expand and eventually touch each other.
Step 11: Second Rise
Cover the pan loosely with a clean kitchen towel or plastic wrap.
Allow the rolls to rise for approximately 45–60 minutes.
They should become noticeably puffy.
Don’t rush this step because the second rise helps create light, fluffy rolls.
Step 12: Prepare the Egg Wash
In a small bowl, whisk together:
- 1 egg
- 1 tablespoon milk
Mix until smooth.
Step 13: Brush the Rolls
Once the rolls have completed their second rise, gently brush the tops with the egg wash.
Make sure you don’t press down on the dough.
For additional flavor and texture, sprinkle the tops with sesame seeds or poppy seeds.
Step 14: Bake
Preheat your oven to 350°F (175°C).
Bake the rolls for approximately 20–25 minutes.
They should become beautifully golden brown on top.
The internal temperature should be around 190°F (88°C) when fully baked.
If the tops brown too quickly, loosely cover them with aluminum foil during the final few minutes.
Step 15: Brush With Butter
Remove the rolls from the oven.
While they’re still warm, brush the tops with melted butter.
This gives them a soft, glossy finish and adds extra buttery flavor.
Allow them to cool for approximately 10–15 minutes before serving.
Tips for Perfect Milk Brioche Rolls
Use Whole Milk
Whole milk gives the rolls a richer flavor and softer crumb.
You can use lower-fat milk, but the texture may be slightly less rich.
Don’t Add Too Much Flour
Brioche dough is naturally soft and somewhat sticky.
Adding excessive flour will make the finished rolls heavy.
Use Softened Butter
The butter should be soft enough to blend into the dough but not melted.
Knead Thoroughly
Good gluten development is important for brioche.
The dough should become smooth, elastic, and stretchy.
Give the Dough Enough Time to Rise
Don’t rely only on the clock.
The dough should visibly expand.
A cool kitchen can make the rising process take longer.
How to Make Extra-Fluffy Brioche Rolls
For especially soft rolls, use bread flour instead of all-purpose flour.
Bread flour has more protein, which helps create stronger gluten and a pleasantly chewy but tender texture.
You can also refrigerate the dough overnight after the first rise.
Cold fermentation develops flavor and makes the dough easier to handle.
Overnight Milk Brioche Rolls
For fresh rolls in the morning, prepare the dough the night before.
After kneading, place the covered dough in the refrigerator.
Allow it to rise slowly overnight.
The next morning:
- Remove the dough from the refrigerator.
- Divide and shape the rolls.
- Arrange them in the baking pan.
- Allow them to rise until puffy.
- Apply the egg wash.
- Bake as directed.
The slow fermentation can give the rolls a deeper, richer flavor.
Sweet Milk Brioche Rolls
For sweeter breakfast rolls, increase the sugar to ½ cup.
You can also add:
- Raisins
- Dried cranberries
- Chocolate chips
- Cinnamon
- Orange zest
Serve with butter, honey, jam, or cream cheese.
Savory Milk Brioche Rolls
Brioche doesn’t have to be sweet.
For savory rolls, reduce the sugar slightly and add:
- Garlic powder
- Dried herbs
- Grated Parmesan
- Cheddar cheese
- Chopped parsley
- Black pepper
These are excellent served with soups, roasted chicken, or grilled meats.
How to Make Brioche Slider Rolls
Instead of dividing the dough into 12 pieces, divide it into approximately 16 smaller portions.
Shape them into smooth balls.
Arrange them close together in a baking pan.
After baking, separate them and use them as slider buns.
They’re especially good with pulled chicken, beef patties, grilled chicken, or shredded beef.
What to Serve With Milk Brioche Rolls
Breakfast
Serve warm with:
- Butter
- Honey
- Jam
- Peanut butter
- Cream cheese
Dinner
They pair wonderfully with:
- Roast chicken
- Beef stew
- Creamy soups
- Grilled meats
- Roasted vegetables
Sandwiches
Use them for:
- Chicken sandwiches
- Ham and cheese
- Turkey sandwiches
- Breakfast sandwiches
- Mini burgers
How to Store Milk Brioche Rolls
Allow the rolls to cool completely.
Place them in an airtight container or resealable bag.
They can be stored at room temperature for approximately 3 days.
For longer storage, refrigerate them, although refrigeration can slightly firm the bread.
Warm them briefly before serving.
Can You Freeze Milk Brioche Rolls?
Yes.
Brioche rolls freeze very well.
Allow them to cool completely.
Wrap them individually or place them in a freezer-safe bag.
Freeze for up to 2–3 months.
Thaw at room temperature.
For a freshly baked texture, warm them in a 300°F (150°C) oven for approximately 5–8 minutes.
Frequently Asked Questions
Why are my brioche rolls dense?
Dense rolls can result from insufficient kneading, inactive yeast, too much flour, or inadequate rising time.
Make sure the yeast is active and allow the dough to rise until it has visibly expanded.
Why is my dough sticky?
Brioche dough naturally contains a significant amount of butter, eggs, and milk, so it will be softer and stickier than basic bread dough.
Avoid adding large amounts of extra flour.
Can I use instant yeast?
Yes. Instant yeast can be mixed directly with the dry ingredients, although you can also dissolve it in the warm milk if preferred.
Can I use salted butter?
Yes. If using salted butter, reduce the added salt slightly.
Can I make these without eggs?
Eggs contribute to the rich texture and color of brioche, so the result will be different without them. For a traditional brioche texture, eggs are recommended.
Recipe at a Glance
Recipe: Milk Brioche Rolls
Prep Time: 25 minutes
First Rise: 1–1½ hours
Second Rise: 45–60 minutes
Bake Time: 20–25 minutes
Total Time: Approximately 3 hours
Servings: 12 rolls
Course: Breakfast / Bread / Side Dish
Method: Baked
Main Ingredients: Flour, milk, eggs, butter, yeast, sugar
Final Thoughts
These Milk Brioche Rolls are soft, buttery, fluffy, and incredibly versatile. The combination of whole milk, eggs, and butter creates a rich dough that bakes into beautifully tender rolls with golden tops and a delicate crumb.
The key to successful brioche is patience. Knead the dough thoroughly, incorporate the butter gradually, and give the dough enough time to rise properly. Avoid adding too much flour even if the dough initially feels sticky.
Enjoy these rolls warm with butter and jam for breakfast, serve them alongside a comforting dinner, or turn them into delicious homemade sliders. Once you master this simple brioche dough, you’ll have a versatile recipe you can use for countless sweet and savory creations.