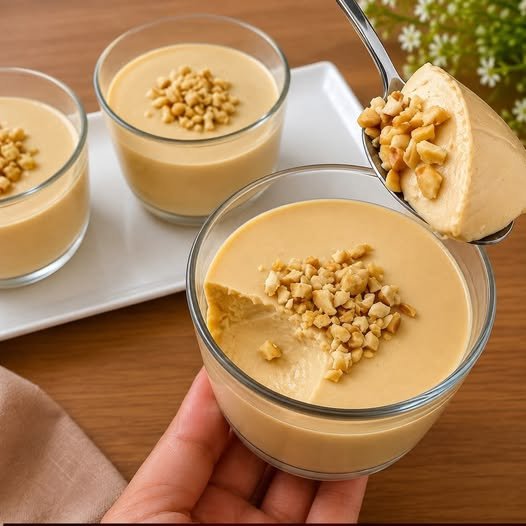
No-Bake 3-Ingredient Milk Pudding Dessert
Looking for an easy dessert that requires almost no effort? This No-Bake 3-Ingredient Milk Pudding Dessert is creamy, silky, and delicious, and it comes together with just three simple ingredients.
There’s no oven, no complicated preparation, and no long list of ingredients. The result is a smooth milk pudding with a delicate sweetness and wonderfully creamy texture. It’s an excellent dessert for busy days, family gatherings, or when you want something sweet without spending hours in the kitchen.
Why You’ll Love This 3-Ingredient Milk Pudding
- Only 3 main ingredients
- No baking required
- No complicated equipment
- Quick and easy preparation
- Creamy and smooth texture
- Budget-friendly
- Great for children and adults
- Perfect make-ahead dessert
- Easy to customize
Ingredients
- 4 cups whole milk
- ½ cup granulated sugar
- ½ cup cornstarch
Optional Garnishes
These aren’t necessary for the basic three-ingredient recipe, but you can use:
- Ground cinnamon
- Cocoa powder
- Chopped nuts
- Fresh berries
- Shredded coconut
- Chocolate shavings
- Crushed cookies
- Fresh fruit
How to Make No-Bake 3-Ingredient Milk Pudding
Step 1: Combine the Cornstarch and Milk
Pour approximately ½ cup of the cold milk into a small bowl.
Add the cornstarch.
Whisk thoroughly until the cornstarch has completely dissolved.
There should be no lumps.
This step is important because adding cornstarch directly to hot milk can cause it to clump.
Step 2: Heat the Remaining Milk
Pour the remaining milk into a medium saucepan.
Add the sugar.
Place the saucepan over medium heat.
Stir occasionally as the milk begins to warm.
You don’t need to bring it to a vigorous boil.
The goal is simply to heat the milk and dissolve the sugar.
Step 3: Add the Cornstarch Mixture
Once the milk is hot, slowly pour in the dissolved cornstarch mixture.
Whisk continuously.
Continue cooking over medium-low heat while stirring constantly.
Within several minutes, the mixture will begin to thicken.
Step 4: Cook Until Thick and Creamy
Continue stirring for approximately 5–8 minutes.
The pudding should become thick enough to coat the back of a spoon.
When you run a finger through the coating on the spoon, the line should remain visible.
Don’t stop stirring because the pudding can stick to the bottom of the pan.
Step 5: Transfer to Serving Dishes
Remove the saucepan from the heat.
Immediately pour the hot pudding into individual dessert cups, ramekins, or one larger serving dish.
Smooth the tops with a spatula or the back of a spoon.
Step 6: Cool the Pudding
Allow the pudding to cool at room temperature for approximately 15–20 minutes.
Once it has cooled slightly, cover the containers.
Place them in the refrigerator.
Step 7: Chill Until Set
Refrigerate the pudding for at least 2–3 hours.
For the best texture, allow it to chill overnight.
The pudding will become firmer as it cools while remaining creamy and smooth.
Step 8: Decorate and Serve
Once completely chilled, serve the pudding as it is or add your favorite garnish.
A light dusting of cinnamon or cocoa powder is an easy way to make it look beautiful.
You can also add fresh berries, chocolate shavings, or crushed cookies.
Serve cold.
Tips for Perfect Milk Pudding
Use Cold Milk for the Cornstarch
Always dissolve cornstarch in cold milk.
This helps prevent lumps.
Whisk Constantly
Once the cornstarch mixture is added, keep whisking.
This produces a smoother pudding and prevents the mixture from sticking.
Don’t Use High Heat
High heat can cause the milk to scorch and can make the pudding thicken unevenly.
Medium to medium-low heat is best.
Give It Enough Time to Chill
The pudding may look soft immediately after cooking.
That’s completely normal.
It will firm up considerably in the refrigerator.
How to Make Extra Creamy Milk Pudding
Whole milk produces the richest texture.
If you want an even creamier dessert, replace ½ cup of the milk with heavy cream.
Keep in mind that this technically makes it a four-ingredient version if you’re counting the cream separately.
Easy Flavor Variations
Although the basic recipe uses only milk, sugar, and cornstarch, you can easily turn it into different flavors.
Chocolate Milk Pudding
Add 2–3 tablespoons unsweetened cocoa powder to the milk and sugar.
Whisk thoroughly before heating.
For an extra-rich chocolate flavor, add melted chocolate.
Vanilla Milk Pudding
Add 1 teaspoon vanilla extract after removing the pudding from the heat.
Cinnamon Milk Pudding
Add ½ teaspoon ground cinnamon while heating the milk.
You can also sprinkle additional cinnamon over the finished dessert.
Coconut Milk Pudding
Replace some of the milk with coconut milk.
Top with toasted coconut for extra flavor.
Coffee Milk Pudding
Dissolve 1–2 teaspoons instant coffee in the warm milk for a simple coffee-flavored dessert.
How to Make a Layered Milk Pudding Dessert
For a more impressive presentation, divide the pudding into two portions.
Leave one portion plain.
Add cocoa powder to the second portion.
Pour alternating layers into small glasses.
Refrigerate until completely set.
Finish with chocolate shavings or crushed cookies.
This creates a beautiful layered dessert without requiring any baking.
Serving Ideas
Fresh Fruit
Top the pudding with strawberries, blueberries, raspberries, bananas, or mango.
Chocolate
Add chocolate curls, chocolate chips, or a light cocoa dusting.
Nuts
Chopped almonds, pistachios, walnuts, or hazelnuts add a pleasant crunch.
Cookies
Crushed chocolate or vanilla cookies create a delicious contrast with the smooth pudding.
Caramel
A small drizzle of caramel sauce adds extra sweetness and richness.
How to Prevent Lumps
Lumpy pudding is usually caused by cornstarch not being dissolved properly.
For perfectly smooth results:
- Measure the cornstarch accurately.
- Mix it with cold milk first.
- Whisk until completely smooth.
- Add it gradually to the hot milk.
- Keep whisking while the pudding thickens.
If small lumps still appear, you can strain the pudding through a fine-mesh sieve before transferring it to serving dishes.
How to Store Milk Pudding
Cover the pudding tightly and refrigerate.
It will generally stay fresh for approximately 3–4 days.
Keep it refrigerated until you’re ready to serve.
Because this is a milk-based dessert, don’t leave it at room temperature for extended periods.
Can You Freeze Milk Pudding?
Freezing isn’t recommended for the best texture.
The pudding can become watery or slightly grainy after thawing.
It’s better to prepare it fresh and refrigerate it until serving.
Frequently Asked Questions
Can I use low-fat milk?
Yes, but whole milk gives a creamier and richer result.
Can I use another thickener?
Cornstarch is the easiest option for this recipe. Other thickeners can work, but the quantity and method may need to be adjusted.
Why didn’t my pudding thicken?
The most likely reasons are not using enough cornstarch or not cooking the mixture long enough.
Continue cooking and whisking until it becomes noticeably thick.
Why is my pudding too thick?
You may have used too much cornstarch.
You can whisk in a small amount of warm milk to loosen it before serving.
Can I reduce the sugar?
Yes.
You can reduce the sugar according to your preference, although reducing it significantly will make the dessert less sweet.
Can I make this dessert ahead?
Yes. It’s actually ideal for making ahead because it needs several hours to chill and set.
Recipe at a Glance
Recipe: No-Bake 3-Ingredient Milk Pudding Dessert
Prep Time: 5 minutes
Cook Time: 8 minutes
Chilling Time: 2–3 hours
Total Time: Approximately 3 hours 15 minutes
Servings: 6
Course: Dessert
Method: Stovetop / No-Bake
Main Ingredients: Milk, sugar, cornstarch