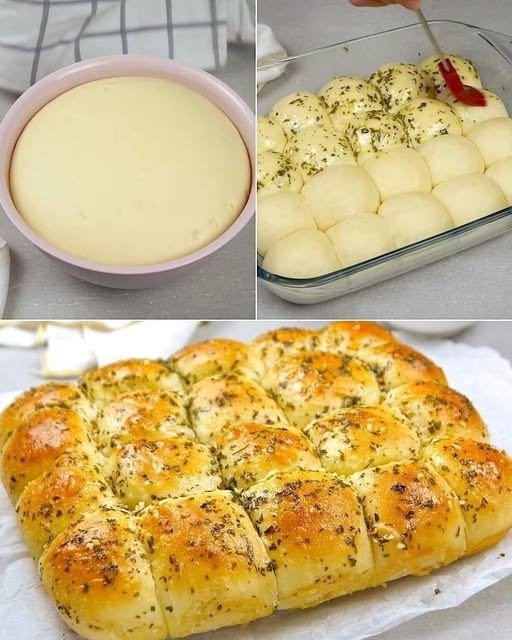
These Homemade Air Fryer Garlic Buns are soft, fluffy, buttery, and loaded with fresh garlic and herbs. They have a lightly golden exterior while staying wonderfully tender inside, making them perfect as a side dish, snack, or accompaniment to soups, pasta, pizza, and grilled meats.
The best part is that you don’t need a traditional oven. The air fryer cooks these buns quickly and gives them a beautiful golden finish with deliciously crisp edges.
Whether you’re making homemade bread for the family or looking for an easy weekend baking project, these garlic buns are simple, comforting, and incredibly satisfying.
Why You’ll Love These Air Fryer Garlic Buns
- Soft and fluffy inside
- Golden and lightly crisp outside
- Packed with buttery garlic flavor
- No conventional oven required
- Easy homemade dough
- Ready faster than traditional baked buns
- Delicious with pasta, soup, or grilled chicken
- Can be customized with cheese and herbs
Ingredients
For the Dough
- 2½ cups all-purpose flour
- 2¼ teaspoons active dry yeast
- 1 tablespoon granulated sugar
- ¾ teaspoon salt
- ¾ cup warm milk
- 2 tablespoons melted unsalted butter
- 1 large egg
- 1–2 tablespoons warm water, only if needed
For the Garlic Butter
- 4 tablespoons unsalted butter, softened or melted
- 4 cloves garlic, finely minced
- 1 tablespoon fresh parsley, finely chopped
- ½ teaspoon Italian seasoning
- ¼ teaspoon salt
- 2 tablespoons grated Parmesan cheese, optional
Optional Cheese Filling
- ½ cup shredded mozzarella
- 2 tablespoons Parmesan cheese
How to Make Homemade Air Fryer Garlic Buns
1. Activate the Yeast
Pour the warm milk into a small bowl.
Add the sugar and active dry yeast.
Stir gently and allow the mixture to stand for about 5–10 minutes.
The mixture should become slightly foamy. This indicates that the yeast is active.
The milk should be warm, not hot. Very hot liquid can damage the yeast.
2. Make the Dough
Add the flour and salt to a large mixing bowl.
Pour in the yeast mixture, melted butter, and egg.
Mix with a wooden spoon until a soft dough begins to form.
If the dough feels very dry, add warm water 1 tablespoon at a time.
3. Knead the Dough
Transfer the dough to a lightly floured surface.
Knead for approximately 7–10 minutes, until the dough becomes smooth and elastic.
You can also use a stand mixer fitted with a dough hook and knead on low-medium speed until smooth.
The dough should feel soft and slightly tacky but shouldn’t stick heavily to your hands.
4. Let the Dough Rise
Place the dough in a lightly greased bowl.
Cover it with plastic wrap or a clean kitchen towel.
Let it rise in a warm place for approximately 1–1½ hours, or until it has roughly doubled in size.
The rising time depends on the temperature of your kitchen.
5. Prepare the Garlic Butter
While the dough rises, prepare the garlic butter.
Combine:
- Butter
- Minced garlic
- Parsley
- Italian seasoning
- Salt
- Parmesan, if using
Mix well and set aside.
For a milder garlic flavor, lightly sauté the minced garlic in a little butter for 1–2 minutes before mixing it into the remaining butter.
6. Shape the Buns
Once the dough has doubled, gently punch it down to release excess air.
Divide it into 8–10 equal portions.
Roll each portion into a smooth ball.
For cheesy garlic buns, flatten each dough ball slightly, add a small amount of mozzarella in the center, then pull the edges together and pinch firmly to seal.
Place the shaped buns seam-side down.
7. Give the Buns a Second Rise
Arrange the buns in an air fryer-safe pan or basket, leaving a little space between them for expansion.
Cover loosely and allow them to rest for approximately 20–30 minutes.
They should look noticeably puffier.
If your air fryer basket is small, cook the buns in batches rather than overcrowding them.
8. Brush With Garlic Butter
Brush the tops generously with the prepared garlic butter.
Save some garlic butter for after cooking.
9. Air Fry
Preheat your air fryer to 330°F (165°C) for about 3 minutes if your model recommends preheating.
Place the buns in the basket or pan.
Air fry for approximately 10–14 minutes, depending on the size of the buns and your air fryer.
They should be puffed and golden brown on top.
If the tops brown too quickly, reduce the temperature slightly or loosely cover the buns with foil if your air fryer setup allows it safely.
10. Add More Garlic Butter
As soon as the buns come out of the air fryer, brush them generously with the remaining garlic butter.
Sprinkle with additional Parmesan and fresh parsley if desired.
Allow them to cool for about 5 minutes before serving.
How to Get Extra-Soft Garlic Buns
For especially soft buns, avoid adding too much flour during kneading.
The dough should remain soft and slightly tacky.
Also, don’t overcook them. Once the tops are golden and the buns are cooked through, remove them from the air fryer.
Brushing them with garlic butter immediately after cooking also helps keep the exterior flavorful and tender.
Cheesy Garlic Bun Variation
For extra cheesy buns, place about 1 tablespoon of shredded mozzarella inside each dough ball before sealing.
You can also add a little Parmesan and Italian seasoning.
After air frying, brush the buns with garlic butter and sprinkle with more cheese.
For an extra-melty topping, add mozzarella during the final 1–2 minutes of cooking.
Air Fryer Tips
Don’t Overcrowd the Basket
The buns need room to expand and for hot air to circulate around them.
Watch the First Batch
Air fryers vary considerably. Your first batch may take slightly more or less time than the recipe suggests.
Use a Lower Temperature
Bread can brown quickly in an air fryer. A temperature around 325–335°F is usually better for buns than very high heat.
Don’t Skip the Second Rise
The second rise helps create lighter, fluffier buns.
Keep the Garlic Butter Generous
A good garlic butter topping is what gives these buns their signature flavor.
What to Serve With Garlic Buns
These buns are perfect alongside:
- Spaghetti
- Lasagna
- Creamy pasta
- Tomato soup
- Chicken soup
- Beef stew
- Grilled chicken
- Steak
- Roasted vegetables
- Chicken Alfredo
- Pizza
- Salads
They’re also delicious on their own as a warm afternoon snack.
Make-Ahead Instructions
You can prepare the dough several hours ahead and keep it covered in the refrigerator after the first rise.
Allow the dough to come closer to room temperature before shaping.
You can also shape the buns and refrigerate them for several hours before the second rise and cooking.
For the freshest results, prepare the garlic butter shortly before baking.
How to Store
Store cooled garlic buns in an airtight container at room temperature for up to 2 days.
For longer storage, refrigerate them for up to 4 days.
Reheat them in the air fryer at 300°F (150°C) for approximately 2–4 minutes.
Avoid overheating because it can dry out the buns.
Can You Freeze Garlic Buns?
Yes.
Allow the cooked buns to cool completely, then place them in a freezer-safe container or bag.
Freeze for up to 2–3 months.
Thaw in the refrigerator or at room temperature, then reheat in the air fryer at 300°F until warm.
For the best texture, brush with a little fresh garlic butter after reheating.
Frequently Asked Questions
Can I use instant yeast?
Yes. Instant yeast can be mixed directly with the dry ingredients, although you can also dissolve it in the warm milk if you prefer.
Why didn’t my buns become fluffy?
The yeast may have been inactive, the milk may have been too hot or cold, the dough may not have had enough rising time, or too much flour may have been added.
Can I make these without eggs?
Yes. The egg contributes richness and softness, but you can omit it and add a little extra milk as needed to create a soft dough.
Can I use garlic powder instead of fresh garlic?
Yes, but fresh garlic gives the strongest and freshest flavor. If using garlic powder, start with about 1 teaspoon and adjust to taste.
Can I use whole-wheat flour?
You can replace up to half of the all-purpose flour with whole-wheat flour. The buns will be slightly denser and have a nuttier flavor.
Final Thoughts
These Homemade Air Fryer Garlic Buns are an easy way to enjoy soft, fluffy homemade bread without turning on a large oven. The buttery garlic topping, fresh herbs, and optional melted cheese make them incredibly flavorful.
Serve them warm alongside pasta, soup, steak, grilled chicken, or your favorite comfort meal. Once you make these quick air fryer buns at home, you may find yourself making them again and again.
SEO Details
SEO Title: Homemade Air Fryer Garlic Buns – Soft, Buttery & Easy
Meta Description: Make soft and fluffy Homemade Air Fryer Garlic Buns with buttery garlic, herbs, and optional cheese. An easy homemade bread recipe ready in minutes.
Focus Keyword: Homemade Air Fryer Garlic Buns
Secondary Keywords: air fryer garlic buns, garlic buns recipe, homemade garlic bread buns, cheesy garlic buns, air fryer bread, easy garlic bread recipe, soft garlic buns
Suggested URL Slug: homemade-air-fryer-garlic-buns
Excerpt: These Homemade Air Fryer Garlic Buns are soft, fluffy, buttery, and packed with fresh garlic and herbs. Easy homemade dough is shaped into buns and air fried until golden, then brushed with garlic butter for an irresistible finish.