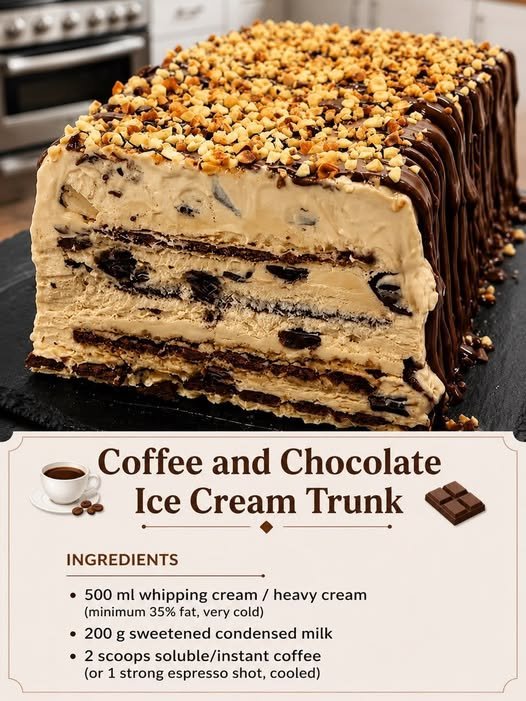
Coffee and Chocolate Ice Cream Trunk
This Coffee and Chocolate Ice Cream Trunk is a rich, creamy, and impressive frozen dessert that combines two irresistible flavors: bold coffee and decadent chocolate. Made with layers of smooth ice cream, chocolate cake, and a luscious chocolate coating, this dessert resembles a beautiful chocolate trunk and makes a spectacular centerpiece for special occasions.
The combination of coffee and chocolate creates a deep, sophisticated flavor, while the cold, creamy texture makes every bite incredibly satisfying. Best of all, this dessert can be prepared ahead of time, making it perfect for birthdays, dinner parties, holidays, and celebrations.
Why You’ll Love This Coffee and Chocolate Ice Cream Trunk
- Rich coffee and chocolate flavors
- Creamy frozen texture
- Impressive presentation
- Perfect make-ahead dessert
- Great for celebrations
- No complicated decorating skills required
- Can be customized with nuts, chocolate chips, or caramel
- Delicious served straight from the freezer
Ingredients
For the Chocolate Cake
- ¾ cup all-purpose flour
- ¼ cup unsweetened cocoa powder
- ½ teaspoon baking powder
- ¼ teaspoon salt
- 3 large eggs
- ½ cup granulated sugar
- 1 teaspoon vanilla extract
- 2 tablespoons melted butter
For the Coffee Ice Cream Layer
- 2 cups heavy whipping cream, cold
- 1 can sweetened condensed milk
- 2 tablespoons instant coffee granules
- 1 tablespoon hot water
- 1 teaspoon vanilla extract
For the Chocolate Ice Cream Layer
- 2 cups heavy whipping cream, cold
- 1 can sweetened condensed milk
- ½ cup unsweetened cocoa powder
- 4 ounces melted semi-sweet chocolate
- 1 teaspoon vanilla extract
For the Chocolate Coating
- 8 ounces semi-sweet or dark chocolate
- 2 tablespoons coconut oil or unsalted butter
Optional Decorations
- Chocolate shavings
- Chocolate curls
- Chopped hazelnuts
- Almonds
- Coffee beans
- Cocoa powder
- Caramel sauce
- Whipped cream
How to Make Coffee and Chocolate Ice Cream Trunk
Step 1: Prepare the Chocolate Cake
Preheat your oven to 350°F (175°C).
Line a rectangular baking pan with parchment paper.
In a bowl, whisk together the flour, cocoa powder, baking powder, and salt.
In a separate bowl, beat the eggs and sugar for approximately 4–5 minutes, until pale, thick, and fluffy.
Add the vanilla extract and melted butter.
Gently fold the dry ingredients into the egg mixture.
Don’t overmix because you want to preserve the air incorporated into the eggs.
Step 2: Bake the Cake
Spread the batter evenly into the prepared pan.
Bake for approximately 10–14 minutes, depending on the size and thickness of your pan.
The cake should spring back lightly when touched.
Don’t overbake it because a dry cake will be harder to roll and can become unpleasantly firm after freezing.
Remove from the oven and allow it to cool completely.
Step 3: Prepare the Coffee Mixture
Dissolve the instant coffee granules in the hot water.
Stir until completely dissolved.
Allow the mixture to cool.
Using concentrated coffee rather than a large amount of liquid coffee gives the dessert a strong coffee flavor without making the ice cream mixture watery.
Step 4: Make the Coffee Ice Cream
Pour the cold heavy cream into a large mixing bowl.
Whip until soft peaks begin to form.
Add the sweetened condensed milk, cooled coffee mixture, and vanilla extract.
Continue whipping until the mixture becomes thick and creamy.
Be careful not to overwhip.
The finished mixture should be smooth and fluffy.
Step 5: Make the Chocolate Ice Cream
In another bowl, whip the cold heavy cream until soft peaks form.
Add the sweetened condensed milk and cocoa powder.
Mix gently.
Add the melted chocolate and vanilla extract.
Continue mixing until everything is smooth and creamy.
Allow the melted chocolate to cool slightly before adding it so that it doesn’t cause the whipped cream to collapse.
Step 6: Prepare the Trunk Mold
Choose a rectangular loaf pan or another deep rectangular mold.
Line it generously with plastic wrap, leaving plenty of overhang on all sides.
The overhanging plastic wrap will help you remove the frozen dessert later.
Smooth the plastic wrap as much as possible.
Step 7: Add the First Layer
Spread the coffee ice cream evenly across the bottom of the lined mold.
Use a spatula to smooth the surface.
Place the mold in the freezer for approximately 30–45 minutes.
The layer doesn’t need to freeze completely solid; it simply needs to become firm enough to support the next layer.
Step 8: Add the Chocolate Layer
Remove the mold from the freezer.
Spread the chocolate ice cream evenly over the coffee layer.
Smooth the surface with a spatula.
Return the mold to the freezer.
Freeze for another 30–45 minutes.
Step 9: Add the Chocolate Cake
Cut the cooled chocolate cake so that it fits the top of the mold.
Place the cake over the ice cream layer.
Press very gently so it makes good contact with the ice cream.
If there are gaps, trim the cake as necessary.
Cover the top with the remaining plastic wrap.
Step 10: Freeze the Dessert
Place the entire mold in the freezer.
Freeze for at least 6–8 hours.
For the best results, freeze overnight.
The dessert needs to be completely firm before removing it from the mold.
Step 11: Prepare the Chocolate Coating
Place the chopped chocolate in a heatproof bowl.
Melt it gently over a double boiler or in short microwave intervals.
Stir after each interval.
Once smooth, add the coconut oil or butter.
Mix until glossy.
Allow the chocolate to cool slightly.
It should remain fluid but shouldn’t be hot.
Step 12: Remove the Ice Cream Trunk
Take the frozen dessert from the freezer.
Unwrap the top.
Carefully lift it out of the mold using the plastic wrap.
Place it on a chilled serving board or tray.
Remove the remaining plastic wrap.
If the dessert feels too hard to work with, allow it to sit at room temperature for approximately 3–5 minutes.
Step 13: Coat With Chocolate
Pour the melted chocolate over the frozen dessert.
Use a spatula to spread the chocolate across the top and sides.
The cold surface will cause the chocolate to firm up quickly.
You can create a smooth finish or use a fork to make textured lines resembling the surface of a wooden trunk.
Step 14: Decorate
Before the chocolate completely hardens, add your decorations.
Try using:
- Chocolate curls
- Chopped hazelnuts
- Almonds
- Chocolate shavings
- Cocoa powder
- Coffee beans
- Caramel drizzle
For an elegant finish, keep the decoration simple with chocolate curls and a light dusting of cocoa powder.
Step 15: Freeze Again
Return the finished Coffee and Chocolate Ice Cream Trunk to the freezer for approximately 30–60 minutes.
This allows the chocolate coating to set completely.
When ready to serve, allow it to sit at room temperature for approximately 5–10 minutes.
This makes slicing easier.
Tips for the Perfect Ice Cream Trunk
Use Cold Cream
Heavy cream should be thoroughly chilled before whipping.
Cold cream produces a thicker, more stable texture.
Don’t Overwhip
Stop whipping when the cream becomes thick and holds its shape.
Overwhipped cream can become grainy.
Cool Melted Chocolate
Always allow melted chocolate to cool slightly before adding it to whipped cream.
Hot chocolate can deflate the mixture.
Freeze Between Layers
Freezing briefly between layers makes it easier to create distinct coffee and chocolate layers.
Line the Mold Properly
Leave plenty of plastic wrap hanging over the sides.
This makes removing the frozen dessert much easier.
How to Get a Strong Coffee Flavor
Coffee can sometimes become less noticeable in frozen desserts.
For a stronger coffee flavor, use 2½–3 tablespoons instant espresso powder instead of regular instant coffee.
You can also add a small amount of coffee liqueur if you’re making an adult version.
For a family-friendly dessert, stick with espresso powder or instant coffee.
Coffee and Chocolate Ice Cream Trunk Variations
Mocha Ice Cream Trunk
Add extra espresso powder to the chocolate layer for an intense mocha flavor.
Hazelnut Chocolate Trunk
Add finely chopped toasted hazelnuts between the layers.
You can also add a thin layer of hazelnut spread.
Caramel Coffee Trunk
Drizzle caramel sauce over the coffee ice cream layer.
Make sure the caramel is completely cool before adding it.
White Chocolate Coffee Trunk
Replace part of the dark chocolate coating with melted white chocolate.
The contrasting colors create an elegant appearance.
Mint Chocolate Trunk
Add a small amount of peppermint extract to the chocolate ice cream layer.
Pair it with dark chocolate coating for a refreshing variation.
How to Serve
This dessert is best served slightly softened.
Remove it from the freezer approximately 5–10 minutes before slicing.
Use a sharp knife dipped briefly in hot water and wiped dry.
Slice into thick pieces.
Serve immediately.
A small drizzle of chocolate or caramel sauce can be added to each plate.
How to Store
Keep the Coffee and Chocolate Ice Cream Trunk tightly wrapped or stored in an airtight freezer-safe container.
It can be stored in the freezer for approximately 1–2 weeks for the best quality.
Make sure the dessert remains well covered to prevent freezer burn and unwanted odors from affecting the flavor.
Can You Make It Ahead?
Absolutely.
This is an excellent make-ahead dessert.
You can prepare the entire dessert 1–2 days before serving.
In fact, making it ahead is recommended because it gives all the layers enough time to freeze completely.
Frequently Asked Questions
Can I use store-bought ice cream?
Yes.
For a faster version, use good-quality coffee and chocolate ice cream.
Simply layer them with the chocolate cake and freeze until firm.
Do I need a special mold?
No.
A loaf pan or rectangular baking dish works perfectly.
Can I skip the cake?
Yes.
You can make this dessert entirely from alternating coffee and chocolate ice cream layers.
However, the cake provides a delicious soft texture that contrasts with the frozen layers.
How long should the dessert freeze?
At least 6–8 hours, although overnight is best.
Why is my ice cream layer icy?
Too much liquid can create ice crystals.
Use concentrated coffee rather than a large amount of brewed coffee, and make sure your cream is properly whipped.
Recipe at a Glance
Recipe: Coffee and Chocolate Ice Cream Trunk
Prep Time: 45 minutes
Bake Time: 10–14 minutes
Freezing Time: 6–8 hours
Total Time: Approximately 8 hours
Servings: 10–12
Course: Dessert
Method: Frozen dessert
Main Flavors: Coffee, chocolate, cream, vanilla