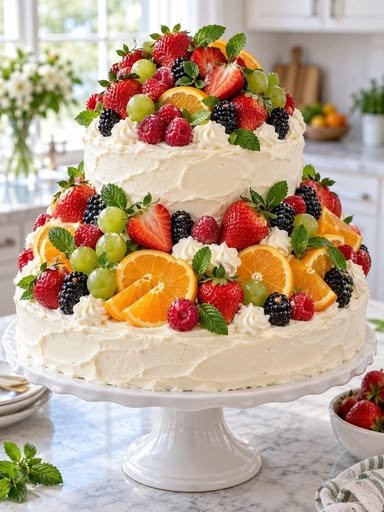
Nothing says celebration quite like a tall, elegant cake covered with clouds of vanilla cream and colorful fresh fruit. This Two-Tier Fresh Fruit & Vanilla Cream Celebration Cake combines light and fluffy vanilla sponge layers with a creamy vanilla filling and plenty of juicy strawberries, kiwi, blueberries, mango, and other seasonal fruit.
The two-tier design makes this cake look impressive enough for birthdays, anniversaries, showers, family gatherings, and special celebrations, while the fresh fruit keeps it lighter and more refreshing than a traditional buttercream cake.
The secret to a beautiful fruit cake is simple: bake soft, sturdy sponge cakes, chill the cream well, and make sure the fruit is thoroughly dried before decorating.
Why You’ll Love This Celebration Cake
- Light and fluffy homemade vanilla sponge
- Creamy vanilla filling without heavy buttercream
- Plenty of fresh fruit in every layer
- Beautiful two-tier presentation
- Perfect for birthdays and special occasions
- Can be customized with your favorite seasonal fruits
- Fresh, colorful, and refreshing
Ingredients
For the Vanilla Sponge
Large Tier
- 2½ cups all-purpose flour
- 2½ teaspoons baking powder
- ¼ teaspoon salt
- ¾ cup unsalted butter, softened
- 1½ cups granulated sugar
- 4 large eggs
- 2 teaspoons vanilla extract
- 1 cup whole milk
Small Tier
- 1½ cups all-purpose flour
- 1½ teaspoons baking powder
- Pinch of salt
- ½ cup unsalted butter, softened
- ¾ cup granulated sugar
- 3 large eggs
- 1½ teaspoons vanilla extract
- ½ cup whole milk
For the Vanilla Cream
- 3 cups cold heavy whipping cream
- ½ cup powdered sugar
- 2 teaspoons vanilla extract
- 4 ounces softened cream cheese, optional
- 1 tablespoon instant vanilla pudding powder, optional, for extra stability
For the Fruit Filling and Decoration
Use a colorful mixture of:
- 2 cups strawberries, sliced
- 1 cup blueberries
- 2 kiwis, peeled and sliced
- 1 cup mango, diced or thinly sliced
- ½ cup raspberries
- ½ cup grapes, halved
- Fresh cherries, optional
- Additional fruit for the top
You do not need to use every fruit listed. Choose approximately 4–6 varieties that are fresh and colorful.
Optional Simple Syrup
- ½ cup water
- ½ cup granulated sugar
- ½ teaspoon vanilla extract
How to Make the Cake
1. Prepare the Cake Pans
Preheat the oven to 350°F (175°C).
Grease and line the bottoms of two cake pans for the large tier and two smaller pans for the upper tier.
A practical combination is:
- Two 8-inch pans for the bottom tier
- Two 6-inch pans for the top tier
You can adjust the sizes depending on how many guests you’re serving.
2. Mix the Dry Ingredients
For each cake size, whisk together the flour, baking powder, and salt.
Set aside.
3. Cream the Butter and Sugar
Beat the softened butter and sugar until pale, light, and fluffy.
This usually takes about 3–4 minutes.
Properly creaming the butter and sugar helps create a lighter cake texture.
4. Add the Eggs
Add the eggs one at a time, beating well after each addition.
Mix in the vanilla extract.
If the mixture looks slightly curdled, don’t worry. It will come together when the flour is added.
5. Add the Flour and Milk
Add the dry ingredients in three additions, alternating with the milk.
Begin and end with the dry ingredients.
Mix only until the batter is smooth. Avoid overmixing.
6. Bake the Sponge Cakes
Divide the batter evenly between the prepared pans.
Bake until the tops are lightly golden and a toothpick inserted into the center comes out clean.
The larger cakes generally take around 25–32 minutes, while the smaller cakes may take around 20–26 minutes.
Because ovens and pan depths vary, begin checking a few minutes before the expected baking time.
Allow the cakes to cool in their pans for about 10 minutes, then transfer them to a wire rack.
Cool completely before filling.
7. Prepare the Vanilla Cream
Make sure the heavy cream is thoroughly chilled.
Beat the cream, powdered sugar, and vanilla on medium speed until soft peaks form.
If using cream cheese, beat it separately until smooth, then gently incorporate it into the whipped cream.
For extra stability, you can add the optional instant vanilla pudding powder while whipping.
Stop once the cream reaches firm peaks.
Do not overwhip, or the cream can become grainy.
8. Prepare the Fruit
Wash the fruit and dry it thoroughly.
This step is extremely important.
Excess moisture can make the cream watery and cause the cake layers to slide.
Slice the strawberries and kiwi, dice the mango, and prepare the remaining fruit.
Keep some of the prettiest pieces aside for the final decoration.
9. Prepare the Simple Syrup
For a moister sponge, combine the water and sugar in a small saucepan.
Heat until the sugar dissolves.
Remove from the heat and stir in the vanilla.
Cool completely before using.
Brush or lightly drizzle the syrup over the cake layers. Don’t soak them excessively.
10. Assemble the Bottom Tier
Place one large cake layer on a cake board or serving plate.
Spread a layer of vanilla cream over the top.
Arrange sliced strawberries, kiwi, mango, and blueberries over the cream.
Add another thin layer of cream to help hold the fruit in place.
Place the second cake layer on top.
Cover the top and sides with a thin layer of vanilla cream.
Refrigerate while preparing the upper tier.
11. Assemble the Smaller Tier
Repeat the same process with the smaller cake layers.
Add cream and fresh fruit between the layers, then cover the outside with a smooth layer of vanilla cream.
Chill the smaller cake until firm.
12. Stack the Two Tiers
This step requires a little care.
Place the large tier on its final cake board.
Insert food-safe cake dowels into the bottom tier, positioned underneath the area where the smaller tier will sit.
Trim the dowels so they are level with the surface of the cake.
Place a small cake board underneath the chilled upper tier.
Carefully position it on top of the supported bottom tier.
The dowels provide support and help prevent the upper cake from sinking into the lower cake.
For a taller or heavier cake, use an appropriate central support system designed for tiered cakes.
13. Decorate With Fresh Fruit
Now comes the fun part.
Arrange strawberries, blueberries, kiwi, mango, raspberries, grapes, and other fruit around the top of the cake.
You can create:
- A cascading fruit design
- A fruit crown around the top
- A simple half-moon arrangement
- A colorful border around each tier
For a more elegant appearance, keep the fruit arrangement intentional rather than covering every inch of the cake.
Add a few small mint leaves if desired.
Tips for the Best Two-Tier Fruit Cake
Dry the Fruit Thoroughly
Water is one of the biggest enemies of whipped cream cakes.
After washing the fruit, pat it dry carefully with paper towels.
Chill Everything
Cold cream whips better and stays more stable.
Keep the cream, mixing bowl, and beaters cold before whipping.
Don’t Overfill the Cake
Fresh fruit contains moisture and can make the layers slippery. Use moderate amounts of fruit between the layers.
Chill Before Stacking
Both tiers should be firm and cold before you attempt to stack them.
Use Cake Boards and Dowels
Never place a heavy upper tier directly onto a soft cream-covered cake without proper support.
Choose Firm Fruit
Strawberries, blueberries, kiwi, mango, grapes, and raspberries work beautifully.
Avoid very watery or extremely soft fruit in large quantities.
Fruit Combinations to Try
Classic Berry
- Strawberries
- Blueberries
- Raspberries
- Blackberries
Tropical
- Mango
- Pineapple
- Kiwi
- Strawberries
Elegant Summer
- Strawberries
- Peaches
- Blueberries
- Raspberries
Mango Vanilla
Use diced mango and thin strawberry slices between the layers and decorate the top with mango fans.
Can I Make This Cake Ahead?
Yes.
The sponge layers can be baked 1–2 days ahead. Once completely cool, wrap them tightly and refrigerate.
The cake can be assembled several hours before serving.
For the freshest appearance, add delicate fruit decorations relatively close to serving time.
How to Store the Cake
Because this cake contains whipped cream and fresh fruit, keep it refrigerated.
Store covered in the refrigerator and ideally enjoy it within 1–2 days for the best texture and appearance.
Do not leave the finished cake at room temperature for extended periods, particularly in warm weather.
Frequently Asked Questions
Can I use store-bought cake layers?
Yes. If you’re short on time, prepared vanilla sponge layers can make assembly much faster.
Can I use regular whipped cream?
Yes, but stabilized whipped cream is preferable for a two-tier cake because it holds its shape better.
Can I make the cake without cream cheese?
Absolutely. The cream cheese is optional. A stabilized vanilla whipped cream works beautifully on its own.
Why is my fruit cake sliding?
Too much cream, wet fruit, warm cake layers, or insufficient chilling can cause sliding.
Make sure the sponge is completely cool, the fruit is dry, and the cake is well chilled before stacking.
Can I use frozen fruit?
Fresh fruit is strongly recommended for decoration. Frozen fruit releases extra moisture as it thaws and can make the cream and cake soggy.
Recipe at a Glance
Prep Time: 1 hour 15 minutes
Baking Time: 45–60 minutes total
Assembly Time: 45 minutes
Chilling Time: 2–4 hours
Servings: Approximately 18–24
Oven Temperature: 350°F (175°C)
Final Thoughts
This Two-Tier Fresh Fruit & Vanilla Cream Celebration Cake is a beautiful centerpiece for any special occasion. The soft vanilla sponge provides the perfect foundation for fluffy cream and juicy fruit, while the two-tier design gives the cake an elegant bakery-style appearance.
The key to success is patience: let the cakes cool completely, keep the cream chilled, dry the fruit well, and use proper support when stacking the tiers.
Once decorated with colorful fresh fruit, even a simple homemade cake can become a stunning celebration dessert.
SEO Title: Two-Tier Fresh Fruit & Vanilla Cream Celebration Cake
Meta Description: Make a stunning two-tier fresh fruit and vanilla cream celebration cake with fluffy vanilla sponge, creamy filling, and colorful seasonal fruit. Perfect for birthdays and special occasions.