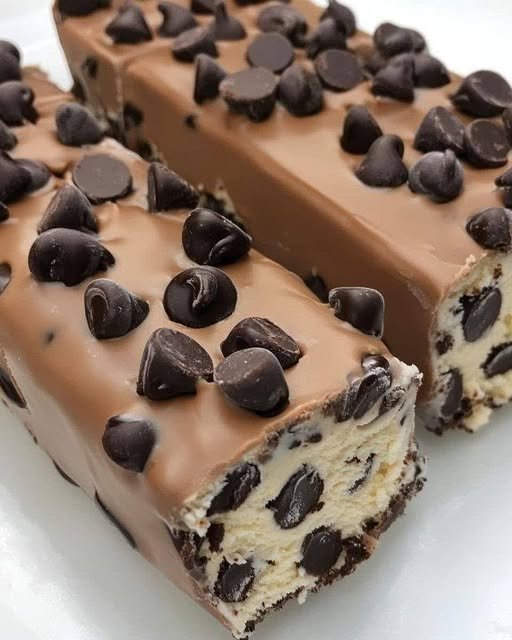
When you want a rich, creamy dessert without turning on the oven, these No-Bake Chocolate Chip Cheesecake Bars are exactly what you need. They combine a buttery cookie crust with a smooth cheesecake filling packed with mini chocolate chips, creating a dessert that tastes indulgent while being surprisingly easy to prepare.
There is no complicated water bath, no oven temperature to worry about, and no need to spend hours in the kitchen. Simply prepare the crust, whip together the creamy filling, fold in the chocolate chips, chill, slice, and enjoy.
These cheesecake bars are perfect for family gatherings, parties, holidays, potlucks, afternoon treats, or whenever you have a craving for cheesecake and chocolate.
Why You’ll Love These Cheesecake Bars
- No oven required
- Easy ingredients
- Creamy and smooth cheesecake filling
- Buttery cookie crust
- Plenty of chocolate chips in every bite
- Easy to make ahead
- Great for parties and gatherings
- Simple to slice and serve
- Perfect for chocolate and cheesecake lovers
Ingredients
For the Crust
- 2 cups graham cracker crumbs
- 1/2 cup unsalted butter, melted
- 2 tablespoons granulated sugar
- 1/4 teaspoon salt
For the Cheesecake Filling
- 16 ounces cream cheese, softened
- 3/4 cup powdered sugar
- 1 teaspoon vanilla extract
- 1 tablespoon lemon juice
- 1 cup heavy whipping cream, cold
- 1 cup mini chocolate chips
For the Topping
- 1/3 cup mini chocolate chips
- Chocolate shavings, optional
- Whipped cream, optional
How to Make No-Bake Chocolate Chip Cheesecake Bars
Step 1: Prepare the Pan
Line an 8×8-inch square baking pan with parchment paper, leaving some parchment hanging over the sides.
These overhanging edges will make it much easier to lift the chilled cheesecake out of the pan later.
Step 2: Make the Cookie Crust
Add the graham cracker crumbs, melted butter, sugar, and salt to a mixing bowl.
Stir until everything is evenly combined. The mixture should resemble damp sand and hold together when pressed.
Transfer the mixture to the prepared pan.
Use the bottom of a measuring cup, glass, or flat spatula to press the crust firmly and evenly into the bottom of the pan.
Place the crust in the refrigerator while you prepare the filling.
Step 3: Beat the Cream Cheese
Place the softened cream cheese in a large mixing bowl.
Beat it with an electric mixer until smooth and creamy.
Add the powdered sugar, vanilla extract, and lemon juice.
Continue mixing until the filling is smooth and completely free of lumps.
For the smoothest cheesecake, make sure the cream cheese is properly softened before mixing.
Step 4: Whip the Cream
In a separate bowl, pour in the cold heavy whipping cream.
Beat until stiff peaks form.
Be careful not to overbeat the cream, as it can eventually become grainy and start turning into butter.
Step 5: Combine the Filling
Gently fold the whipped cream into the cream cheese mixture.
Work slowly and carefully so you don’t lose too much of the air that gives the cheesecake filling its light, creamy texture.
Once combined, fold in 1 cup of mini chocolate chips.
Mini chocolate chips are ideal because they distribute throughout the filling instead of creating large, difficult-to-cut pieces.
Step 6: Assemble the Cheesecake Bars
Remove the crust from the refrigerator.
Spoon the cheesecake mixture over the chilled crust.
Spread it evenly using a spatula.
Sprinkle the remaining mini chocolate chips over the top.
For an extra chocolatey finish, add a few chocolate shavings if desired.
Step 7: Chill
Cover the pan and refrigerate for at least 6 hours, preferably overnight.
The cheesecake needs enough time to firm up properly.
Avoid trying to slice it too early, as the filling may still be too soft.
Step 8: Slice and Serve
Once completely chilled, use the parchment paper to carefully lift the cheesecake from the pan.
Place it on a cutting board.
For clean slices, use a sharp knife and wipe the blade clean between cuts.
Cut into squares or rectangular bars and serve chilled.
Tips for Perfect No-Bake Cheesecake Bars
Use Full-Fat Cream Cheese
Full-fat cream cheese generally gives the filling a richer flavor and firmer texture. Reduced-fat varieties can sometimes produce a softer filling.
Soften the Cream Cheese Properly
Cold cream cheese can leave lumps in your cheesecake mixture.
Allow it to soften at room temperature before beating.
Keep the Heavy Cream Cold
Cold heavy cream whips more effectively and helps create a stable, fluffy cheesecake filling.
Press the Crust Firmly
A loose crust can crumble when you lift or cut the bars. Press it firmly and evenly into the pan.
Don’t Rush the Chilling Time
This is one of the most important steps. Give the cheesecake plenty of time to set.
For the firmest bars, refrigerate overnight.
Use Mini Chocolate Chips
Mini chocolate chips are easier to distribute evenly throughout the filling and make the bars easier to cut.
How to Get Clean Cheesecake Slices
If you’re serving these at a party, presentation matters.
For neat slices:
- Chill the cheesecake thoroughly.
- Use a sharp knife.
- Dip the knife briefly into hot water.
- Wipe it completely dry.
- Make one clean cut.
- Wipe the blade and repeat.
This simple technique helps create smooth, bakery-style edges.
Delicious Variations
Chocolate Cookie Crust
Replace the graham cracker crumbs with crushed chocolate sandwich cookies for an extra chocolate-heavy dessert.
Peanut Butter Chocolate Chip Bars
Add 1/3 cup smooth peanut butter to the cream cheese mixture before folding in the whipped cream.
White Chocolate Version
Replace some or all of the regular chocolate chips with white chocolate chips.
Mint Chocolate Cheesecake Bars
Add a small amount of peppermint extract to the filling and use chocolate chips for a refreshing chocolate-mint combination.
Caramel Chocolate Chip Bars
Drizzle a little caramel sauce over the chilled cheesecake before serving.
Double Chocolate Version
Add a few tablespoons of unsweetened cocoa powder to the cream cheese mixture for a chocolate cheesecake filling.
Can I Make These Cheesecake Bars Ahead of Time?
Yes. These bars are particularly convenient for entertaining because they need time to chill.
You can prepare them the day before serving and keep them refrigerated until you’re ready to slice them.
In fact, allowing them to chill overnight can make them easier to cut and serve.
Storage
Store leftover cheesecake bars in an airtight container or cover the pan tightly with plastic wrap.
Keep refrigerated for up to 4–5 days.
Because the filling contains dairy, don’t leave the bars sitting at room temperature for extended periods.
Can You Freeze No-Bake Cheesecake Bars?
Yes.
For longer storage, place the fully chilled cheesecake bars in a freezer-safe container.
You can freeze the whole cheesecake before slicing or freeze individual portions.
For best texture, allow frozen bars to thaw gradually in the refrigerator.
Avoid repeatedly freezing and thawing the entire batch.
Frequently Asked Questions
Why didn’t my cheesecake set?
The most common reasons are insufficient chilling time, overly soft ingredients, or whipped cream that wasn’t whipped enough. Make sure the cheesecake has several hours to chill before slicing.
Can I use regular-size chocolate chips?
Yes, but mini chocolate chips are easier to mix into the filling. Regular chips can also make slicing slightly more difficult.
Can I use homemade whipped cream?
Absolutely. Freshly whipped heavy cream works beautifully in this recipe.
Can I make these without lemon juice?
Yes. Lemon juice adds a subtle brightness to balance the richness, but you can leave it out if preferred.
Can I use a different pan?
Yes. A 9-inch square pan will produce slightly thinner bars. You can also use a rectangular pan, although the thickness and chilling time may vary.
Do I have to use graham crackers?
No. Crushed digestive biscuits, vanilla cookies, or chocolate cookies can all be used to create different crust flavors.
Serving Ideas
Serve these cheesecake bars straight from the refrigerator for the best texture.
For a special presentation, top each piece with:
- A small swirl of whipped cream
- Extra mini chocolate chips
- Chocolate shavings
- A light drizzle of chocolate sauce
- Fresh berries
- Crushed cookies
They’re rich enough to stand alone, so even a simple garnish can make them look impressive.
Final Thoughts
These No-Bake Chocolate Chip Cheesecake Bars are proof that an impressive dessert doesn’t have to require complicated baking techniques. The buttery cookie crust, creamy cheesecake filling, and generous chocolate chips create an irresistible combination of textures and flavors.
The best part is how convenient they are. Prepare them ahead of time, let the refrigerator do the work, and you’ll have a chilled dessert ready whenever your guests arrive.
Whether you’re making them for a weekend family dessert or a special celebration, these cheesecake bars are an easy recipe you’ll want to make again and again.
Recipe at a Glance
Prep Time: 25 minutes
Chill Time: 6 hours
Total Time: About 6 hours 25 minutes
Servings: 12–16 bars
Category: Dessert
Method: No-bake
SEO Details
SEO Title: No-Bake Chocolate Chip Cheesecake Bars – Easy & Creamy Dessert
Meta Description: These easy No-Bake Chocolate Chip Cheesecake Bars feature a buttery cookie crust, creamy cheesecake filling, and plenty of mini chocolate chips. No oven required!
Focus Keyphrase: No-Bake Chocolate Chip Cheesecake Bars