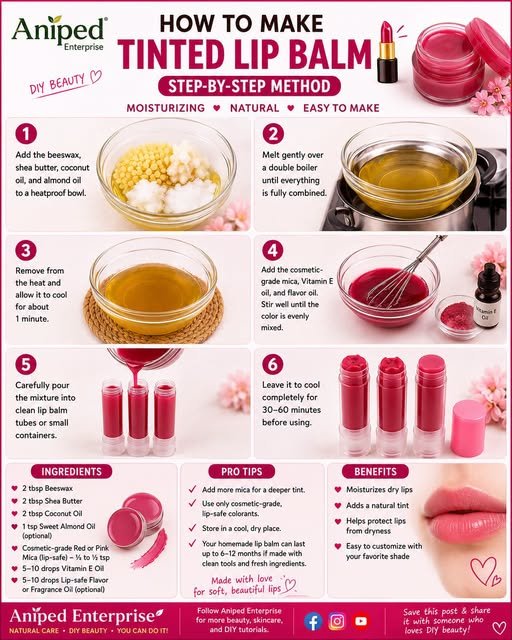
Want soft, moisturized lips with a natural touch of color without buying an expensive lip product? Making a simple tinted lip balm at home can be an easy and enjoyable DIY project.
With a few basic ingredients, you can create a moisturizing balm that gives your lips a subtle rosy or berry-colored tint. You can also adjust the amount of color depending on whether you prefer a barely-there tint or a slightly more noticeable shade.
The best part is that you can make a small batch in just a few minutes.
What Is a Tinted Lip Balm?
A tinted lip balm is a lip-care product that combines the moisturizing properties of a balm with a small amount of color.
Unlike a traditional lipstick, a homemade tinted balm generally provides a softer, more natural-looking finish. It can be especially convenient for everyday use when you want a little color without a heavy makeup look.
Ingredients You’ll Need
For a small batch, gather:
- 1 tablespoon shea butter
- 1 tablespoon coconut oil
- 1 teaspoon beeswax pellets
- A small amount of cosmetic-grade mica or lip-safe colorant
- 1–2 drops of vitamin E oil, optional
- A few drops of lip-safe flavoring, optional
About the Color
For the safest result, use cosmetic-grade color specifically labeled as safe for use on lips.
Do not use craft glitter, non-cosmetic pigments, crayons, or random powdered makeup products. Ingredients that are safe for skin or crafts are not necessarily suitable for use around the mouth.
You can choose a pink, rose, peach, berry, or red lip-safe pigment depending on the shade you want.
How to Make It
Step 1: Prepare Your Container
Wash and completely dry a small lip balm tube, cosmetic pot, or other suitable container.
Make sure everything that comes into contact with the balm is clean and dry.
Step 2: Melt the Base
Place the shea butter, coconut oil, and beeswax into a small heat-safe bowl.
Set the bowl over a saucepan containing a small amount of gently simmering water to create a simple double boiler.
Warm the mixture slowly, stirring occasionally, until everything has melted.
Avoid overheating the ingredients.
Step 3: Add the Tint
Remove the melted mixture from the heat.
Add a very small amount of your lip-safe colorant and stir thoroughly.
Start with less color than you think you’ll need. You can always add a little more, but adding too much can make the balm overly pigmented.
Mix until the color is evenly distributed and no visible clumps remain.
Step 4: Add Optional Ingredients
If desired, stir in a drop or two of vitamin E oil.
You can also add a small amount of lip-safe flavoring, but make sure the ingredient is specifically intended for cosmetic or lip use.
Step 5: Pour Into the Container
Carefully pour the warm mixture into your clean container.
Allow it to cool undisturbed at room temperature until it becomes firm.
For a faster set, you can place it in the refrigerator for a short time.
How to Customize the Color
One of the nicest things about making your own tinted balm is being able to adjust the shade.
For a soft pink tint, use a very small amount of pink pigment.
For a rosy shade, add slightly more pink or combine pink with a tiny amount of red.
For a berry tone, choose a lip-safe berry or mauve pigment.
For a peachy tint, use a lip-safe peach or warm-toned pigment.
Always test a tiny amount first before making a larger batch.
How to Apply Homemade Tinted Lip Balm
Apply a thin layer directly to clean lips.
For a very natural look, use one layer. If you want more color, allow the first layer to settle and apply another thin layer.
You can also apply it over lipstick to add moisture and a softer finish.
Important Safety Tips
Because this product is intended for use on the lips, ingredient safety is especially important.
- Use only ingredients intended for cosmetic use.
- Make sure pigments are specifically approved or labeled for lip use.
- Avoid using craft glitter or non-lip-safe pigments.
- Do not use the balm if it causes burning, itching, swelling, or irritation.
- Perform a small skin patch test with unfamiliar ingredients before regular use.
- Keep water and moisture out of the container because homemade products without preservatives can spoil more easily.
- Make small batches rather than storing homemade balm for a long time.
- Keep the container clean and tightly closed.
If you have sensitive skin or known cosmetic allergies, choose ingredients carefully and stop using the product if irritation develops.
How Long Does Homemade Lip Balm Last?
The shelf life depends on the freshness and stability of the ingredients you use, as well as how cleanly the balm is prepared and stored.
Store the finished balm in a cool, dry place away from direct sunlight and heat. If you notice an unusual smell, change in texture, discoloration, or any sign of contamination, discard it.
Final Thoughts
Making a simple tinted lip balm at home is an easy way to create a personalized lip product with a soft hint of color.
With shea butter, coconut oil, beeswax, and a lip-safe cosmetic pigment, you can create a moisturizing balm and customize the shade to suit your preference.
Start with a small batch and a small amount of pigment. Once you find the texture and color you like, you can experiment with different shades and adjust the formula to create your own everyday lip balm.