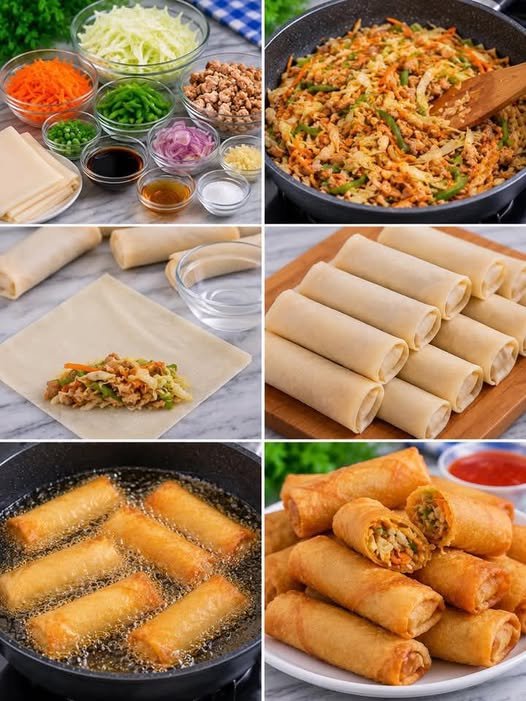
Crispy Chicken Spring Rolls are one of those irresistible appetizers that disappear almost as soon as they hit the table. Each spring roll is filled with tender seasoned chicken, crunchy vegetables, and aromatic spices, then wrapped in a thin pastry and fried until perfectly golden and crisp.
They make a wonderful appetizer for parties, family dinners, gatherings, or snack time. You can also prepare them ahead of time and freeze them, making them especially convenient when you need something quick and delicious.
The secret to really crispy spring rolls is keeping the filling relatively dry and allowing it to cool completely before wrapping. When the rolls hit the hot oil, the wrappers quickly become beautifully crisp while the savory filling stays tender and flavorful inside.
Why You’ll Love These Chicken Spring Rolls
- Crispy and golden on the outside
- Tender, flavorful chicken filling
- Packed with crunchy vegetables
- Easy to prepare ahead
- Perfect for parties and gatherings
- Freezer-friendly
- Delicious with sweet chili or garlic dipping sauce
Ingredients
For the Chicken Filling
- 2 cups cooked chicken, finely shredded
- 1 tablespoon vegetable oil
- 2 cloves garlic, minced
- 1 teaspoon freshly grated ginger
- 1 small onion, finely chopped
- 1 cup shredded cabbage
- 1/2 cup shredded carrots
- 1/2 cup thinly sliced bell pepper
- 2 green onions, finely sliced
- 1 tablespoon soy sauce
- 1 teaspoon sesame oil
- 1/2 teaspoon black pepper
- 1/2 teaspoon paprika
- 1/4 teaspoon salt, or to taste
- 1/2 teaspoon red chili flakes, optional
For the Spring Rolls
- 12–15 spring roll wrappers
- 2 tablespoons all-purpose flour
- 3 tablespoons water
- Vegetable oil, for deep frying
How to Make Crispy Chicken Spring Rolls
1. Prepare the Chicken
If you’re starting with raw chicken, cook it thoroughly first, then allow it to cool slightly before shredding or finely chopping it.
You can use cooked chicken breast or chicken thighs. Thigh meat tends to be slightly juicier, while breast meat gives you a leaner filling.
2. Cook the Aromatics
Heat 1 tablespoon of oil in a large skillet or wok over medium-high heat.
Add the chopped onion and cook for 2–3 minutes until it begins to soften.
Add the minced garlic and grated ginger.
Stir-fry for about 30 seconds until fragrant.
3. Add the Vegetables
Add the shredded cabbage, carrots, bell pepper, and green onions.
Increase the heat slightly and stir-fry for 2–4 minutes.
The vegetables should remain slightly crisp rather than becoming completely soft.
4. Season the Filling
Add the shredded chicken, soy sauce, sesame oil, paprika, black pepper, salt, and chili flakes if using.
Toss everything together and cook for another 2–3 minutes.
The filling should be flavorful but relatively dry.
This is important because excess moisture can make spring rolls soggy or cause them to burst during frying.
5. Cool the Filling
Transfer the filling to a wide plate or bowl.
Spread it out slightly and allow it to cool completely before wrapping.
Never fill spring roll wrappers with very hot filling because the heat and moisture can soften the wrappers and make them difficult to seal.
Make the Sealing Paste
Mix the flour and water together in a small bowl to create a thick paste.
This will be used to seal the edges of the spring rolls.
How to Roll Spring Rolls
Place one spring roll wrapper on a clean surface with one corner pointing toward you.
Add approximately 2 tablespoons of filling near the lower center of the wrapper.
Fold the bottom corner over the filling.
Fold the left and right corners toward the center.
Roll the spring roll upward tightly, keeping the filling compact.
Brush a little flour paste along the final corner and press firmly to seal.
Repeat with the remaining wrappers and filling.
Avoid overfilling the wrappers because this can make them difficult to roll and may cause them to split during frying.
Fry the Spring Rolls
Heat enough vegetable oil in a deep pan to completely submerge the spring rolls.
Aim for approximately 350°F (175°C).
Carefully place several spring rolls into the hot oil without overcrowding the pan.
Fry for approximately 3–5 minutes, turning occasionally, until they are evenly golden brown and crisp.
Remove them with a slotted spoon or kitchen tongs.
Place them on a wire rack or paper towels to drain excess oil.
For the crispiest result, a wire rack is preferable because it allows air to circulate underneath the spring rolls.
How to Make Extra-Crispy Spring Rolls
Keep the filling dry
This is the most important tip. Cook the vegetables over fairly high heat so excess moisture evaporates.
Cool the filling completely
Warm filling can soften the wrappers before they reach the oil.
Don’t overfill
A modest amount of filling creates a tighter roll and helps prevent splitting.
Seal properly
Make sure the final corner is firmly sealed with flour paste.
Maintain the oil temperature
Oil that is too cool can make the wrappers greasy. Oil that is too hot can brown the outside before the filling is properly heated.
Don’t overcrowd the pan
Adding too many spring rolls at once can lower the oil temperature dramatically.
Air Fryer Method
For a lighter cooking option, brush or spray the assembled spring rolls lightly with oil.
Place them in a single layer in an air fryer basket.
Cook at 375°F (190°C) for approximately 8–12 minutes, turning halfway through.
Cooking times vary between air fryers, so watch them closely toward the end.
Oven-Baked Method
Preheat your oven to 425°F (220°C).
Place the spring rolls on a lightly greased or parchment-lined baking sheet.
Brush or spray them lightly with oil.
Bake for approximately 18–22 minutes, turning halfway through, until golden and crisp.
The texture may be slightly different from deep-fried spring rolls, but they can still become pleasantly crunchy.
Delicious Filling Variations
Chicken & Mushroom
Add finely chopped mushrooms and cook them until their moisture has completely evaporated.
Spicy Chicken
Add chili garlic sauce, red pepper flakes, or finely chopped fresh chili to the filling.
Chicken & Cheese
Add a small amount of shredded mozzarella or cheddar after removing the filling from the heat.
Chicken & Corn
Sweet corn pairs beautifully with the savory chicken and crunchy vegetables.
Garlic Chicken
Increase the garlic slightly and add a little extra black pepper for a simple, aromatic version.
Dipping Sauce Ideas
Serve your crispy chicken spring rolls with:
- Sweet chili sauce
- Garlic chili sauce
- Soy-ginger dipping sauce
- Honey garlic sauce
- Spicy mayonnaise
- Sweet-and-sour sauce
A combination of sweet chili sauce and a little fresh lime juice makes an especially simple dipping sauce.
Make-Ahead Instructions
Spring rolls are excellent for preparing ahead.
Assemble the uncooked spring rolls and place them in a single layer on a parchment-lined tray.
If stacking them, place parchment paper between the layers to prevent sticking.
Refrigerate for several hours before cooking.
For longer storage, freeze the uncooked spring rolls in a single layer until firm, then transfer them to a freezer-safe container or bag.
They can generally be cooked directly from frozen; simply allow additional cooking time.
Storage
Store leftover cooked spring rolls in an airtight container in the refrigerator for up to 3 days.
For the best texture, reheat them in an air fryer or oven rather than the microwave.
The microwave tends to soften the crispy wrapper.
Frequently Asked Questions
Can I use leftover chicken?
Absolutely. Leftover roasted, grilled, or poached chicken works perfectly as long as it is properly refrigerated and still fresh.
Why are my spring rolls not crispy?
The most common reasons are excess moisture in the filling, oil that is not hot enough, overcrowding the pan, or allowing the fried spring rolls to sit directly on a flat surface where steam gets trapped.
Can I freeze chicken spring rolls?
Yes. Freezing them uncooked is often the most convenient option. Freeze them individually first so they don’t stick together.
Can I use chicken thighs?
Yes. Chicken thighs provide a richer and more tender filling, while chicken breast gives a lighter result.
How do I prevent spring rolls from bursting?
Don’t overfill them, keep the filling relatively dry, roll them firmly, and seal the wrapper securely.
Recipe at a Glance
Prep Time: 25 minutes
Cook Time: 15 minutes
Total Time: About 40 minutes
Servings: 12–15 spring rolls
Cuisine: Asian-inspired
Category: Appetizer, Snack
Final Thoughts
These Crispy Chicken Spring Rolls combine everything you want in a great appetizer: a golden crunchy wrapper, juicy seasoned chicken, colorful vegetables, and plenty of savory flavor.
The key to making restaurant-style spring rolls at home is surprisingly simple: keep the filling dry, cool it completely, roll tightly, and maintain the correct frying temperature.
Serve them fresh and hot with your favorite dipping sauce, and they’re sure to become a favorite for parties, family dinners, and casual snack time.
SEO Title: Crispy Chicken Spring Rolls – Easy Homemade Recipe
Meta Description: Make crispy chicken spring rolls at home with tender chicken, crunchy vegetables, and a golden wrapper. Perfect for appetizers, parties, and snacks.