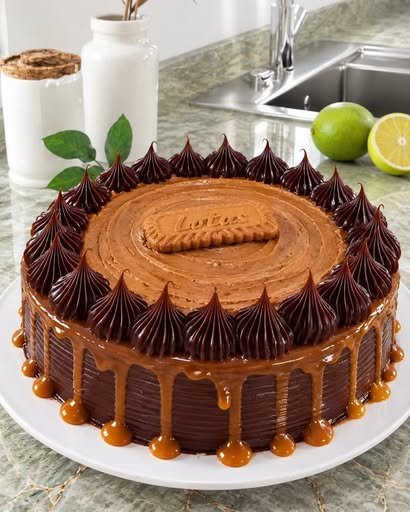
If you love the combination of rich chocolate and creamy Biscoff, this Chocolate Biscoff Drip Cake is the ultimate celebration dessert. It features soft, deeply chocolatey cake layers covered in silky Biscoff buttercream, finished with a smooth Biscoff drip and plenty of crushed Biscoff cookies.
The contrast is what makes this cake so irresistible: rich chocolate cake, sweet caramelized cookie butter, crunchy biscuit pieces, and a creamy frosting in every bite.
Despite its impressive appearance, the cake can be made at home with straightforward ingredients and a few simple decorating techniques.
Why You’ll Love This Cake
- Rich and moist chocolate cake
- Creamy Biscoff buttercream
- Smooth Biscoff drip
- Crunchy Biscoff cookie pieces
- Perfect for birthdays and celebrations
- Can be prepared ahead of time
- Beautiful bakery-style presentation
Ingredients
For the Chocolate Cake
- 2 cups all-purpose flour
- 1¾ cups granulated sugar
- ¾ cup unsweetened cocoa powder
- 2 teaspoons baking powder
- 1½ teaspoons baking soda
- ½ teaspoon salt
- 2 large eggs
- 1 cup buttermilk
- ½ cup vegetable oil
- 2 teaspoons vanilla extract
- 1 cup hot water or hot brewed coffee
For the Biscoff Buttercream
- 1 cup unsalted butter, softened
- 1½ cups smooth Biscoff cookie butter
- 3½ cups powdered sugar
- 1 teaspoon vanilla extract
- 3–5 tablespoons heavy cream or milk
- Pinch of salt
For the Biscoff Drip
- ¾ cup smooth Biscoff cookie butter
- 3 tablespoons heavy cream
For Decorating
- 10–12 Biscoff cookies
- ½ cup crushed Biscoff cookies
- Extra Biscoff cookie butter, optional
- Whole Biscoff cookies for the top
How to Make Chocolate Biscoff Drip Cake
Step 1: Prepare the Cake Pans
Preheat your oven to 350°F (175°C).
Grease three 8-inch round cake pans and line the bottoms with parchment paper.
If you only have two pans, bake the batter in batches rather than overcrowding the pans.
Step 2: Mix the Dry Ingredients
In a large bowl, whisk together:
- Flour
- Sugar
- Cocoa powder
- Baking powder
- Baking soda
- Salt
Mix thoroughly so the leavening agents and cocoa are evenly distributed.
Step 3: Add the Wet Ingredients
Add the eggs, buttermilk, vegetable oil, and vanilla.
Beat until the mixture is smooth.
Gradually pour in the hot water or hot coffee while mixing on low speed.
The batter will be quite thin. This is normal and helps create a moist chocolate cake.
Step 4: Bake
Divide the batter evenly among the prepared pans.
Bake for approximately 22–28 minutes, or until a toothpick inserted into the center comes out with a few moist crumbs.
Avoid overbaking because chocolate cake can become dry if left in the oven too long.
Allow the cakes to cool in their pans for about 10 minutes before transferring them to a wire rack.
Let them cool completely before decorating.
Make the Biscoff Buttercream
Place the softened butter in a large mixing bowl.
Beat for approximately 3–4 minutes until light and creamy.
Add the Biscoff cookie butter and continue beating until smooth.
Gradually add the powdered sugar, about ½ cup at a time.
Add the vanilla and a pinch of salt.
Pour in the heavy cream one tablespoon at a time until the frosting reaches a smooth, spreadable consistency.
Beat for another 2–3 minutes until fluffy.
Assemble the Cake
Place the first chocolate cake layer on a cake board or serving plate.
Spread a generous layer of Biscoff buttercream over the top.
Sprinkle a small amount of crushed Biscoff cookies over the frosting for extra texture.
Place the second cake layer on top.
Repeat with another layer of buttercream and cookie crumbs.
Add the final cake layer upside down so the top is as level as possible.
Apply the Crumb Coat
Cover the entire cake with a thin layer of Biscoff buttercream.
This first layer doesn’t need to look perfect. Its purpose is to trap loose cake crumbs.
Refrigerate for 20–30 minutes.
Add the Final Frosting
Apply another layer of Biscoff buttercream around the cake and across the top.
Use a cake scraper or offset spatula to smooth the sides.
Chill the cake again for about 20 minutes before adding the drip.
Make the Biscoff Drip
Place the Biscoff cookie butter and heavy cream in a microwave-safe bowl.
Heat in short intervals, stirring between each one, until smooth and fluid.
Don’t make the mixture extremely hot. It should be warm enough to flow but cool enough that it doesn’t melt the frosting.
Allow the drip to cool slightly if necessary.
Create the Drip Effect
Spoon a small amount of Biscoff drip near the edge of the chilled cake.
Allow it to gently run down the side.
Continue around the cake, creating drips of different lengths.
Once the edges are finished, spread the remaining Biscoff mixture over the center of the cake.
Smooth the top gently.
Decorate
Finish the cake with:
- Whole Biscoff cookies
- Crushed Biscoff crumbs
- Small buttercream swirls
- Additional cookie butter drizzle
For a simple bakery-style finish, pipe small swirls of Biscoff buttercream around the top edge and place half or whole Biscoff cookies between the swirls.
Tips for the Perfect Drip Cake
Cool the Cake Completely
Never frost a warm cake. Heat can soften the buttercream and make the layers slide.
Chill Before the Drip
A cold, firm frosting surface makes it much easier to control the drip.
Test the Drip First
Before decorating the entire cake, test one drip on the side.
If it runs too quickly, allow the mixture to cool.
If it barely moves, warm it slightly.
Don’t Make the Frosting Too Soft
If the buttercream is too soft, the cake can become difficult to decorate. Add a little more powdered sugar if necessary.
Level the Cake Layers
If your cake layers have domed tops, carefully trim them before assembling. Even layers make the finished cake much more stable.
Optional Chocolate Cake Soak
For an even moister cake, lightly brush each chocolate layer with a simple chocolate syrup before adding the buttercream.
Combine:
- ½ cup water
- ¼ cup sugar
- 1 tablespoon cocoa powder
Heat until the sugar dissolves, then cool completely.
Brush a small amount over each cake layer. Don’t oversaturate the cake.
Delicious Variations
Extra Chocolate Biscoff Cake
Add a thin layer of chocolate ganache between the cake layers before applying the Biscoff buttercream.
Biscoff Crunch Layer
Mix crushed Biscoff cookies with melted chocolate and spread a very thin layer between the cake layers. Let it firm up before assembling.
White Chocolate Biscoff Cake
Add a thin layer of melted white chocolate ganache beneath the Biscoff frosting for a sweeter, creamier flavor.
Mini Biscoff Drip Cakes
Divide the batter into smaller cake pans to create individual celebration cakes.
Make-Ahead Instructions
The chocolate cake layers can be baked 1–2 days ahead.
Wrap the completely cooled layers tightly in plastic wrap and refrigerate.
The Biscoff buttercream can also be prepared ahead and stored in an airtight container in the refrigerator.
Bring it back toward room temperature and beat again before decorating.
For the best presentation, assemble and decorate the cake the day before serving.
Storage
Store the finished cake covered in the refrigerator for up to 4–5 days.
Allow it to sit at room temperature for approximately 20–30 minutes before serving so the buttercream becomes soft and creamy.
The assembled cake can also be frozen, preferably without delicate cookie decorations, for up to 2 months. Wrap it securely and thaw overnight in the refrigerator.
Frequently Asked Questions
Can I use regular milk instead of buttermilk?
Yes. You can make a simple buttermilk substitute by adding about 1 tablespoon of lemon juice or vinegar to 1 cup of milk and letting it stand for 5–10 minutes.
Why is my chocolate cake batter so thin?
That’s normal for this style of chocolate cake. The hot water or coffee creates a thin batter that produces a moist, tender crumb after baking.
Can I use crunchy Biscoff spread?
Smooth Biscoff cookie butter is easier to use for the frosting and drip. Crunchy spread can still be used, but it will produce a different texture.
How do I get clean cake slices?
Chill the cake before cutting and use a large sharp knife. Wipe the blade clean between slices for neat layers.
Can I make this cake without coffee?
Absolutely. Use hot water instead. Coffee simply intensifies the chocolate flavor without necessarily making the cake taste like coffee.
Recipe at a Glance
Prep Time: 40 minutes
Bake Time: 22–28 minutes
Decorating Time: 30–45 minutes
Chilling Time: About 1 hour
Total Time: Approximately 2½ hours
Servings: 12–16 slices
Cake Size: Three 8-inch layers
Oven Temperature: 350°F (175°C)
Final Thoughts
This Chocolate Biscoff Drip Cake brings together two irresistible dessert flavors in one spectacular cake. The rich chocolate layers provide a deep cocoa base, while the creamy Biscoff buttercream adds its signature caramelized biscuit flavor.
The finishing touches—the glossy Biscoff drip and crunchy cookies—make it look special enough for a birthday, anniversary, holiday gathering, or any occasion where you want an impressive homemade dessert.
For the best texture, give the cake plenty of time to cool and chill before decorating. Once sliced, you’ll have beautiful layers of chocolate cake, creamy Biscoff frosting, and crunchy cookie goodness in every bite.
SEO Title: Chocolate Biscoff Drip Cake Recipe
Meta Description: Make a rich Chocolate Biscoff Drip Cake with moist chocolate layers, creamy Biscoff buttercream, a smooth cookie butter drip, and crunchy Biscoff cookies.