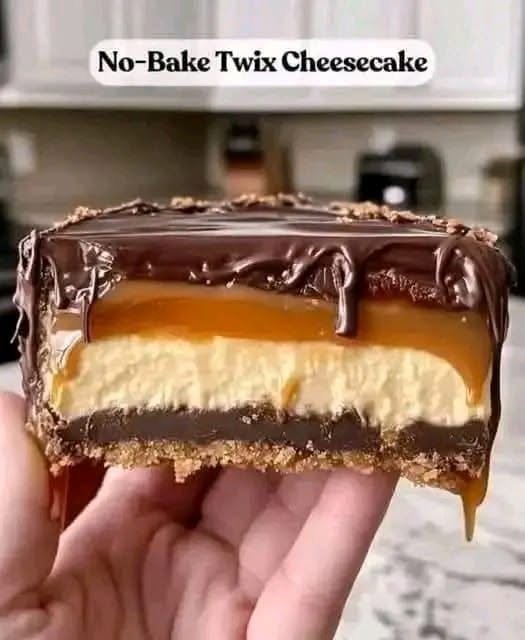
If you love the irresistible combination of chocolate, caramel, and crunchy cookies in a classic Twix bar, this Homemade No-Bake Twix Cheesecake is about to become one of your favorite desserts. It features a buttery graham cracker crust, a smooth chocolate layer, a light and creamy cheesecake filling, and generous ribbons of rich caramel sauce.
The best part? You don’t need to turn on your oven! This easy no-bake cheesecake comes together with simple ingredients and sets in the refrigerator, making it an excellent dessert for birthdays, holidays, family gatherings, potlucks, or a weekend treat.
Every slice delivers several delicious textures: a crisp cookie base, silky chocolate, fluffy cream cheese filling, and sweet caramel. Finish it with extra chocolate drizzle and chopped Twix bars for a dessert that looks as impressive as it tastes.
Why You’ll Love This No-Bake Twix Cheesecake
- No oven required: The refrigerator does the work of setting the cheesecake.
- Inspired by Twix candy bars: Chocolate, caramel, and cookie flavors come together in every bite.
- Rich and creamy texture: Cream cheese and whipped cream create a soft, luxurious filling.
- Perfect for entertaining: Prepare it ahead of time and serve it chilled when guests arrive.
- Easy to customize: Add chopped candy bars, extra caramel, or a chocolate ganache topping.
Ingredients
Serves 10–12
For the Graham Cracker Crust
- 2 cups graham cracker crumbs
- 1/2 cup unsalted butter, melted
For the Chocolate Layer
- 1 cup chocolate chips
- 1/2 cup heavy cream
For the Cheesecake Filling
- 2 cups cream cheese, softened to room temperature
- 1/2 cup powdered sugar
- 1 teaspoon vanilla extract
- 1 cup whipped cream, prepared and chilled
For the Caramel Layer
- 1 cup caramel sauce
Optional Toppings
- 2–3 Twix candy bars, chopped
- Extra caramel sauce for drizzling
- Melted chocolate for decoration
- Chocolate shavings or additional cookie crumbs
Ingredient tip: Use full-fat block cream cheese for the firmest, creamiest filling. If using store-bought whipped cream, choose a stabilized variety when possible. The recipe’s final texture will depend on the type of whipped cream and caramel sauce you use.
Kitchen Equipment
- 8- or 9-inch springform pan
- Mixing bowls
- Electric hand mixer or stand mixer
- Rubber spatula
- Measuring cups and spoons
- Microwave-safe bowl
- Offset spatula or the back of a spoon
A springform pan makes removing the cheesecake easier, but you can also use a deep dish lined with parchment paper if you prefer to serve it directly from the dish.
Instructions
Step 1: Prepare the Graham Cracker Crust
Place the graham cracker crumbs in a medium mixing bowl. Pour in the melted butter and stir until the crumbs are evenly coated and resemble damp sand.
Transfer the mixture to the bottom of your springform pan. Press it down firmly using the back of a spoon or the bottom of a flat measuring cup. Make the crust as even as possible, paying particular attention to the edges.
Refrigerate for at least 10–15 minutes while you prepare the chocolate layer.
Helpful tip: A firmly packed crust is less likely to crumble when you slice the cheesecake. If you prefer a thicker crust, reserve a small amount of crumbs to sprinkle over the finished dessert.
Step 2: Make the Chocolate Layer
Place the chocolate chips and heavy cream in a microwave-safe bowl.
Microwave in 20-second intervals, stirring thoroughly after each interval, until the chocolate has melted and the mixture is smooth. Avoid overheating, as chocolate can scorch or become grainy.
Allow the chocolate mixture to cool for a few minutes so it is warm rather than piping hot.
Pour it over the chilled graham cracker crust and spread it evenly with a spatula.
Return the pan to the refrigerator for approximately 15–20 minutes, or until the chocolate layer has started to firm up.
Important: The chocolate should not be extremely hot when added to the crust. Letting it cool slightly helps protect the crust and encourages a more even layer.
Step 3: Prepare the Creamy Cheesecake Filling
Place the softened cream cheese in a large mixing bowl. Beat with an electric mixer on medium speed until smooth and free of lumps.
Add the powdered sugar and vanilla extract. Continue beating until the mixture is creamy and evenly combined.
Scrape down the sides of the bowl as needed so that no pockets of cream cheese remain.
Add the prepared whipped cream and gently fold it into the cream cheese mixture using a rubber spatula. Use slow, sweeping movements to preserve the airy texture.
Continue folding until the filling looks smooth, light, and uniform.
Helpful tip: Make sure the cream cheese is softened before mixing. Cold cream cheese can leave small lumps that are difficult to remove once the whipped cream has been added.
Step 4: Add the Caramel Layer
Remove the cheesecake pan from the refrigerator.
Spoon approximately half of the caramel sauce over the chocolate layer, spreading it gently into a thin, even coating.
If the caramel sauce is very thick, allow it to sit at room temperature briefly so it becomes easier to spread. Avoid heating it until hot, as warm caramel can soften the chocolate layer and affect the filling.
Reserve the remaining caramel sauce for the top of the cheesecake.
Step 5: Add the Cheesecake Filling
Carefully spoon the cream cheese filling over the caramel layer.
Spread it evenly using an offset spatula or the back of a spoon. Work gently so you do not disturb the chocolate and caramel underneath.
Smooth the top to create an attractive finish.
If desired, drizzle a small amount of the reserved caramel sauce over the filling and gently swirl it with a toothpick for a decorative effect.
Step 6: Chill Until Firm
Cover the springform pan loosely with plastic wrap or another suitable cover.
Refrigerate the cheesecake for at least 6–8 hours, preferably overnight. This extended chilling time allows the filling to firm up and the different layers to settle.
Although the crust and chocolate layer need only a short initial chilling period, the completed cheesecake needs considerably longer to become sliceable.
Do not rush this step. Cutting the cheesecake too early may cause the filling to collapse or the layers to slide apart.
Step 7: Decorate the Cheesecake
Once the cheesecake is fully chilled, carefully release the sides of the springform pan.
Drizzle the remaining caramel sauce over the top in thin ribbons. Add melted chocolate if desired, allowing it to cool slightly before decorating.
Scatter chopped Twix bars over the cheesecake, concentrating some pieces around the center and edges. You can also add chocolate shavings or a light sprinkle of graham cracker crumbs.
For the cleanest presentation, add the chopped candy bars shortly before serving so they retain their texture.
Step 8: Slice and Serve
Dip a sharp knife in warm water, wipe it dry, and cut the cheesecake into slices.
Repeat the process between cuts for neater edges. Serve each slice chilled, with additional caramel sauce if desired.
The finished dessert should have a buttery crust, a distinct chocolate layer, a smooth cheesecake center, and a delicious caramel finish.
Tips for the Best No-Bake Twix Cheesecake
Use room-temperature cream cheese. Softened cream cheese blends more smoothly and helps prevent lumps.
Choose the right whipped cream. Whip heavy cream to medium-stiff peaks before folding it into the filling if you are preparing it from scratch. Avoid overwhipping, which can make the texture grainy.
Let the chocolate cool slightly. Adding piping-hot chocolate to the crust can interfere with the texture and make assembly more difficult.
Chill overnight when possible. A full night’s refrigeration generally produces cleaner slices and a firmer filling.
Use a thick caramel sauce. A very runny sauce may seep between the layers. Choose a thick dessert caramel or caramel topping designed for cakes and cheesecakes.
Release the pan carefully. Run a thin knife around the edge before opening the springform clasp if the cheesecake appears to be sticking.
Keep the layers distinct. Allow the chocolate layer to firm before adding caramel and cheesecake filling. This helps prevent the layers from blending together.
Delicious Variations
1. Chocolate Cookie Crust
Replace the graham cracker crumbs with chocolate sandwich cookie crumbs. For a richer chocolate base, use the whole cookies and adjust the butter as needed according to their filling.
2. Extra Caramel Twix Cheesecake
For a stronger caramel flavor, add a thin caramel ribbon through the cheesecake filling before chilling. Avoid adding too much liquid caramel, as excess moisture can prevent the cheesecake from setting firmly.
3. Chocolate Ganache Topping
For an elegant finish, prepare a small batch of chocolate ganache using melted chocolate and warm cream. Let it cool until slightly thickened, then spread a thin layer over the chilled cheesecake.
Refrigerate briefly before adding caramel drizzle and chopped candy bars.
4. Mini No-Bake Twix Cheesecakes
Prepare the crust and filling in individual dessert cups or muffin liners. Add a little chocolate and caramel to each base, then divide the filling evenly among the portions.
Chill until firm. Individual desserts may set more quickly than a full-size cheesecake, although the time will depend on the container and filling depth.
5. Salted Caramel Twix Cheesecake
Add a small pinch of flaky sea salt to the caramel topping. The contrast between sweet caramel and salt creates a more balanced flavor.
6. Peanut Butter Chocolate Variation
Swirl a small amount of smooth peanut butter into the chocolate layer before it sets. Peanut butter pairs well with chocolate and caramel, creating a richer variation of the original dessert.
What to Serve With Twix Cheesecake
This cheesecake is rich and sweet, so it pairs well with simple drinks and fresh fruit.
- Fresh strawberries: Their slight tartness balances the caramel and chocolate.
- Fresh raspberries: A bright, fruity contrast to the creamy filling.
- Black coffee: Its bitterness complements the sweetness of the dessert.
- Unsweetened tea: A refreshing choice after a rich meal.
- Vanilla ice cream: Ideal if you want an extra-indulgent dessert, although it makes the serving richer.
For a party, arrange small cheesecake slices on a dessert platter with strawberries and a little extra caramel sauce on the side.
Storage and Make-Ahead Instructions
Refrigeration: Store the cheesecake covered in the refrigerator for up to 3–4 days. Keep it chilled between servings because the filling contains cream cheese and whipped cream.
Make ahead: Prepare the cheesecake the day before serving. Overnight chilling helps it become firmer and makes it easier to slice.
Freezing: For best results, freeze the cheesecake without delicate candy-bar decorations. Wrap individual slices or the whole cheesecake securely and freeze for up to 1 month for good quality.
Thawing: Thaw frozen cheesecake in the refrigerator overnight. Add fresh caramel drizzle and chopped Twix bars after thawing.
Food safety: Do not leave the cheesecake at room temperature for more than 2 hours, or more than 1 hour in temperatures above 90°F (32°C).
Frequently Asked Questions
Can I make this cheesecake without a springform pan?
Yes. Use a deep pie dish or another suitable serving dish. Line it with parchment paper if you want to lift out portions, although serving directly from the dish is often easier.
Why is my no-bake cheesecake too soft?
The filling may need more chilling time, the whipped cream may not have been whipped enough, or the ingredients may contain too much liquid. Refrigerate for longer before cutting. For future batches, use full-fat block cream cheese and properly whipped cream.
Can I use homemade caramel sauce?
Yes. Homemade caramel works well as long as it is thick enough to stay in place between the layers. Cool it completely before assembling the cheesecake.
Can I use whipped topping instead of whipped cream?
Yes. A prepared whipped topping can be folded into the cream cheese mixture, but the texture and sweetness may differ. The final setting time can also vary, so chill the cheesecake until firm.
Can I make this recipe gluten-free?
Yes. Use certified gluten-free graham-style crumbs or gluten-free cookies for the crust. Check the labels on your chocolate, caramel sauce, and candy-bar decorations to ensure they meet your dietary requirements.
Does this recipe need gelatin?
No. This version relies on chilled cream cheese, whipped cream, and sufficient refrigeration to help it set. However, the texture may be softer than a gelatin-stabilized cheesecake, particularly in warm conditions.
How can I get clean cheesecake slices?
Chill the cheesecake overnight, use a sharp knife dipped in warm water, wipe the blade between cuts, and avoid letting the cheesecake sit out too long before serving.
Final Thoughts
Homemade No-Bake Twix Cheesecake is a dreamy dessert for anyone who loves chocolate, caramel, and buttery cookies. With its crisp graham cracker crust, smooth chocolate layer, fluffy cheesecake filling, and sweet caramel topping, it transforms familiar candy-bar flavors into a beautiful homemade treat.
Because it can be prepared ahead of time without baking, it is especially convenient for celebrations and busy occasions. Give it plenty of time to chill, decorate it with chopped Twix bars, and serve each slice cold for the best texture and flavor.
Whether you make the classic version or experiment with chocolate cookie crumbs, salted caramel, or mini cheesecake cups, this dessert is sure to be a memorable addition to your dessert table.
SEO Details
SEO Title: Homemade No-Bake Twix Cheesecake Recipe
Meta Description: Make an easy no-bake Twix cheesecake with a buttery graham cracker crust, chocolate ganache, creamy cheesecake filling, and rich caramel topping.
Focus Keyword: Homemade No-Bake Twix Cheesecake
URL Slug: homemade-no-bake-twix-cheesecake
Related Keywords: no-bake Twix dessert, chocolate caramel cheesecake, easy no-bake cheesecake recipe, Twix candy bar cheesecake, caramel chocolate cheesecake, no-bake cheesecake with graham cracker crust