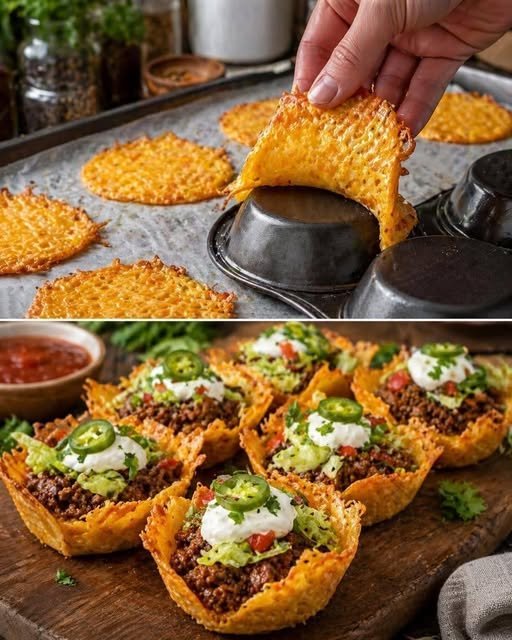
I don’t eat tacos anymore—because these Zero-Carb Taco Cups are too good to resist!
Forget traditional taco shells and flour tortillas. These fun Zero-Carb Taco Cups use crispy melted cheese as the shell, then fill each cup with juicy, seasoned ground beef and your favorite taco toppings.
They’re crunchy around the edges, cheesy in the center, and packed with savory taco flavor. Best of all, they’re incredibly simple to make and perfect for a quick lunch, easy dinner, party appetizer, or low-carb snack.
Why You’ll Love These Zero-Carb Taco Cups
- No flour tortillas or traditional taco shells
- Crispy, golden cheese cups
- Juicy and flavorful seasoned beef
- Easy to customize with your favorite toppings
- Great for low-carb and keto-style meals
- Perfect for parties and gatherings
- Ready with just a handful of ingredients
Ingredients
For the Cheese Cups
- 2 cups shredded cheddar cheese
- ½ cup shredded Monterey Jack or mozzarella cheese
- Nonstick cooking spray
For the Beef Filling
- 1 pound ground beef
- ½ small onion, finely diced
- 2 cloves garlic, minced
- 1 tablespoon taco seasoning
- ½ teaspoon smoked paprika
- ¼ teaspoon ground cumin
- ¼ teaspoon black pepper
- Salt, to taste
- 2 tablespoons water
- 1 tablespoon chopped fresh cilantro, optional
Optional Toppings
- Diced tomatoes
- Shredded lettuce
- Diced avocado
- Sour cream
- Jalapeños
- Chopped cilantro
- Diced red onion
- Salsa
- Shredded cheese
- Lime wedges
How to Make Zero-Carb Taco Cups
Step 1: Prepare the Oven
Preheat your oven to 375°F (190°C).
Lightly spray a muffin tin with nonstick cooking spray.
A regular muffin pan works perfectly for making individual taco cups.
Step 2: Make the Crispy Cheese Shells
Place small piles of shredded cheddar and Monterey Jack cheese onto a parchment-lined baking sheet.
Make each cheese circle approximately 4–5 inches wide, leaving some space between them.
Bake for about 5–7 minutes, or until the cheese has melted and the edges are golden brown.
Keep a close eye on the cheese because it can go from golden to overly browned quickly.
Step 3: Shape the Cheese Cups
Allow the melted cheese to cool for about 30–60 seconds, just until it is firm enough to handle but still flexible.
Carefully lift each cheese round with a spatula.
Place it over the bottom of an upside-down muffin tin or gently press it into the inside of a muffin cup to create a bowl shape.
Let the cheese cool completely until crisp.
Repeat with the remaining cheese.
Important Tip
Work quickly while the cheese is warm. Once it cools completely, it becomes crispy and much harder to shape.
Step 4: Cook the Beef
Heat a large skillet over medium-high heat.
Add the ground beef and cook, breaking it apart with a wooden spoon, until browned and cooked through.
Add the diced onion and cook for another 2–3 minutes until softened.
Add the minced garlic and cook for about 30 seconds.
Step 5: Season the Beef
Drain excess grease if necessary.
Add the taco seasoning, smoked paprika, cumin, black pepper, and salt.
Pour in 2 tablespoons of water and stir well.
Cook for another 2–3 minutes until the seasoning coats the beef and the mixture becomes flavorful and slightly juicy.
Remove from the heat and stir in fresh cilantro if desired.
Step 6: Fill the Taco Cups
Once the cheese cups have completely cooled and become crisp, carefully fill each one with the seasoned beef.
Don’t overfill them, especially if you’re adding several toppings.
Step 7: Add Your Favorite Toppings
Top the taco cups with your favorite ingredients.
Try a combination of:
- Sour cream
- Diced avocado
- Tomato
- Jalapeño
- Lettuce
- Red onion
- Cilantro
Serve immediately while the cheese cups are still crisp.
Tips for Perfect Cheese Taco Cups
Use Full-Fat Cheese
Cheese with a good fat content generally melts and crisps better for this recipe.
Don’t Make the Cheese Too Thin
Very thin cheese rounds can become fragile. Use enough cheese to create a sturdy cup.
Watch the Oven
Cheese can brown quickly. Start checking it after about 5 minutes.
Let the Cups Cool Completely
The cheese becomes significantly crispier as it cools. Don’t fill the cups while they’re still soft.
Keep the Beef Juicy but Not Watery
Excess liquid can make the crispy cheese shells soggy. Cook the beef until it is flavorful and moist but not swimming in sauce.
Add Wet Toppings Right Before Serving
Salsa, sour cream, and juicy tomatoes can soften the cheese if they sit inside the cups for too long.
Easy Variations
Chicken Taco Cups
Replace ground beef with cooked shredded chicken seasoned with taco seasoning, cumin, paprika, and garlic.
Spicy Beef Taco Cups
Add diced jalapeños, cayenne pepper, or crushed red pepper flakes to the beef.
Bacon Cheeseburger Taco Cups
Mix cooked crumbled bacon into the beef and use cheddar cheese for an extra-rich combination.
Chicken Fajita Cups
Fill the cheese cups with seasoned chicken, sautéed bell peppers, and onions.
Breakfast Taco Cups
Fill the crispy cheese shells with scrambled eggs, cooked bacon, and a little shredded cheese.
How to Serve Zero-Carb Taco Cups
These taco cups are excellent as an appetizer, snack, or main meal.
For dinner, serve them alongside:
- Fresh green salad
- Guacamole
- Avocado salad
- Roasted vegetables
- Cauliflower rice
- Cucumber salad
For parties, make smaller cheese cups and create a taco-cup bar with different toppings so everyone can build their own.
Storage
These taco cups are best eaten immediately because the cheese shells gradually lose their crispness when exposed to moisture.
If you have leftovers, store the cheese cups and beef separately in airtight containers in the refrigerator.
Reheat the beef separately and allow it to cool slightly before filling the cheese cups.
For the crispiest result, reheat the cheese cups briefly in an oven or air fryer rather than a microwave.
Frequently Asked Questions
Are these really zero-carb?
The cheese and beef themselves contain very little carbohydrate, but the exact carbohydrate content depends on the specific cheese, taco seasoning, and toppings you use. If you’re following a strict zero-carb diet, check the nutrition labels of all ingredients.
Can I use mozzarella instead of cheddar?
Yes. Mozzarella works well, although cheddar generally provides a stronger taco-style flavor and can crisp beautifully.
Can I make the cheese cups ahead of time?
Yes. Prepare the cheese cups in advance and store them in an airtight container once completely cooled. Keep them dry and fill them shortly before serving.
Why did my cheese cups become soft?
Moisture is usually the culprit. Make sure the beef isn’t overly watery and add wet toppings just before serving.
Can I use ground turkey?
Absolutely. Ground turkey or ground chicken can be used instead of beef. Add extra seasoning to ensure plenty of flavor.
Final Thoughts
These Zero-Carb Taco Cups are a fun twist on classic tacos. Instead of tortillas or traditional shells, crispy melted cheese creates a crunchy little cup for juicy, seasoned beef and your favorite toppings.
They’re quick, customizable, and perfect whenever you’re craving taco flavors without the usual flour or corn shell. Serve them fresh for the best crispy texture, and don’t be afraid to experiment with different cheeses and fillings.
SEO Details
SEO Title: Zero-Carb Taco Cups – Crispy Cheese & Juicy Beef Recipe
Meta Description: Make crispy Zero-Carb Taco Cups with melted cheese shells, juicy seasoned beef, and your favorite taco toppings. An easy low-carb and keto-friendly recipe.
Focus Keyword: Zero-Carb Taco Cups
Secondary Keywords: zero carb taco cups, cheese taco cups, low carb tacos, keto taco cups, crispy cheese tacos, ground beef taco cups, cheese shell tacos
Suggested URL Slug:
zero-carb-taco-cups
Excerpt:
Skip the traditional taco shells and make these crispy Zero-Carb Taco Cups instead! Golden melted cheese forms the shell around juicy seasoned beef for a delicious low-carb twist on taco night.