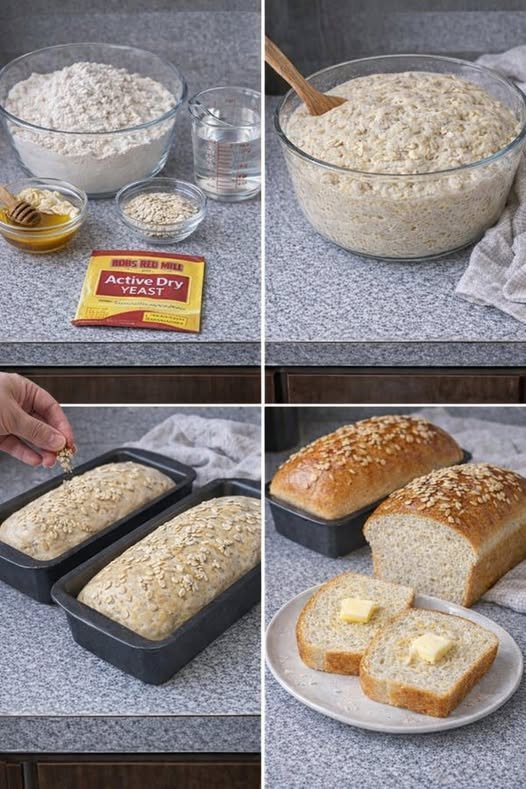
There is something incredibly satisfying about pulling a freshly baked loaf of homemade bread from the oven. This Amish White Bread is soft, fluffy, lightly sweet, and wonderfully buttery, with a tender crumb that makes it perfect for sandwiches, toast, or simply enjoying warm with a little butter.
What makes this recipe especially appealing is how simple the ingredients are. You don’t need special equipment or complicated bread-making techniques. With all-purpose flour, sugar, yeast, warm water, salt, and butter, you can make a beautiful homemade loaf right in your kitchen.
The secret to mastering Amish-style white bread is giving the dough enough time to rise and handling it gently. Once you understand those two steps, homemade bread becomes much easier.
Why You’ll Love This Amish White Bread
- Soft and fluffy texture
- Simple pantry ingredients
- Lightly sweet flavor
- Delicious fresh from the oven
- Excellent for sandwiches and toast
- Freezer-friendly
- No bread machine required
- Beginner-friendly recipe
Ingredients
For the Bread
- 4 cups all-purpose flour, plus extra for dusting
- 2 tablespoons sugar
- 1 tablespoon salt
- 1 packet (2¼ teaspoons) instant yeast
- 1½ cups warm water, about 110°F
- ¼ cup unsalted butter, melted
How to Make Amish White Bread
1. Prepare the Yeast Mixture
Pour the warm water into a large mixing bowl.
The water should feel warm but not hot, ideally around 110°F (43°C). Add the sugar and instant yeast.
Stir gently and let the mixture stand for about 5 minutes.
Instant yeast can generally be mixed directly with the flour, but briefly combining it with the warm water helps distribute it evenly through the dough.
2. Add the Flour and Salt
Add about 3½ cups of the flour and the salt to the bowl.
Mix with a wooden spoon or sturdy spatula until a shaggy dough begins to form.
Add the remaining flour gradually rather than adding all of it at once. Depending on the flour, humidity, and measuring method, you may not need every last bit.
3. Add the Melted Butter
Pour in the melted butter.
Mix until the butter is incorporated and the dough starts coming together.
The dough should be soft and slightly tacky but shouldn’t be excessively sticky.
If it feels very wet, add a little more flour, about 1 tablespoon at a time.
4. Knead the Dough
Lightly flour your work surface.
Transfer the dough to the surface and knead for approximately 8–10 minutes by hand.
Push the dough away from you with the heel of your hand, fold it back toward you, rotate it slightly, and repeat.
As you knead, the dough should become smoother and more elastic.
You can also use a stand mixer fitted with a dough hook and knead on low to medium-low speed for approximately 5–7 minutes.
5. Let the Dough Rise
Shape the dough into a ball.
Place it in a lightly greased bowl and turn it once so the surface is lightly coated.
Cover the bowl with a clean kitchen towel or plastic wrap.
Place it somewhere warm and allow the dough to rise for approximately 1–1½ hours, or until it has roughly doubled in size.
The exact rising time depends on the temperature of your kitchen.
6. Shape the Loaf
Once the dough has doubled, gently press it down to release excess air.
Transfer it to a lightly floured surface.
Shape the dough into a loaf by flattening it gently into a rectangle, folding the sides inward, and rolling it tightly from one end to the other.
Pinch the seam closed.
Place the shaped dough seam-side down into a greased 9×5-inch loaf pan.
7. Let It Rise Again
Cover the loaf loosely and allow it to rise again for approximately 30–45 minutes.
The dough should become noticeably puffy and rise above or close to the top edge of the loaf pan.
Don’t let it rise excessively, because an over-proofed loaf can collapse during baking.
8. Bake the Bread
Preheat your oven to 350°F (175°C).
Place the risen loaf in the center of the oven.
Bake for approximately 30–35 minutes, or until the top is golden brown and the loaf sounds hollow when gently tapped.
If the top begins browning too quickly, loosely cover it with aluminum foil during the final portion of baking.
9. Cool Before Slicing
Remove the bread from the oven and allow it to cool in the pan for about 5–10 minutes.
Carefully transfer it to a wire rack.
For the cleanest slices, allow the loaf to cool for at least 30–60 minutes before cutting.
It can be tempting to slice immediately, but allowing the interior to finish setting helps prevent a gummy texture.
How to Tell When Homemade Bread Is Done
There are several ways to check your loaf.
The crust should be golden brown, and the bread should sound hollow when tapped.
If you have an instant-read thermometer, the center of a fully baked sandwich loaf is generally around 190–200°F (88–93°C).
This is more reliable than judging the color of the crust alone.
Tips for Perfect Amish White Bread
Measure Flour Correctly
For the most consistent results, spoon flour into your measuring cup and level it off rather than packing it down.
Too much flour can make the bread dense and dry.
Don’t Make the Water Too Hot
Very hot water can damage yeast. Aim for warm water around 110°F.
Watch the Dough, Not Just the Clock
Rising times vary depending on room temperature.
A warm kitchen may produce a faster rise, while a cool kitchen can take considerably longer.
Don’t Add Too Much Flour
The dough should be soft and slightly tacky. Adding excessive flour during kneading can produce a heavy loaf.
Knead Until Smooth
Proper kneading develops gluten, which gives the bread structure and helps create its soft, stretchy texture.
Give It Enough Time to Rise
Under-proofed dough can produce a dense loaf. Look for the dough to become visibly puffy and approximately double during the first rise.
Let the Bread Cool
Cooling allows the crumb to finish setting and makes slicing much easier.
How to Get an Extra-Soft Loaf
For especially soft bread, avoid adding unnecessary flour during kneading.
You can also brush the freshly baked crust with a little melted butter immediately after removing the loaf from the oven.
This gives the crust a softer texture and adds a subtle buttery finish.
Delicious Ways to Serve Amish White Bread
Fresh Amish white bread is incredibly versatile.
Serve it with:
- Butter and honey
- Strawberry or raspberry jam
- Peanut butter
- Scrambled eggs
- Fried eggs
- Cheese
- Turkey and cheese
- Chicken salad
- Tuna salad
- Homemade soup
- Stews
- Breakfast sandwiches
For a simple treat, toast a thick slice and spread it with butter while it’s still warm.
Homemade French Toast
This bread is also excellent for French toast.
Thick slices absorb the egg mixture beautifully while remaining soft inside.
Dip slices in a mixture of eggs, milk, vanilla, and cinnamon, then cook in a buttered skillet until golden brown on both sides.
Serve with maple syrup and fresh fruit.
Homemade Garlic Toast
Slice the bread, spread with softened butter mixed with garlic and parsley, and toast until golden.
You can also add a little Parmesan cheese for an easy homemade garlic bread.
Storage
Once completely cooled, store the loaf in an airtight bag or container at room temperature.
For the best texture, enjoy it within approximately 2–3 days.
Avoid refrigerating homemade bread unless necessary, because refrigeration can cause bread to stale more quickly.
Can You Freeze Amish White Bread?
Yes.
Allow the loaf to cool completely, then wrap it tightly in plastic wrap or foil and place it in a freezer-safe bag.
Freeze for up to approximately 2–3 months for best quality.
You can freeze the entire loaf or slice it first so you can remove individual slices whenever needed.
Thaw at room temperature before serving.
Frequently Asked Questions
Can I use active dry yeast instead of instant yeast?
Yes. Active dry yeast can be used, although it may benefit from being dissolved in warm water before mixing with the remaining ingredients.
Why is my bread dense?
Dense bread can result from too much flour, insufficient kneading, inactive yeast, or inadequate rising time.
Make sure your yeast is fresh and allow the dough to rise until it is visibly doubled rather than relying only on a fixed time.
Why didn’t my dough rise?
The yeast may be old, the water may have been too hot or too cold, or the environment may have been too cool.
Move the covered dough to a comfortably warm, draft-free location and give it additional time.
Can I make this bread without a stand mixer?
Absolutely. This recipe is easy to knead by hand.
Can I use bread flour?
Yes. Bread flour can produce a slightly chewier loaf because of its higher protein content, while all-purpose flour produces a softer, tender sandwich-style bread.
Can I make rolls with this dough?
Yes. Divide the dough into smaller portions, shape into rolls, allow them to rise again, and bake until golden brown.
Can I add cinnamon or raisins?
Yes. For a sweeter variation, cinnamon, raisins, dried cranberries, or other additions can be incorporated during shaping.
Final Thoughts
Mastering Amish White Bread is all about understanding a few simple bread-making principles: use properly measured ingredients, keep the water warm rather than hot, knead the dough until smooth and elastic, and give it enough time to rise.
Once baked, you’ll have a soft, golden loaf with a tender interior and a lightly buttery flavor that’s far more satisfying than store-bought bread.
Whether you serve it alongside a bowl of soup, turn it into a sandwich, toast it for breakfast, or simply enjoy a warm slice with butter, this homemade loaf is a recipe worth keeping.
SEO Details
SEO Title: Mastering Amish White Bread – Soft & Fluffy Homemade Bread
Meta Description: Learn how to make soft, fluffy Amish White Bread with simple pantry ingredients, step-by-step instructions, helpful baking tips, and easy serving ideas.
Focus Keyword: Amish white bread
Slug: mastering-amish-white-bread
Category: Bread Recipes
Tags: Amish white bread, homemade white bread, soft white bread, easy bread recipe, homemade bread, sandwich bread, yeast bread, fluffy bread, baking recipes