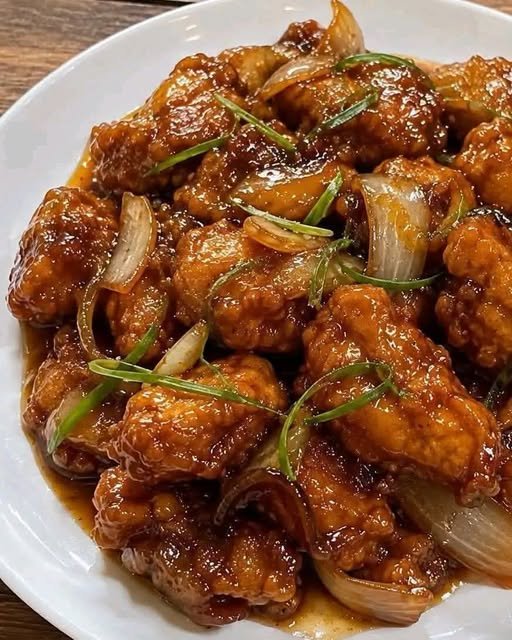
There’s something irresistible about perfectly crispy fried chicken coated in a rich, buttery sauce. This Crispy Fried Chicken with Butter Sauce combines juicy, tender chicken with a crunchy golden coating and a savory garlic butter sauce that adds incredible flavor to every bite.
The chicken is seasoned before being coated in a flavorful flour mixture and fried until crisp and golden. It is then finished with a buttery sauce made with garlic, herbs, and a touch of seasoning. Serve it with mashed potatoes, rice, fries, or a fresh salad for a satisfying family dinner.
Ingredients
For the Chicken
- 2 pounds boneless, skinless chicken thighs or chicken breasts
- 1 cup buttermilk
- 1 large egg
- 1 teaspoon salt
- 1/2 teaspoon black pepper
- 1 teaspoon paprika
- 1/2 teaspoon garlic powder
- 1/2 teaspoon onion powder
For the Crispy Coating
- 2 cups all-purpose flour
- 1/2 cup cornstarch
- 1 teaspoon paprika
- 1 teaspoon garlic powder
- 1 teaspoon onion powder
- 1 teaspoon dried oregano
- 1/2 teaspoon black pepper
- 1/2 teaspoon salt
- 1/4 teaspoon cayenne pepper, optional
For Frying
- Vegetable or canola oil, enough for frying
For the Butter Sauce
- 4 tablespoons unsalted butter
- 4 cloves garlic, minced
- 1 tablespoon fresh lemon juice
- 1 teaspoon Italian seasoning
- 1/4 teaspoon paprika
- 1/4 teaspoon red pepper flakes, optional
- 2 tablespoons chopped fresh parsley
- Salt and black pepper, to taste
Instructions
1. Marinate the Chicken
Cut the chicken into evenly sized pieces if necessary.
In a large bowl, whisk together the buttermilk, egg, salt, black pepper, paprika, garlic powder, and onion powder.
Add the chicken and toss until completely coated.
Cover and refrigerate for at least 30 minutes, or up to 8 hours for more flavorful and tender chicken.
2. Prepare the Crispy Coating
In a separate bowl, combine the flour, cornstarch, paprika, garlic powder, onion powder, oregano, black pepper, salt, and cayenne pepper.
Mix thoroughly so the seasonings are evenly distributed.
The cornstarch helps create a lighter, extra-crispy coating.
3. Coat the Chicken
Remove each piece of chicken from the buttermilk mixture, allowing excess marinade to drip off.
Place it into the seasoned flour mixture and press the coating firmly onto the chicken.
For an extra-crispy crust, dip the coated chicken briefly back into the buttermilk and then into the flour mixture again.
Place the coated pieces on a wire rack while you finish coating the remaining chicken.
4. Heat the Oil
Pour enough oil into a heavy-bottomed skillet or Dutch oven for the chicken to cook safely without overcrowding the pan.
Heat the oil to approximately 350°F (175°C).
Use a thermometer if possible to maintain a consistent frying temperature.
5. Fry the Chicken
Carefully place the chicken into the hot oil, working in batches so the pan isn’t overcrowded.
Fry until the coating is deep golden brown and the chicken is cooked through.
Cooking time will depend on the size and thickness of the pieces, but boneless pieces generally take around 5–8 minutes per side.
The chicken should reach an internal temperature of 165°F (74°C).
Transfer the cooked chicken to a wire rack set over a baking sheet to drain. Avoid placing it directly on paper towels if you want to preserve maximum crispiness.
6. Make the Butter Sauce
While the chicken rests, melt the butter in a clean skillet over medium-low heat.
Add the minced garlic and cook for about 30–60 seconds, stirring frequently. Do not allow the garlic to burn.
Add the lemon juice, Italian seasoning, paprika, and red pepper flakes.
Stir well and cook for another minute.
Taste and adjust the seasoning.
7. Combine
You can either drizzle the butter sauce directly over the crispy chicken or lightly toss the chicken in the sauce just before serving.
For the crispiest texture, drizzle the sauce over individual portions rather than coating the entire batch at once.
Finish with freshly chopped parsley.
Tips for Extra-Crispy Chicken
Use cornstarch:
Adding cornstarch to the flour mixture helps create a crispier crust.
Don’t overcrowd the pan:
Too many pieces at once can lower the oil temperature and result in greasy chicken.
Keep the oil temperature steady:
Aim for around 350°F (175°C). If the oil becomes too cool, the coating can absorb excess oil.
Use a wire rack:
Allowing the fried chicken to drain on a rack keeps hot air circulating underneath and helps preserve the crispy coating.
Don’t sauce too early:
Butter sauce can soften the crust if the chicken sits in it for too long. Drizzle just before serving.
Serving Suggestions
Serve this crispy chicken with:
- Creamy mashed potatoes
- French fries
- Buttered rice
- Coleslaw
- Corn on the cob
- Green beans
- Roasted vegetables
- Macaroni and cheese
- Fresh garden salad
- Garlic bread
A little extra butter sauce on the side is perfect for dipping.
Easy Variations
Spicy Butter Chicken
Add extra red pepper flakes or cayenne pepper to both the coating and butter sauce.
Honey Butter Chicken
Add 1 tablespoon of honey to the finished butter sauce for a sweet and savory glaze.
Parmesan Butter Chicken
Stir 2–3 tablespoons of finely grated Parmesan into the butter sauce just before serving.
Lemon Herb Chicken
Increase the lemon juice slightly and add fresh parsley, thyme, or oregano to the sauce.
Chicken Tenders
Use chicken tenderloins instead of larger pieces. They cook quickly and are especially convenient for serving children.
Storage and Reheating
Store leftover chicken in an airtight container in the refrigerator for up to 3–4 days.
For the best texture, reheat it in an oven or air fryer rather than the microwave.
Reheat at 375°F (190°C) until hot and crisp again. Add fresh butter sauce after reheating.
The chicken can also be frozen. Allow it to cool completely, place it in a freezer-safe container, and freeze for up to 2–3 months.
Final Thoughts
Crispy Fried Chicken with Butter Sauce brings together everything you want in a comforting chicken dinner: juicy meat, a crunchy golden crust, and a rich garlic butter sauce with a bright touch of lemon.
For maximum crispiness, keep the chicken and sauce separate until you’re ready to eat. Serve it alongside your favorite classic sides for an easy meal that is full of flavor.