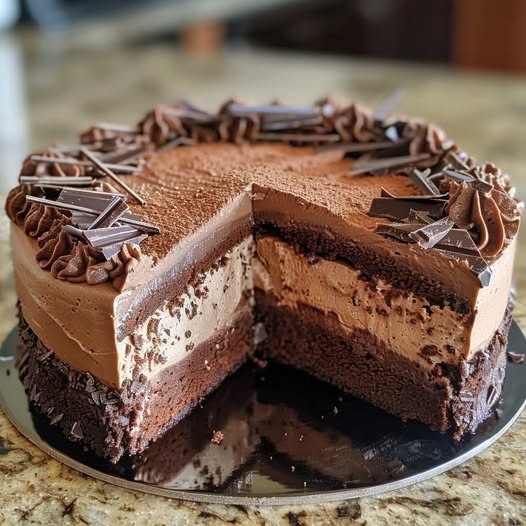
If you love rich chocolate desserts, this Multi-Layer Chocolate Mousse Cake is the kind of dessert that makes any occasion feel special. It combines a tender chocolate cake base with smooth layers of creamy chocolate mousse, creating a beautiful dessert with different textures in every bite.
Despite its impressive appearance, this cake is surprisingly manageable to make at home. The key is allowing each layer enough time to chill and set before adding the next one.
Ingredients
For the Chocolate Cake
- 1 cup all-purpose flour
- ½ cup unsweetened cocoa powder
- ¾ cup granulated sugar
- 1 teaspoon baking powder
- ½ teaspoon baking soda
- ¼ teaspoon salt
- 2 large eggs
- ½ cup buttermilk
- ¼ cup vegetable oil
- 1 teaspoon vanilla extract
- ½ cup hot water or hot coffee
For the Chocolate Mousse
- 2 cups heavy whipping cream, divided
- 8 ounces semi-sweet or dark chocolate, finely chopped
- ¼ cup powdered sugar
- 1 teaspoon vanilla extract
- 1 teaspoon unflavored gelatin
- 2 tablespoons cold water
For the Chocolate Ganache
- 4 ounces semi-sweet or dark chocolate, chopped
- ½ cup heavy cream
- 1 tablespoon butter
For Decoration
- Chocolate curls or shavings
- Cocoa powder
- Fresh berries, optional
- Whipped cream, optional
Step 1: Prepare the Chocolate Cake
Preheat your oven to 350°F (175°C). Grease an 8-inch round cake pan and line the bottom with parchment paper.
In a bowl, whisk together the flour, cocoa powder, sugar, baking powder, baking soda, and salt.
In another bowl, whisk the eggs, buttermilk, oil, and vanilla until smooth.
Add the wet ingredients to the dry ingredients and mix just until combined. Slowly pour in the hot water or coffee while stirring.
The batter will be relatively thin. That’s normal and helps create a moist chocolate cake.
Pour the batter into the prepared pan and bake for approximately 20–25 minutes, or until a toothpick inserted into the center comes out with a few moist crumbs.
Allow the cake to cool completely.
Step 2: Prepare the Chocolate Mousse
Place the chopped chocolate in a heatproof bowl.
Warm 1 cup of the heavy cream in a saucepan over medium-low heat until steaming, but don’t let it boil vigorously.
Pour the hot cream over the chocolate and let it sit for 2 minutes. Stir gently until the chocolate melts and the mixture becomes smooth.
Set aside to cool until it is slightly warm or close to room temperature.
Add the Gelatin
Place the gelatin in the cold water and let it sit for about 5 minutes to bloom.
Gently warm the bloomed gelatin until completely dissolved. Don’t boil it.
Stir the gelatin into the cooled chocolate mixture.
Whip the Cream
Beat the remaining 1 cup heavy cream with powdered sugar and vanilla until soft peaks form.
Carefully fold the whipped cream into the chocolate mixture in batches. Fold gently so you don’t lose too much air.
You should end up with a light, smooth chocolate mousse.
Step 3: Assemble the Cake
Place the cooled chocolate cake on a serving plate or inside an 8-inch springform pan.
If desired, place an acetate strip around the inside of the pan. This will make removing the finished cake much easier.
Spread approximately half of the chocolate mousse over the cake.
Smooth the surface with a spatula.
Place the cake in the refrigerator for 20–30 minutes to allow the first mousse layer to firm slightly.
Add the remaining mousse and smooth the top.
Refrigerate for at least 4–6 hours, preferably overnight.
Step 4: Make the Chocolate Ganache
Place the chopped chocolate in a heatproof bowl.
Heat the heavy cream until steaming and pour it over the chocolate.
Let it stand for 2 minutes, then stir slowly until smooth.
Add the butter and mix until glossy.
Allow the ganache to cool until it is thick enough to spread but still pourable.
Step 5: Finish the Cake
Remove the chilled cake carefully from the springform pan.
Pour the ganache over the top and gently spread it toward the edges. You can allow a little ganache to drip naturally down the sides for a dramatic finish.
Decorate with chocolate curls, chocolate shavings, cocoa powder, or a few fresh berries.
For the cleanest slices, refrigerate the cake for another 20–30 minutes before cutting.
Tips for the Best Chocolate Mousse Cake
Use good-quality chocolate
Because chocolate is the main flavor, the quality makes a noticeable difference. Semi-sweet chocolate gives a balanced flavor, while dark chocolate creates a richer, more intense dessert.
Don’t add hot chocolate to whipped cream
Allow the melted chocolate mixture to cool before folding it into the whipped cream. If it is too hot, it can melt the cream and make the mousse runny.
Fold gently
Use a spatula and gentle folding movements rather than vigorous stirring. This keeps the mousse light and airy.
Give it enough chilling time
Don’t rush the refrigeration stage. The mousse needs several hours to become firm enough to slice neatly.
Use a warm knife
For beautiful slices, dip a sharp knife in hot water, wipe it completely dry, and then cut the cake. Repeat between slices.
Easy Variations
Triple Chocolate Version
Use dark chocolate for the cake, milk chocolate for the mousse, and dark chocolate ganache for the topping.
White Chocolate Layer
Replace part of the chocolate mousse with white chocolate mousse to create contrasting layers.
Raspberry Chocolate Cake
Add a thin layer of raspberry preserves or fresh raspberries between the cake and mousse.
Coffee Chocolate Mousse
Add 1–2 teaspoons of instant espresso powder to the melted chocolate. Coffee enhances the chocolate flavor without making the dessert taste strongly like coffee.
Nutty Chocolate Cake
Sprinkle finely chopped toasted hazelnuts or almonds over the mousse before adding the final layer.
How to Store
Keep the cake covered and refrigerated. It is best enjoyed within 3–4 days.
Because the mousse contains dairy, don’t leave the finished cake at room temperature for extended periods.
The cake can also be prepared a day ahead, making it an excellent dessert for birthdays, dinner parties, holidays, and other special occasions.
Frequently Asked Questions
Can I make this cake without gelatin?
Yes. Depending on the mousse recipe and chocolate used, the mousse can sometimes set without gelatin. However, gelatin provides additional stability and helps the layers hold their shape, particularly when the cake will be transported or displayed for several hours.
Why is my mousse too runny?
The chocolate mixture may have been too warm when the whipped cream was folded in, or the cake may not have chilled long enough. Make sure the chocolate mixture has cooled and give the finished cake several hours to set.
Can I make it ahead of time?
Absolutely. This cake is actually easier to work with when made the day before. Overnight chilling allows the mousse to become firm and the flavors to develop.
Final Thoughts
This Multi-Layer Chocolate Mousse Cake is an elegant dessert that looks like it came from a professional pastry shop but can be prepared in your own kitchen. The combination of moist chocolate cake, airy mousse, and glossy ganache creates a decadent dessert that’s perfect for chocolate lovers.
For the best results, don’t rush the chilling stages. Once properly set, each slice will have beautiful, defined layers and a smooth, creamy texture that makes this cake truly special.