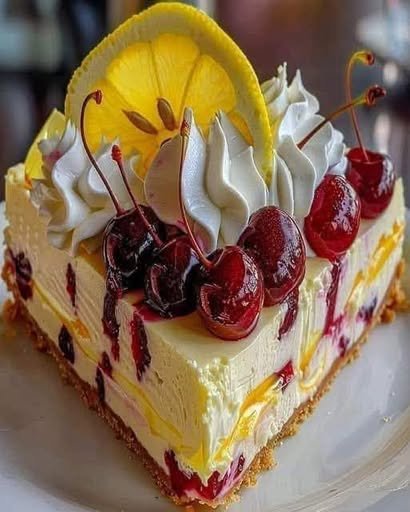
There’s something irresistibly elegant about a cheesecake topped with glossy cherries and brightened with fresh lemon. This Luxurious Cherry Lemon Cheesecake brings together a buttery biscuit crust, a silky lemon-infused cream cheese filling, and a sweet-tart cherry topping for a dessert that looks impressive but is surprisingly manageable to make at home.
The lemon keeps the cheesecake from tasting overly heavy, while the cherries add beautiful color and a burst of fruity sweetness. It’s perfect for birthdays, dinner parties, holidays, afternoon tea, or simply whenever you want a dessert that feels extra special.
The best part? You can prepare it a day ahead, making it an excellent make-ahead dessert for entertaining.
Why You’ll Love This Cheesecake
- Creamy and silky texture
- Fresh lemon flavor without being overwhelmingly sour
- Sweet-tart cherry topping
- Buttery, crunchy crust
- Elegant enough for celebrations
- Can be prepared ahead of time
- Even better after several hours of chilling
Ingredients
For the Crust
- 2 cups finely crushed digestive biscuits or graham crackers
- 5 tablespoons unsalted butter, melted
- 2 tablespoons granulated sugar
- Pinch of salt
For the Lemon Cheesecake Filling
- 24 ounces (680 g) full-fat cream cheese, softened
- 1 cup granulated sugar
- 3 large eggs, room temperature
- 1 cup sour cream
- 2 tablespoons fresh lemon juice
- 1 tablespoon finely grated lemon zest
- 1 teaspoon vanilla extract
- 2 tablespoons all-purpose flour
For the Cherry Topping
- 2 cups pitted fresh or frozen cherries
- 1/3 cup granulated sugar
- 2 tablespoons fresh lemon juice
- 1 tablespoon cornstarch
- 2 tablespoons water
- 1 teaspoon lemon zest
- 1/2 teaspoon vanilla extract
Optional Garnish
- Fresh cherries
- Thin lemon slices
- Small lemon zest curls
- Whipped cream
Equipment
- 9-inch springform pan
- Mixing bowls
- Electric mixer
- Measuring cups and spoons
- Rubber spatula
- Saucepan
- Baking sheet
Step 1: Prepare the Crust
Preheat your oven to 325°F (165°C).
Lightly grease a 9-inch springform pan and, if desired, line the bottom with parchment paper.
Place the crushed biscuits in a bowl. Add the melted butter, sugar, and a small pinch of salt.
Mix until the crumbs are evenly moistened and resemble wet sand.
Press the mixture firmly into the bottom of the pan. Use the bottom of a glass or measuring cup to create an even, compact layer.
Bake the crust for approximately 8–10 minutes.
Remove it from the oven and allow it to cool while preparing the filling.
Step 2: Make the Lemon Cheesecake Filling
Make sure the cream cheese is properly softened before beginning. This helps produce a smooth filling without lumps.
Place the cream cheese in a large mixing bowl and beat on medium-low speed until smooth.
Add the sugar gradually and mix until incorporated.
Add the eggs one at a time, mixing just until each egg disappears into the batter.
Avoid overmixing at this stage. Excessive beating can incorporate too much air, which may cause the cheesecake to puff and crack while baking.
Add the sour cream, lemon juice, lemon zest, vanilla extract, and flour.
Mix gently until everything is combined and the filling is smooth.
Scrape down the sides of the bowl with a spatula if necessary.
Step 3: Bake the Cheesecake
Pour the lemon cheesecake filling over the cooled crust.
Gently tap the pan against the counter once or twice to release large air bubbles.
Place the springform pan on a baking sheet and bake for approximately 50–65 minutes.
The cheesecake should look set around the edges while the center still has a gentle wobble.
Don’t wait until the entire center becomes completely firm in the oven. Cheesecake continues to set as it cools.
Turn off the oven and leave the cheesecake inside with the door slightly open for about 30 minutes.
This gradual cooling can help reduce the chance of sudden temperature changes causing cracks.
Remove the cheesecake and allow it to cool completely at room temperature.
Then refrigerate it for at least 6 hours, preferably overnight.
Step 4: Prepare the Cherry Topping
While the cheesecake chills, prepare the topping.
Place the cherries, sugar, lemon juice, and lemon zest in a saucepan over medium heat.
Cook for several minutes until the cherries begin releasing their juices.
In a small bowl, whisk together the cornstarch and water until smooth.
Pour the cornstarch mixture into the cherries while stirring.
Continue cooking for approximately 2–4 minutes, or until the mixture thickens into a glossy cherry sauce.
Remove from the heat and stir in the vanilla extract.
Allow the topping to cool completely.
Step 5: Assemble the Cheesecake
Once the cheesecake is thoroughly chilled, carefully remove the springform ring.
Spoon the cooled cherry topping over the cheesecake.
You can spread it across the entire surface or leave a small border of cheesecake visible around the edges for a more elegant presentation.
For an extra-special finish, decorate with fresh cherries, small lemon zest curls, or a few small swirls of whipped cream.
How to Get the Perfect Cheesecake Texture
Use Full-Fat Cream Cheese
Full-fat cream cheese gives cheesecake its characteristic richness and creamy texture.
Reduced-fat varieties can produce a softer or less luxurious result.
Bring Ingredients to Room Temperature
Cold cream cheese can remain lumpy even after mixing.
Allow the cream cheese and eggs to sit at room temperature before beginning.
Don’t Overmix
Once the eggs are added, mix only until incorporated.
Too much air in the batter can contribute to cracking.
Don’t Overbake
A perfectly baked cheesecake should still have a slight wobble in the center.
If you bake it until the center is completely firm, the finished cheesecake may become dry or develop cracks.
Chill Thoroughly
Don’t rush the chilling process.
Several hours in the refrigerator allow the filling to fully set and the flavors to develop.
Overnight chilling is ideal.
Fresh or Frozen Cherries?
Both work beautifully.
Fresh cherries:
They provide excellent flavor during cherry season. Remove the pits before cooking.
Frozen cherries:
They’re convenient and available year-round. You don’t necessarily need to thaw them completely before making the topping, although cooking time may be slightly longer.
If using frozen cherries, choose plain frozen cherries rather than sweetened pie filling.
Can You Use Cherry Pie Filling?
Yes, if you need a shortcut.
However, homemade cherry topping gives you much more control over sweetness and lemon flavor.
It also gives the cheesecake a fresher, more homemade taste.
Make It Extra Lemon-Forward
If you love lemon desserts, increase the lemon zest slightly rather than dramatically increasing the lemon juice.
The zest provides concentrated lemon aroma without adding too much liquid or acidity to the cheesecake filling.
You can also add a little extra lemon zest to the cherry topping.
Storage
Keep the cheesecake covered and refrigerated.
It will generally keep well for about 4–5 days when properly refrigerated.
For the best texture and flavor, keep the cherry topping covered as well.
Can You Freeze Cherry Lemon Cheesecake?
Yes.
For best results, freeze the cheesecake without the cherry topping.
Wrap the completely chilled cheesecake tightly in plastic wrap and then place it in a freezer-safe container or additional layer of foil.
Freeze for up to about 1–2 months for best quality.
Thaw overnight in the refrigerator and add the cherry topping before serving.
Serving Suggestions
For an elegant dessert presentation, serve each slice with:
- A few fresh cherries
- A small spoonful of extra cherry sauce
- Whipped cream
- Fresh lemon zest
- A cup of coffee
- Black or herbal tea
Allow the cheesecake to sit at room temperature for about 10–15 minutes before serving. This can make the texture especially creamy.
Frequently Asked Questions
Why did my cheesecake crack?
Cracks can happen because of overmixing, overbaking, rapid temperature changes, or simply the cheesecake cooling unevenly.
Fortunately, the cherry topping makes an excellent cover for small cracks.
Why is my cheesecake too soft?
It may not have chilled long enough, or it may have been slightly underbaked.
Give it additional refrigerator time before deciding that the texture is wrong.
Can I make this cheesecake the day before?
Absolutely.
In fact, making it the day before is one of the best ways to prepare it.
The cheesecake needs several hours to chill and set properly.
Can I use bottled lemon juice?
Fresh lemon juice is strongly recommended because it provides a brighter flavor.
Freshly grated lemon zest is particularly important for achieving that natural lemon aroma.
Can I make this without a springform pan?
A springform pan makes removing the cheesecake much easier.
If necessary, you can use a deep pie dish, but serving neat slices may be more difficult.
Final Thoughts
This Luxurious Cherry Lemon Cheesecake combines everything you want in an impressive dessert: a crisp buttery crust, rich cream cheese filling, fresh lemon brightness, and a glossy cherry topping.
The contrast between sweet cherries and tangy lemon makes every bite balanced rather than overly rich.
For the best result, don’t rush the cooling and chilling stages. A cheesecake that is allowed to cool gradually and chill thoroughly will have a smoother texture and cleaner slices.
Make it the day before your next gathering, add the cherry topping just before serving, and you’ll have a beautiful dessert that looks as though it came straight from a professional bakery.
SEO Title
Luxurious Cherry Lemon Cheesecake Recipe – Creamy & Delicious
Meta Description
Make this luxurious Cherry Lemon Cheesecake with a buttery crust, creamy lemon cheesecake filling, and glossy homemade cherry topping. Perfect for special occasions.